One of the major advancements in recent technology is the rise of cloud computing, and to be perfectly honest with you, I really don’t understand how the whole cloud thing works.
So, I’m going to start a series of blog posts where I will deploy some cloud services, and learn how they work.
Today we will learn how to deploy a Ceph cluster on Ubuntu 19.04 Disco Dingo, so get ready, fire up some VMs with me and follow along.
We will cover what Ceph is, how to deploy it, and what it’s primary use cases are.
Let’s get started.
What is Ceph?
Ceph is a cloud computing technology which implements storage as a service.
The idea is that you can have a lot of inexpensive machines in a data centre or a distributed data centre, and each machine can have many inexpensive consumer disks attached.
Ceph takes care of the hassle of distributing objects across a data centre, by deciding what objects get stored where, how replication is handled for redundancy across a data centre, and striping disks for performance optimisation.
All the users need to do is interact with a manager node to communicate their storage requirements, and Ceph takes care of the rest.
That sounds pretty useful actually. Sure beats having to manage data manually and messing around with expensive RAID devices.
What are Ceph’s main usages?
Ceph has three primary services it offers:
- Object storage: Ceph can be used to store objects through a Amazon S3 like API, letting you store and retrieve objects over HTTP. Useful for managing lots of single files.
- Block storage: Ceph can be used to offer block storage devices, which act exactly like you would expect physical disks to. Useful for virtual machines.
- Filesystem: Ceph lets you attach entire filesystems to a running system, and supports FUSE so you don’t have to load any kernel modules.
In this writeup, we will look at the object storage and block storage features.
Ceph’s Architecture
Ceph has a slightly complicated architecture, which is best explained in detail on the Ceph website, but the basic components of any Ceph setup are:
- Manager Nodes: A Ceph manager node (
ceph-mgr) collects and stores information about the state of the cluster and metrics. These are things like performance metrics, storage utilisation and system load. - Monitor Nodes: A Ceph monitor node (
ceph-mon) keeps maps of the cluster state, such as monitor mappings, manager maps and the OSD map. - Ceph OSDs: A Ceph OSD (
ceph-osd) is what stores data to disk, takes care of balancing, data replication and recovery, and performance optimisation by striping data on the disk. Most clusters have at least 3 copies of data around, and need at least 3 OSDs. - Metadata Nodes: A Ceph metadata node (
ceph-mds) collects and stores metadata about Ceph filesystems in use. They aren’t used for block or object storage nodes. They are needed to reduce OSD load when programs likelsare called.
Architecture of the Cluster We Will Build
Before we start we will plan what our deployment will look like. I have produced a diagram:

We will have five hosts, ceph-admin, ceph-osd1, ceph-osd2, ceph-osd3, and ceph-client. ceph-osd1 will be a manager node, monitor node as well as running three osds for storage. ceph-osd2 will run the object storage gateway as well as three osds for storage. ceph-osd3 will just be a storage node with three osds.
ceph-client is from where we will be accessing Ceph services from.
ceph-admin is the machine which will be orchestrating the deployment.
Deploying the Cluster
Right, lets put these plans into motion and deploy a basic cluster. I’m going to be following along the official installation guides:
Install Ubuntu Server
Create four virtual machines with the following specs:
- ceph-admin: 4gb ram, 1 vcpu, 20gb disk.
- ceph-osd1: 4gb ram, 1vcpu, 20gb disk, 10gb disk, 10gb disk, 10gb disk.
- ceph-osd2: 4gb ram, 1vcpu, 20gb disk, 10gb disk, 10gb disk, 10gb disk.
- ceph-osd3: 4gb ram, 1vcpu, 20gb disk, 10gb disk, 10gb disk, 10gb disk.
Go ahead and install Ubuntu 19.04 Disco Dingo Server on them:
What a slick new installer! I like it.
Make sure to say yes to installing openssh-server when asked. We will be needing it.
Configure Ubuntu Server
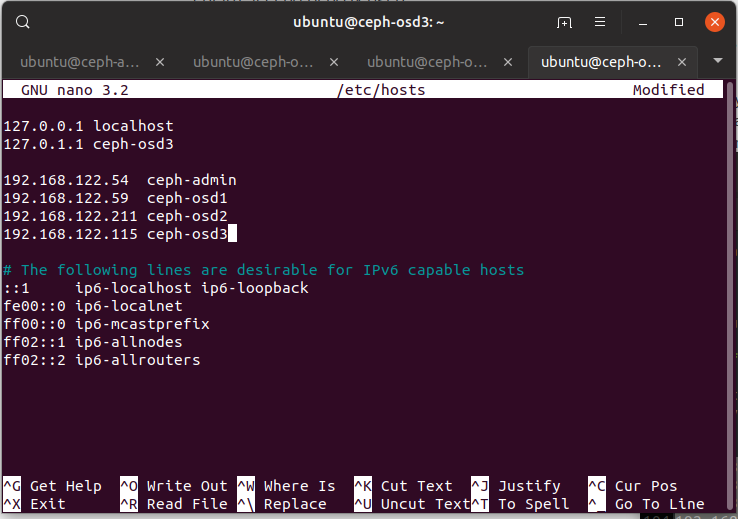
First things first, log into all of your servers and get their IP addresses. While you are at it, make sure their hostnames are set as well.
192.168.122.54  ceph-admin
192.168.122.59  ceph-osd1
192.168.122.211 ceph-osd2
192.168.122.115 ceph-osd3
Once you have collected the above, edit /etc/hosts in all machines with the
above information, so we can refer to each machine via its hostname and not IP
address.
Install ceph-deploy on Admin Node
The admin node is used as a separate node which installs and deploys ceph to the
cluster, so go ahead and install ceph-deploy from the Ubuntu repositories:
$ sudo apt install ceph-deploy
Set up Ceph Nodes
We need to set up a number of things. First, install NTP to make sure each VM has the right time for data consistency.
$ sudo apt install ntp
Now, when we run ceph-deploy from the admin node, it needs to be able to log
into each Ceph node to be able to install software and set configuration. To
do this, it needs passwordless sudo access.
So on each ceph-node, we will make a new user called “ceph-deploy” and make sure it can sudo.
$ sudo useradd -d /home/ceph-deploy -m ceph-deploy
$ sudo passwd ceph-deploy
Then make sure we can use passwordless sudo on each Ceph node:
$ echo "ceph-deploy ALL = (root) NOPASSWD:ALL" | sudo tee /etc/sudoers.d/ceph-deploy
$ sudo chmod 0440 /etc/sudoers.d/ceph-deploy
Set up SSH
When we run ceph-deploy from the admin node, it will connect to each node via
ssh, with no password, so we need to set up ssh keys.
On ceph-admin:
$ ssh-keygen

Generating public/private rsa key pair.
Enter file in which to save the key (/home/ubuntu/.ssh/id_rsa):
Created directory '/home/ubuntu/.ssh'.
Enter passphrase (empty for no passphrase):
Enter same passphrase again:
Your identification has been saved in /home/ubuntu/.ssh/id_rsa.
Your public key has been saved in /home/ubuntu/.ssh/id_rsa.pub.
The key fingerprint is:
SHA256:lvP/i2KybeZ3jaPgGpNTG7X6nIM9y8BTkdxvyvjLCpo ubuntu@ceph-admin
The key's randomart image is:
+---[RSA 2048]----+
|                 |
|           . o   |
|            = .  |
|         . . o . |
|        S o o   o|
|       . * = o o |
|        = Xo. oo |
|        .O*X==+ .|
|        EO+o@O*+ |
+----[SHA256]-----+
We can then install the key on each host with:
$ ssh-copy-id ceph-deploy@ceph-osd1
$ ssh-copy-id ceph-deploy@ceph-osd2
$ ssh-copy-id ceph-deploy@ceph-osd3
To make things even easier, we can modify ~/.ssh/config of ceph-admin so
ceph-deploy can log in without specifying user names:
Add the following to ~/.ssh/config:
Host ceph-osd1
   Hostname ceph-osd1
   User ceph-deploy
Host ceph-osd2
   Hostname ceph-osd2
   User ceph-deploy
Host ceph-osd3
   Hostname ceph-osd3
   User ceph-deploy
Installing the Cluster
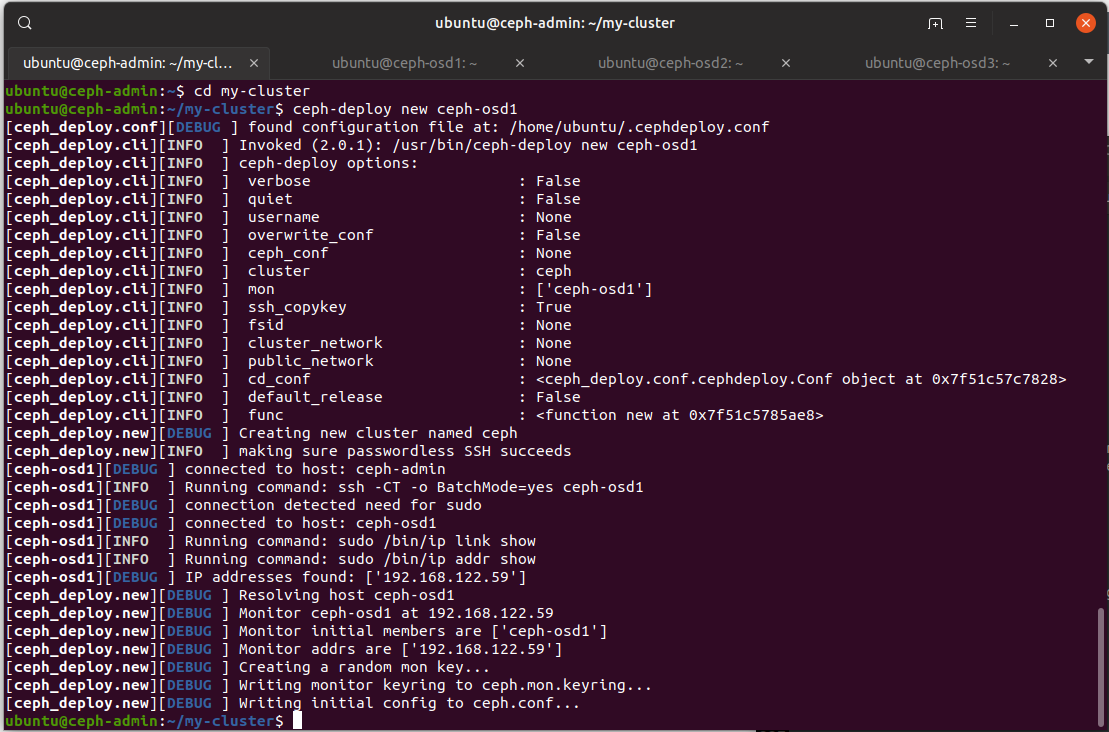
Right, time to actually get Ceph running. Make a folder on the admin node
which will store all the config files that ceph-deploy will make during installation.
mkdir my-cluster
cd my-cluster
We first create a cluster by running ceph-deploy new pointing at a node which
we want to be a monitor node.
$ ceph-deploy new ceph-osd1
There are some interesting files in the current directory, especially ceph.conf:
[global]
fsid = f5f1c178-5c28-4718-8d73-efec639cdb8f
mon_initial_members = ceph-osd1
mon_host = 192.168.122.59
auth_cluster_required = cephx
auth_service_required = cephx
auth_client_required = cephx
Note that fsid is the unique identifier for the cluster, since there may be
multiple cluster in data centres.
Back to deployment. We can install Ceph on all nodes by running:
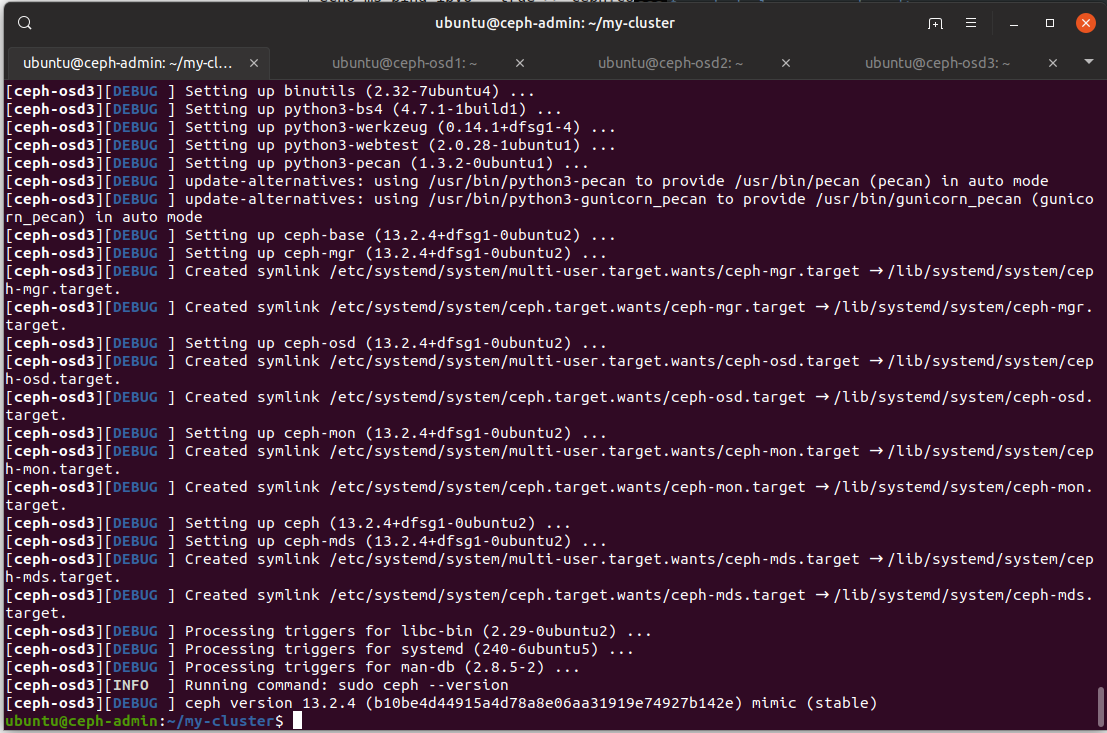
$ ceph-deploy install ceph-osd1 ceph-osd2 ceph-osd3
The admin node will then go ssh into each of the Ceph nodes to install Ceph packages from the Ubuntu package archive, and get everything set up.
Now we can go ahead and deploy our monitor we configured before:
$ ceph-deploy mon create-initial
This uses the config from ~/my-cluster/ceph.conf and deploys a new monitor on
ceph-osd1.
Once that has been done, we can see a bunch of keyrings generated for each Ceph role:
ubuntu@ceph-admin:~/my-cluster$ ll
total 164
drwxrwxr-x 2 ubuntu ubuntu   4096 May 11 03:05 ./
drwxr-xr-x 7 ubuntu ubuntu   4096 May 11 02:47 ../
-rw------- 1 ubuntu ubuntu    113 May 11 03:05 ceph.bootstrap-mds.keyring
-rw------- 1 ubuntu ubuntu    113 May 11 03:05 ceph.bootstrap-mgr.keyring
-rw------- 1 ubuntu ubuntu    113 May 11 03:05 ceph.bootstrap-osd.keyring
-rw------- 1 ubuntu ubuntu    113 May 11 03:05 ceph.bootstrap-rgw.keyring
-rw------- 1 ubuntu ubuntu    151 May 11 03:05 ceph.client.admin.keyring
-rw-rw-r-- 1 ubuntu ubuntu    201 May 11 02:47 ceph.conf
-rw-rw-r-- 1 ubuntu ubuntu 127905 May 11 03:05 ceph-deploy-ceph.log
-rw------- 1 ubuntu ubuntu     73 May 11 02:47 ceph.mon.keyring
Looking at a keyring, we see base64 encoded bytes.
[client.bootstrap-mgr]
	key = AQAAPNZcrCfwJRAANgGQHveZBCPYuc/rMmvORw==
	caps mon = "allow profile bootstrap-mgr"
Since this Ceph deployment is for us to play with and learn how it all works, we will deploy the configuration file and admin key to each node to we don’t have to type in the IP address of the manager or the admin keyfile each time we run a command.
$ ceph-deploy admin ceph-osd1 ceph-osd2 ceph-osd3

Next, we will set up a manager daemon to run on the same node we set up to be a manager node:
$ ceph-deploy mgr create ceph-osd1
Once that is all set, we now have ceph installed on all three nodes, and we have ceph-osd1 set up to also act as a monitor and a manager.
Next we just need to add some storage, and start some OSDs.
Now, on each of ceph-osd1, ceph-osd2 and ceph-osd3, we can run lsblk to find
what the names of the 10gb disks we attached are:
ubuntu@ceph-osd1:~$ lsblk
NAME   MAJ:MIN RM  SIZE RO TYPE MOUNTPOINT
loop0    7:0    0 89.3M  1 loop /snap/core/6673
loop1    7:1    0 53.9M  1 loop /snap/lxd/10601
sr0     11:0    1 1024M  0 rom
vda    252:0    0   20G  0 disk
├─vda1 252:1    0    1M  0 part
└─vda2 252:2    0   20G  0 part /
vdb    252:16   0   10G  0 disk
vdc    252:32   0   10G  0 disk
vdd    252:48   0   10G  0 disk
Luckily for me, they are all named vdb, vdc and vdd on each node.
Probably because they are connected via the virtio bus.
From here, we can add storage devices and start object storage daemons from the admin node.
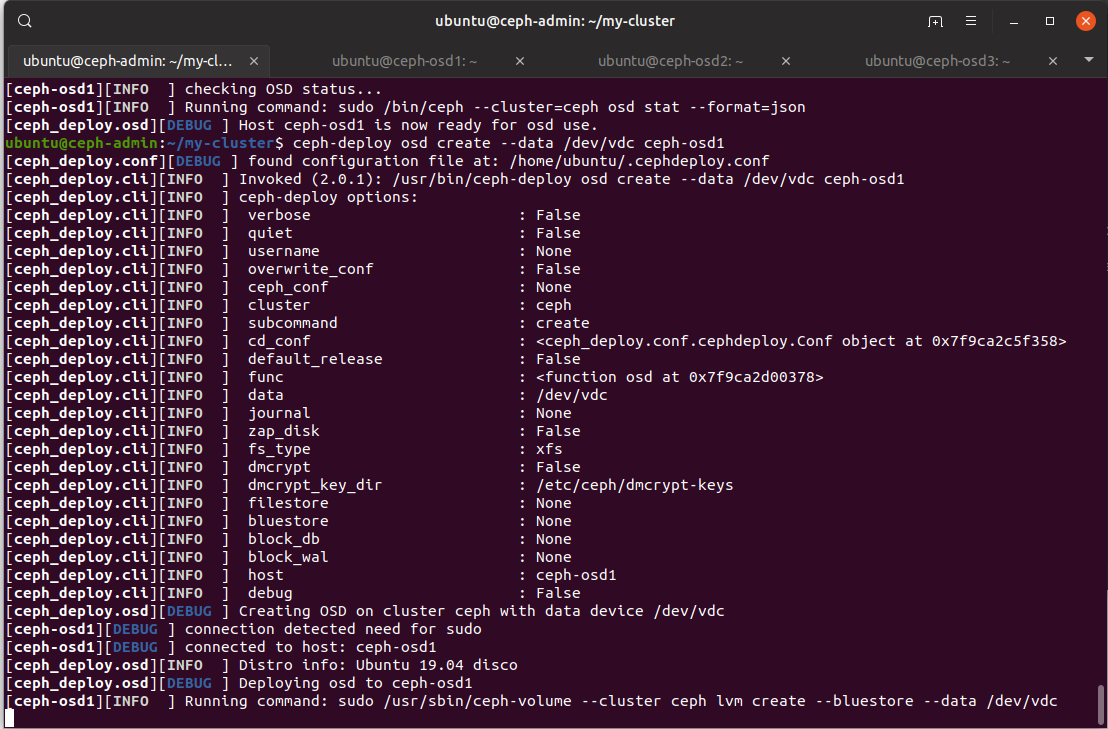
$ ceph-deploy osd create --data /dev/vdb ceph-osd1
$ ceph-deploy osd create --data /dev/vdc ceph-osd1
$ ceph-deploy osd create --data /dev/vdd ceph-osd1

$ ceph-deploy osd create --data /dev/vdb ceph-osd2
$ ceph-deploy osd create --data /dev/vdc ceph-osd2
$ ceph-deploy osd create --data /dev/vdd ceph-osd2

$ ceph-deploy osd create --data /dev/vdb ceph-osd3
$ ceph-deploy osd create --data /dev/vdc ceph-osd3
$ ceph-deploy osd create --data /dev/vdd ceph-osd3
There’s a lot of interesting output we can see in the default config options we have used.
Firstly, is that dmcrypt, or LUKS, doesn’t seem to be enabled by default.
Second, the filesystem used is xfs. Interesting choice. I wonder why they chose xfs?
According to the OSD Backends page, all new Ceph OSDs are created with the BlueStore backend. It seems to be pretty optimised for xfs to be running ontop of it.
While the older FileStore used to support xfs and btrfs. Hmm. btrfs is another interesting choice. I know that it has some truly incredible features, like efficient copy on write snapshots, but reading the kernel changelog, btrfs is under constant development every single kernel release, and never seems stable.
Anyway, back to our deployment:
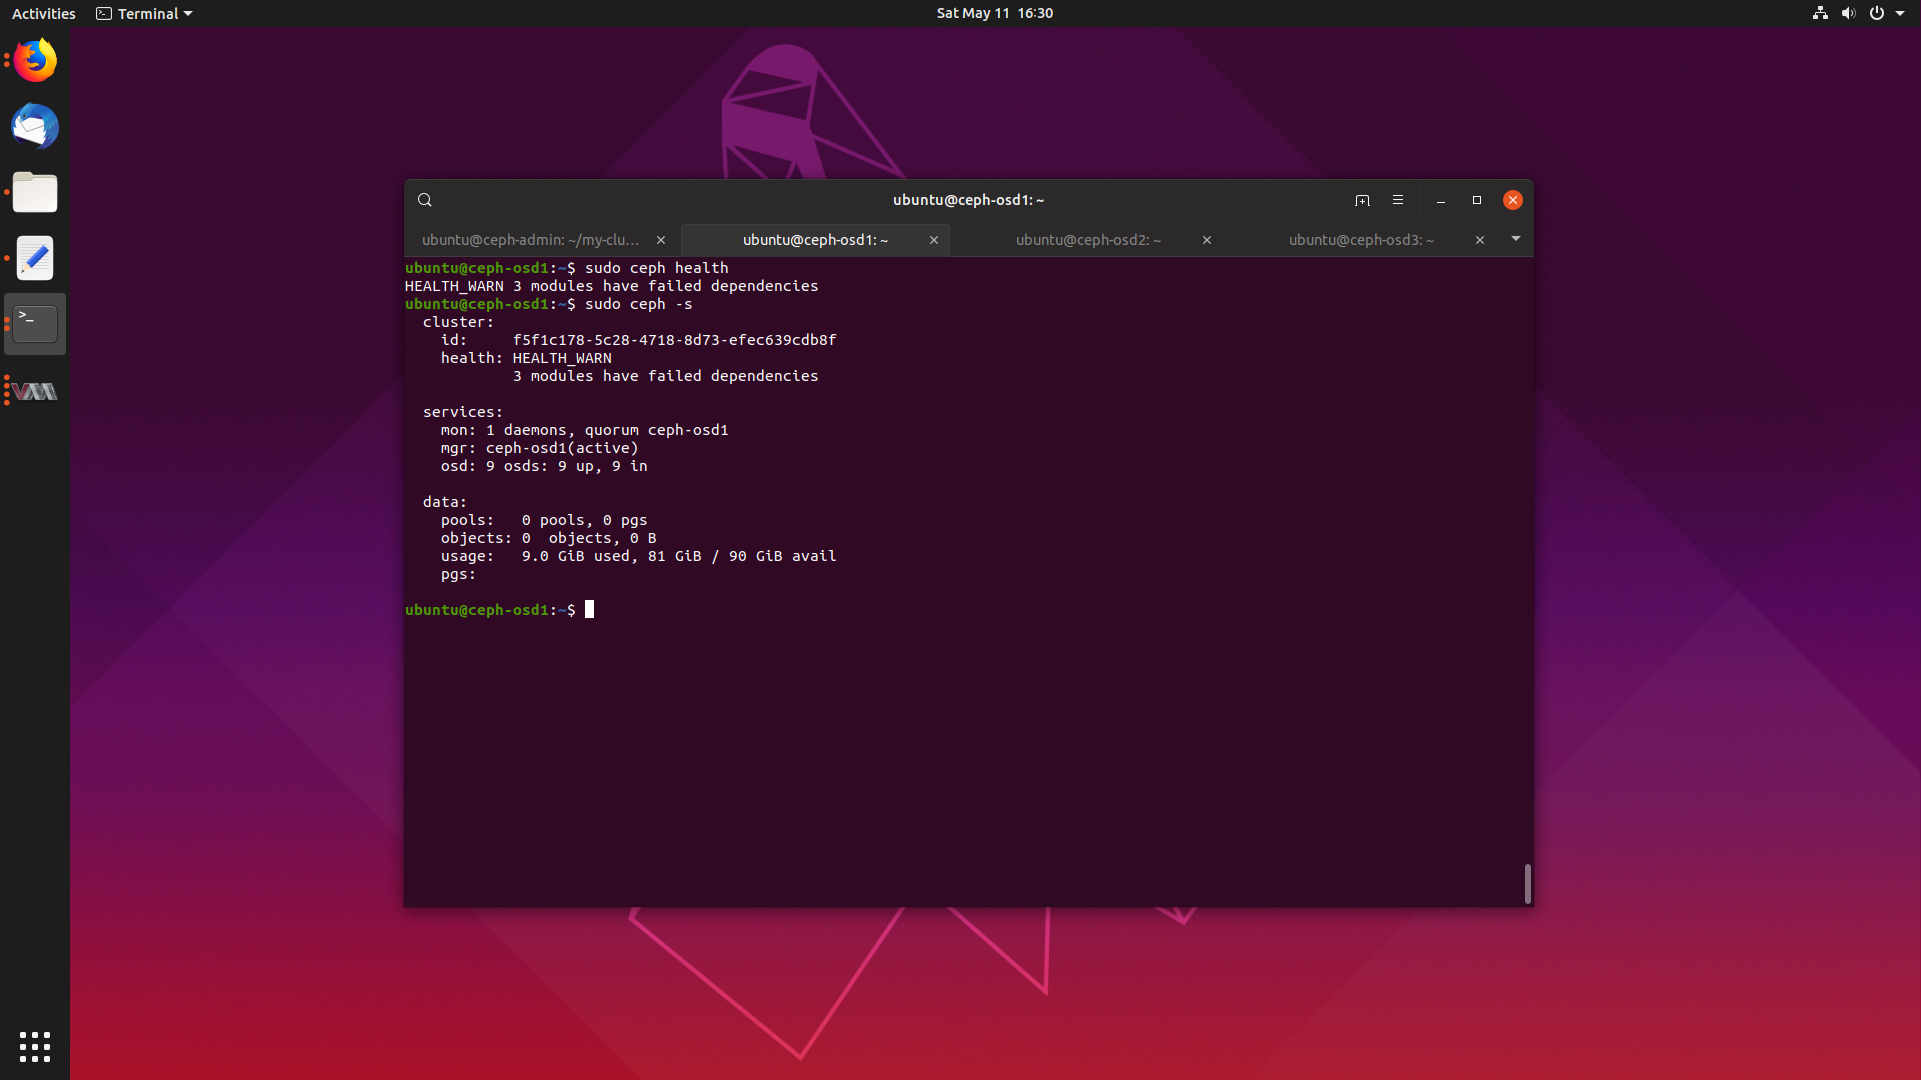
We should be all set now. We can go ahead and check our cluster’s health, and it should say HEALTH_OK.
$ sudo ceph health
HEALTH_WARN 3 modules have failed dependencies
WHAT! This can’t be!
$ sudo ceph -s
  cluster:
    id:     f5f1c178-5c28-4718-8d73-efec639cdb8f
    health: HEALTH_WARN
            3 modules have failed dependencies

  services:
    mon: 1 daemons, quorum ceph-osd1
    mgr: ceph-osd1(active)
    osd: 9 osds: 9 up, 9 in

  data:
    pools:   0 pools, 0 pgs
    objects: 0  objects, 0 B
    usage:   9.0 GiB used, 81 GiB / 90 GiB avail
    pgs:
We have our brand new bright and shiny Ceph deployment, and it seems some of our modules are broken. Let’s find out what ones:
sudo ceph mgr module ls
{
    "enabled_modules": [
        "balancer",
        "iostat",
        "restful",
        "status"
    ],
    "disabled_modules": [
        {
            "name": "dashboard",
            "can_run": false,
            "error_string": "Interpreter change detected - this module can only be loaded into one interpreter per process."
        },
        {
            "name": "hello",
            "can_run": false,
            "error_string": "Interpreter change detected - this module can only be loaded into one interpreter per process."
        },
        {
            "name": "influx",
            "can_run": false,
            "error_string": "Interpreter change detected - this module can only be loaded into one interpreter per process."
        },
        {
            "name": "localpool",
            "can_run": false,
            "error_string": "Interpreter change detected - this module can only be loaded into one interpreter per process."
        },
        {
            "name": "prometheus",
            "can_run": false,
            "error_string": "Interpreter change detected - this module can only be loaded into one interpreter per process."
        },
        {
            "name": "selftest",
            "can_run": false,
            "error_string": "Interpreter change detected - this module can only be loaded into one interpreter per process."
        },
        {
            "name": "smart",
            "can_run": false,
            "error_string": "Interpreter change detected - this module can only be loaded into one interpreter per process."
        },
        {
            "name": "telegraf",
            "can_run": false,
            "error_string": "Interpreter change detected - this module can only be loaded into one interpreter per process."
        },
        {
            "name": "telemetry",
            "can_run": false,
            "error_string": "Interpreter change detected - this module can only be loaded into one interpreter per process."
        },
        {
            "name": "zabbix",
            "can_run": false,
            "error_string": "Interpreter change detected - this module can only be loaded into one interpreter per process."
        }
    ]
}
Well this is a bummer. Looking this error up, we find #25585 with the bug and #27971 with the backport to Mimic, the version in disco’s archives.
It seems that cython changed to forbid sub interpreters, which most modules are based on. Looks like we are going to wait for upstream to come up with a fix for this one.
But can we still use and enjoy our Ceph cluster, even when its down on modules?
Only one way to try.
Using Ceph
So since we cannot enable the dashboard, we will stick to the core functionality. We will set up block storage, and mount a disk, and also set up object storage and test saving and retrieving objects.
Creating a Block Device
Let’s try taking block device creation and mounting for a spin. I’m going to be following along the documentation on adding a block device.
Since we want to use this block device on a client machine, we will be using the Desktop release of Ubuntu 19.04, known as ceph-client. It has a IP address of 192.168.122.100.
The test is to see if I can mount a Ceph block device in the desktop and copy files to it.
So, we need to set up the client just like we did with the Ceph nodes, by adding
/etc/hosts file entries, adding a ceph-deploy user, and set up passwordless
sudo and ssh.
I won’t explain it again, but go ahead and do it for ceph-client.
We need to run ceph-deploy install on ceph-client to install the necessary
Ceph packages:
$ ceph-deploy install ceph-client
And, like before, we will copy over our admin keys and monitor information:
$ ceph-deploy admin ceph-client
Now, on ceph-admin, we will create a block device pool. We need to determine how many placement groups we will add, so we will follow the recommended defaults even though they are probably far too much for me.
$ ceph osd pool create rbd 100
We can make sure our pool was created with lspools:
$ ceph osd lspools
1 rbd
Next, we initialise the rbd pool to be used by RDB:
$ rbd pool init rbd
Right. Block storage pool all configured. Now we can go ahead and try get ourselves some block storage on our client machine:
On ceph-client, create an image which represents the backing file:
$ sudo rbd create mystorage --size 2048 --image-feature layering
After that, we just map the image to a block device on the system:
$ sudo rbd map mystorage --name client.admin
/dev/rbd0
Checking out lsblk reveals we do indeed have a block device at /dev/rbd0:
$ lsblk
NAME   MAJ:MIN RM  SIZE RO TYPE MOUNTPOINT
loop0    7:0    0 89.3M  1 loop /snap/core/6673
loop1    7:1    0    4M  1 loop /snap/gnome-calculator/406
loop2    7:2    0  151M  1 loop /snap/gnome-3-28-1804/31
loop3    7:3    0 14.8M  1 loop /snap/gnome-characters/254
loop4    7:4    0 53.7M  1 loop /snap/core18/941
loop5    7:5    0  3.7M  1 loop /snap/gnome-system-monitor/77
loop6    7:6    0 35.3M  1 loop /snap/gtk-common-themes/1198
loop7    7:7    0 1008K  1 loop /snap/gnome-logs/61
loop8    7:8    0 89.4M  1 loop /snap/core/6818
loop9    7:9    0 14.8M  1 loop /snap/gnome-characters/258
loop10   7:10   0  3.7M  1 loop /snap/gnome-system-monitor/81
loop11   7:11   0  151M  1 loop /snap/gnome-3-28-1804/40
sr0     11:0    1 1024M  0 rom
rbd0   251:0    0    2G  0 disk
vda    252:0    0   20G  0 disk
└─vda1 252:1    0   20G  0 part /
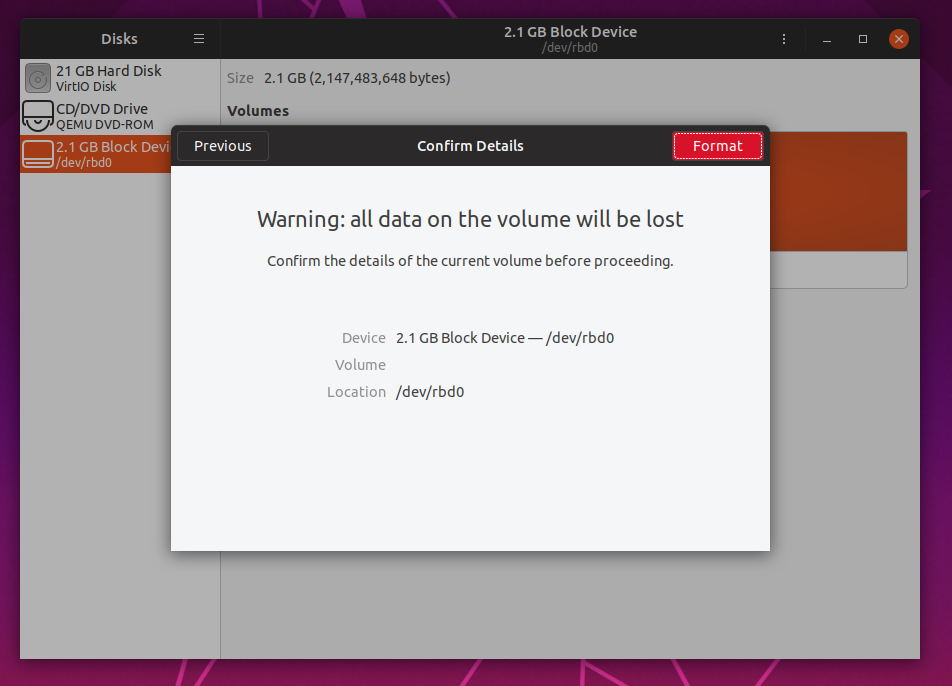
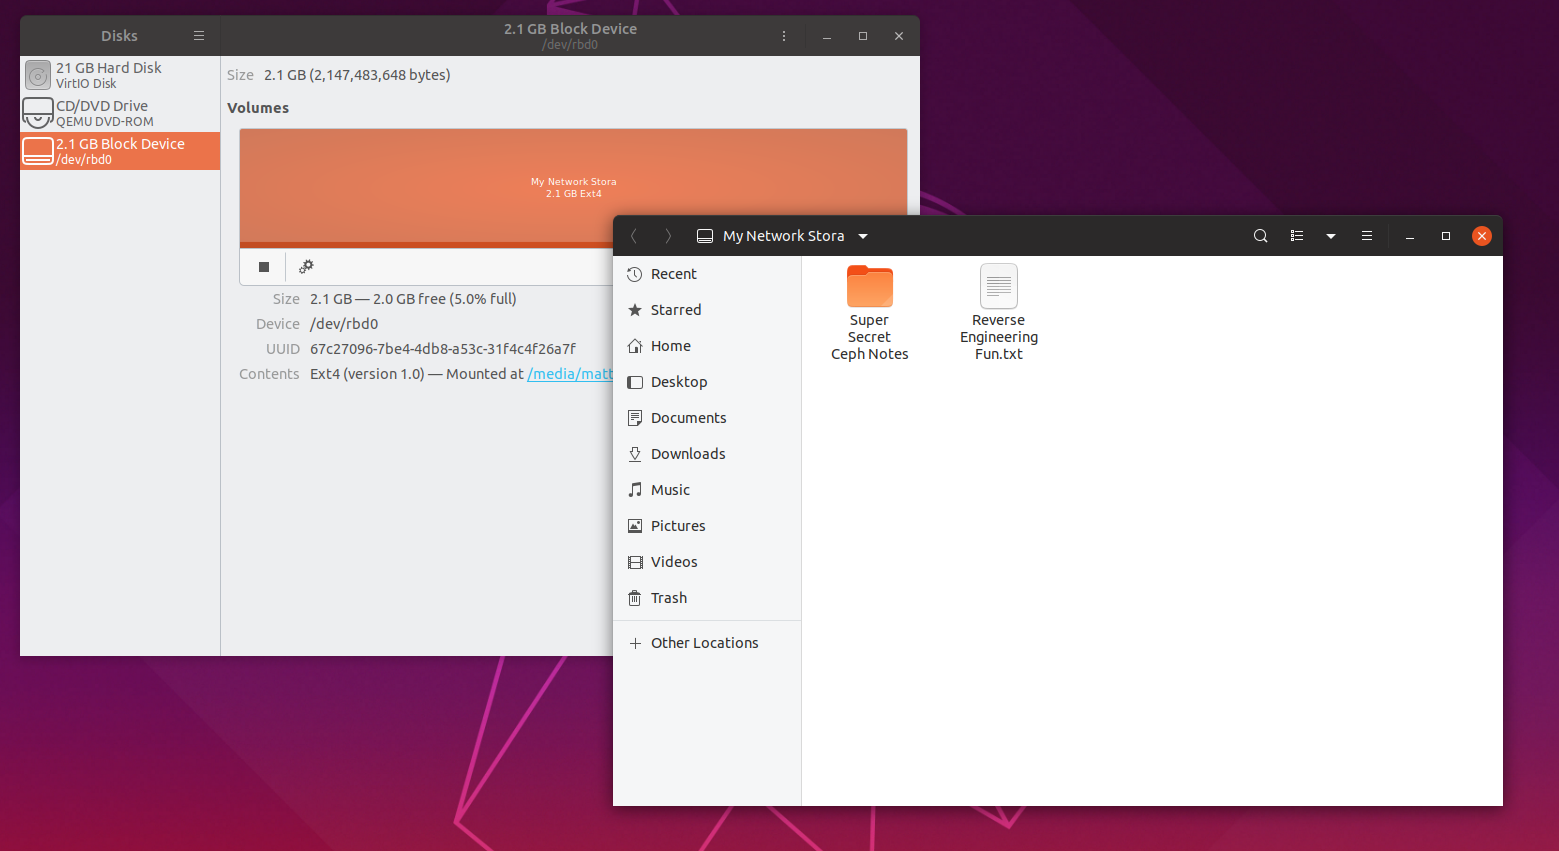
Lets go and format the disk with a fresh file system, graphical style with gnome-disks:
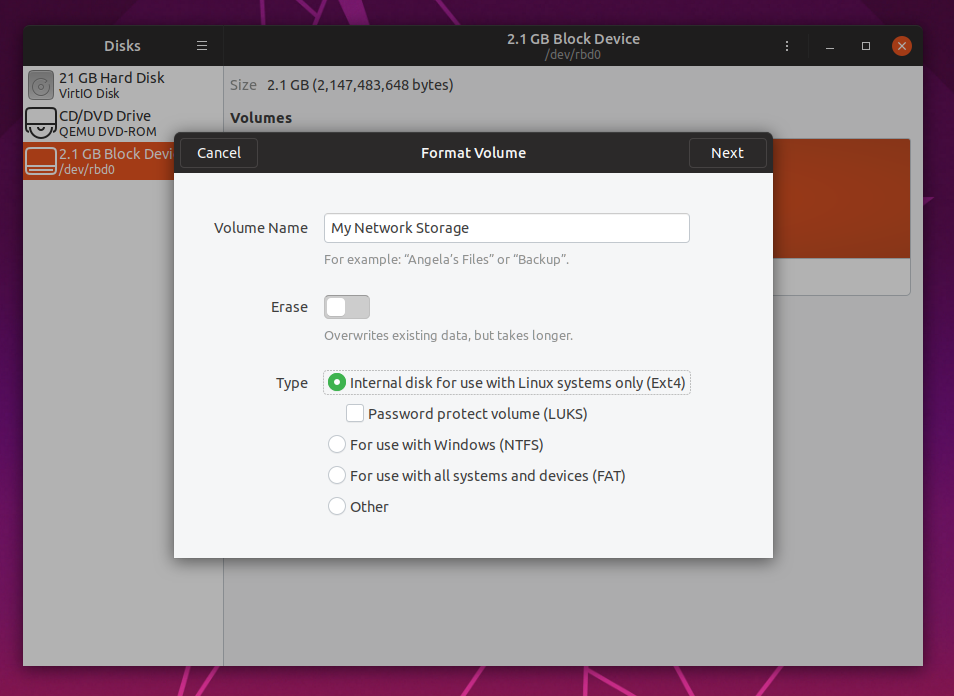
I know you can go and run mkfs.ext4 and then issue mount commands manually,
but hey, this example is for use with a desktop client, not a server, so why
not use programs like gnome-disks to make your life easier?
Woo-hoo! Just like that we have block storage. Very nice. Guess our HEALTH_ERR Ceph cluster still works after all. Go ahead and write some files to your disk, you probably deserve it if you have followed through this far.
When you are finished with your block storage, feel free to unmount the disk.
To remove map for the image:
$ sudo rbd device unmap /dev/rbd0
If you want to mount the disk again, just re-map the image again:
$ sudo rbd map mystorage --name client.admin
Easy right? Then just mount the disk like normal and your files will be right where you left them.
I gotta say, I’m pretty sold on block storage fundamentals. Let’s see how object storage mounts up.
Using Object Storage
For setting up object storage, I am going to be following along the documentation for setting up a object gateway.
First things first, we need to choose a node to be our object gateway. This will host the API endpoints which we will be making requests to. This can be a new server entirely or just one of our Ceph nodes. I’ll use ceph-osd2.
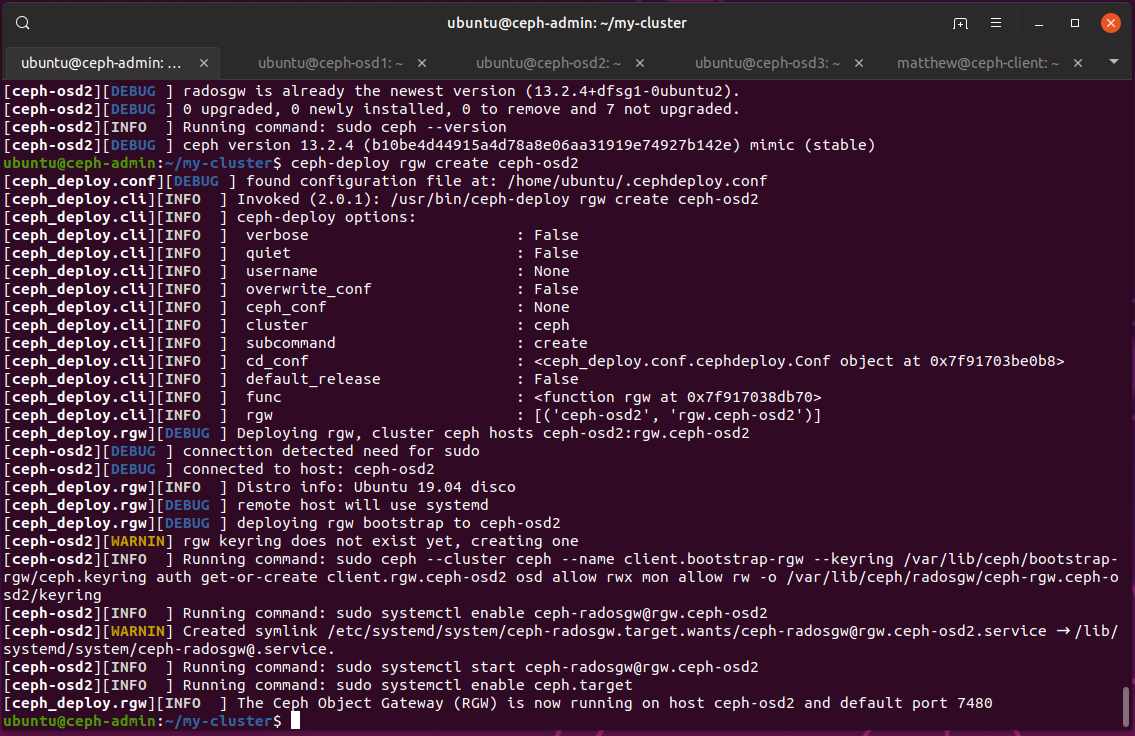
From ceph-admin, we go and deploy ceph-osd2 to be a object gateway:
$ ceph-deploy install --rgw ceph-osd2
Next we just create the instance, and things should pretty much start working:
$ ceph-deploy rgw create ceph-osd2
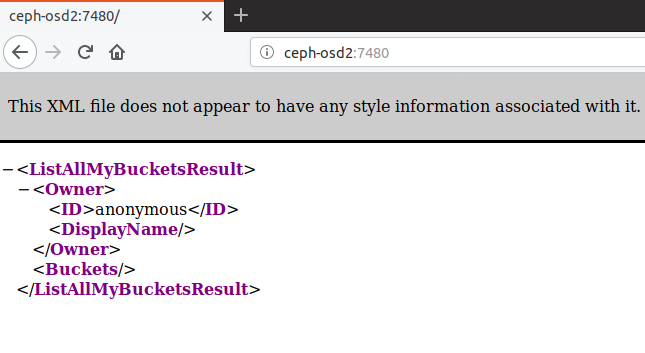
Just like that, we have a object gateway up and running on port 7480:
We can then visit the endpoint to see if it all works, we see some plain xml which lists available buckets. This is empty since we haven’t made any yet.
Creating a User and Accessing the Gateway
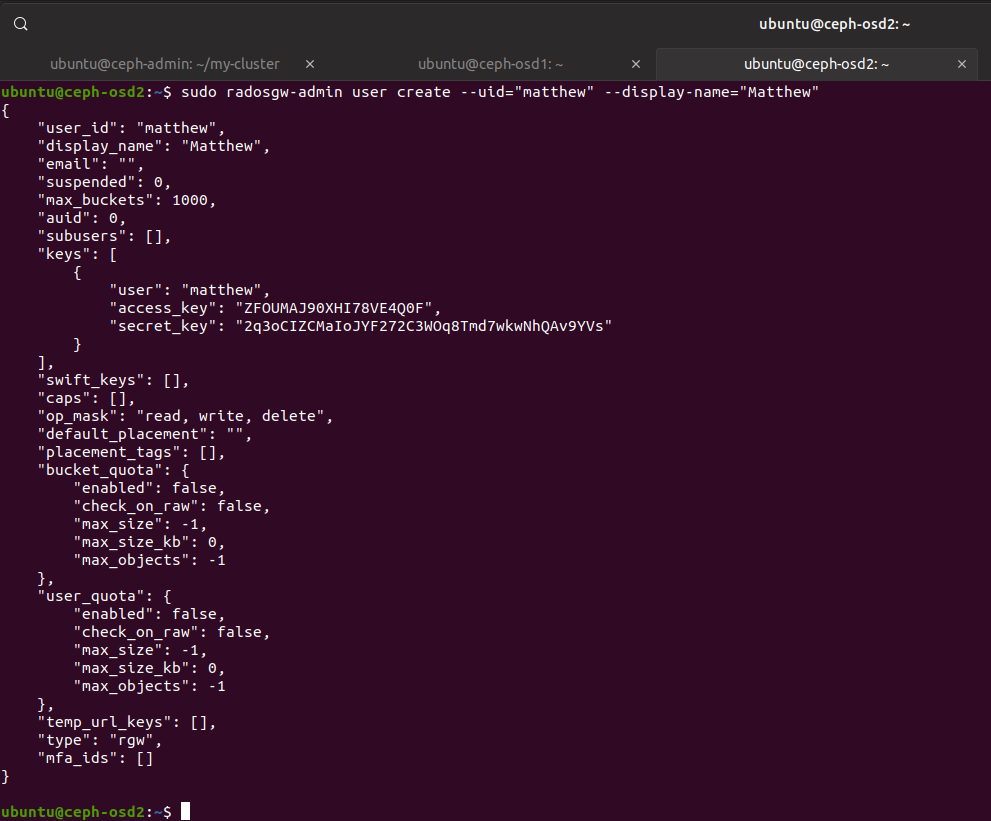
In order to create buckets and to upload files, we need to create a user. This can be done with:
$ radosgw-admin user create --uid="matthew" --display-name="Matthew"
And we get a json response, containing our access keys:
Great. All that’s left now is to work out how to supply commands to the gateway and how to supply our credentials. I did go and look up how to RESTful commands via curl, but that’s a little old school, so instead we will look at a tool called s3cmd.
s3cmd is a tool which makes using S3 compatible services easy and is a python script packed with features.
Go ahead and install it to a client machine, like ceph-client:
$ sudo apt install s3cmd
Now we just need to create a configuration file. I’m mostly following this nice guide.
On ceph-client:
$ s3cmd --configure -c s3test.cfg
Go ahead and accept all the defaults for now, we will go back and modify the configuration file.
Once the config is generated, edit it. Replace the following with:
access_key = ZFOUMAJ90XHI78VE4Q0F 	# The access key for your user
host_base = ceph-osd2:7480		# The host running the gateway, note the port
host_bucket = %(bucket)s.ceph-osd2:7480	# Again, host running the gateway, note the port
secret_key = 2q3oCIZCMaIoJYF272C3WOq8Tmd7wkwNhQAv9YVs	# The secret key for your user
Make sure to put the port in correctly. Since we haven’t moved from the default port to port 80, we need to define 7480.
Now we can save the config and test everything works:
$ s3cmd -c s3test.cfg ls
Hopefully you won’t have any errors. There are no buckets yet, so we won’t see any output.
Creating a Bucket
You can create a bucket by using the mb command:
$ s3cmd -c s3test.cfg mb s3://DISCOBUCKET
Bucket 's3://DISCOBUCKET/' created
We can check with the ls command which shows us our buckets:
$ s3cmd -c s3test.cfg ls
2019-05-17 06:50  s3://DISCOBUCKET
Placing an Object in the Bucket
We can stick a file in our bucket with:
$ echo "This Ceph thing is starting to make sense now" > findings.txt
$ s3cmd -c s3test.cfg put findings.txt s3://DISCOBUCKET
upload: 'findings.txt' -> 's3://DISCOBUCKET/findings.txt'  [1 of 1]
 46 of 46   100% in    4s    10.10 B/s  done
I could hear my disk writing data to three different OSDs when I was uploading that tiny text file.
We can make sure the file got there with:
$ s3cmd -c s3test.cfg la
2019-05-17 07:10        46   s3://DISCOBUCKET/findings.txt
Fetching an Object from the Bucket
We can retrieve our object with:
$ s3cmd -c s3test.cfg get s3://DISCOBUCKET/findings.txt download.txt
download: 's3://DISCOBUCKET/findings.txt' -> 'download.txt'  [1 of 1]
 46 of 46   100% in    0s     7.79 kB/s  done
$ cat download.txt
This Ceph thing is starting to make sense now
Works like a charm.
Deleting the Object
Finally, we can delete the object with:
$ s3cmd -c s3test.cfg del s3://DISCOBUCKET/findings.txt
delete: 's3://DISCOBUCKET/findings.txt'
Finishing Up
Well, there we have it. We have managed to deploy a tiny Ceph cluster in a bunch of virtual machines, and get the cluster to an operational state.
We then went and looked into Ceph usages, such as allocating block storage images, and using object storage. Everything went pretty well, and we managed to mount a disk backed with block storage and create buckets and upload and download objects from those buckets.
Aside from the small problem with our cluster being in HEALTH_WARN due to that cython bug, which makes me wonder if anyone tests Ceph deployments on non-lts Ubuntu releases, Ceph is logical and isn’t very hard to use at a basic level.
I’m happy I did the deployment, now I understand what Ceph is all about, what a typical deployment looks like, the fundamental building blocks and architecture of any Ceph deployment, and how to use its services of block and object storage.
I hope you enjoyed it, and as always, feel free to contact me.
Matthew Ruffell