It has been a really long time since my last blog post, so let’s fix that by writing a followup post to my popular article on learning to write Juju Charms, where we wrote a simple Charm to deploy a production ready Minetest server, complete with postgresql integration through Juju relations.
Today, we are going to go a step further and delve into Reactive Charms, where we can define and maintain state through flags. Flags let us have a memory of events that have happened in the past, and only run certain functions to “react” to changes in those flags.

Reactive Charms are primarily written in Python, and there are a lot of different submodules that exist to help you develop your Charm. So buckle up, because we are going to take our little Minetest Charm to the next level.
Original Charms vs Reactive Charms
Original Charms could be written in any language, and we decided to write our old Minetest Charm in bash. Reactive Charms are intended to be developed using Python 3, and to take advantage of the rich Python submodule ecosystem built and maintained by the community, which provides simple blueprints to make great production ready code.
Reactive Charms build on many of the same mechanisms from the older Bash Charms,
and you will find that files like metadata.yaml and config.yaml are exactly
the same, so we should be able to reuse some code from our old Charm during its
port to becoming a Reactive charm.
In that case, make sure you read my previous articles so you have a good understanding of how hook based Charms work:
- Getting Started With Juju to Deploy and Scale Software Effortlessly
- Learning How to Write Juju Charms by Creating a Minetest Charm
There are three notable changes between hook Charms and Reactive Charms.
Charmhelpers Library Code
There is a wealth of already implemented functions you can use to help develop
your Charm, and they are in the charmhelpers Python module. There is excellent
documentation
available to help you find what these functions do, and what their API is.
charmhelpers helps you write correct code the first time, by implementing
useful things like if a group exists
or creating new groups,
adding users,
or adding users to groups.
You can also do things like get a dictionary of the Charm’s config.yaml, write to the juju log or set juju status information.
Have a look around, and I’m sure you will find all sorts of useful functions to help you write your Charm.
Flags
Reactive Charms have the ability to store state, so you can now selectively run functions only if they meet certain conditions, stored in flags. This is super useful, since you might only want to generate the configuration file once the database has been configured, so you don’t want config-changed to be run before the user relates a database, for example.
It also allows us to implement finite state machines for more complex deployments where you don’t want race conditions or to jump steps, which is particularly useful for managing critical data in storage Charms.
Flags can be named anything you want, and we use methods like set_flag() and
clear_flag() to manage them.
Flags are actually implemented in the charms.reactive Python module, and are
used as decorators on your functions. There are a whole bunch of different
decorators you can use, but the common ones are when(), when_not(),
when_any(), hook().
A simple example is to guard against only doing something once, much like a singleton pattern but not as advanced. We can do this by setting a flag:
@when_not('myprogram.installed')
def install_myprogram():
    # Get your things installed...

    set_flag('myprogram.installed')
When your Charm is first deployed, myprogram.installed won’t be set, so we will
run the install_myprogram() function, and then once we set myprogram.installed
we can no longer fulfil the @when_not() decorator, and we won’t run
install_myprogram() again.
Neat.
Layers
Layers are all about incorporating the flags and hooks from other Charms, and putting them to use in your own Charm, helping the code reuse and correctness.
Layers are effectively libraries you can import, and are mostly set and forget with no need to write any code to make them work. You can set some options in the layer definition file, and they will be passed to layer functions as needed.
In this guide, we will take advantage of the basic and apt layers, as well
as the pgsql interface for database management. I will show you how they work
slightly later on.
Reactive Charm Writing Method
I’m again going to be following along the Reactive Charm Documentation as well as the recommended Reactive Charm Tutorial found on discourse.
What You Will Need To Get Started
We will need to have Juju installed, and also charm tools. We can get both of these from the Snap Store.
$ sudo snap install --classic juju
$ sudo snap install --classic charm
Create Charm Directory Structure
Charms are a collection of text files, which are primarily split up into Python scripts and YAML configuration files.
Much like last time, we will make a directory for our Charms to live in, but
this time, we create two more directories, layers and interfaces.
$ mkdir -p ~/charms
$ mkdir -p ~/charms/layers
$ mkdir -p ~/charms/interfaces
We also need to setup some environment variables for Charm tools to use, so
add the following to your ~./bashrc:
$ cat << EOF | tee --append ~/.bashrc
export CHARM_LAYERS_DIR="~/charms/layers"
export CHARM_INTERFACES_DIR="~/charms/interfaces"
EOF
$ source ~/.bashrc
We can use Charm tools to automatically generate the correct directory structure for us, so run:
$ cd ~/charms/layers
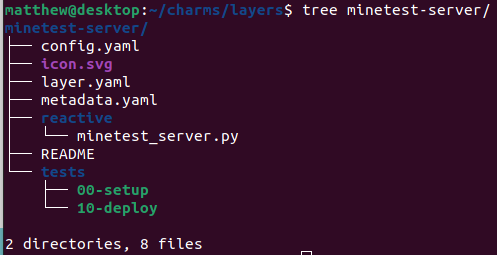
$ charm create minetest-server
You should now have these files in ~/charms/layers/minetest-server:
Edit the README File
We need a README file to tell our users what our Charm is about, how to deploy it, and how to scale it. We will tweak what we did last time, and the following should do:
Minetest is a fun, free and open source voxel game inspired by Minecraft.
It supports various game modes, like survival and creative, and many more can
be added with mods.

This Charm deploys a basic game server, and is backed by a PostgreSQL database
for maximum performance. There are no mods, so you will need to add them
yourself.

To deploy:

$ juju bootstrap
$ juju deploy postgresql
$ juju deploy minetest-server
$ juju relate postgresql:db minetest-server:db
$ juju expose minetest-server
Edit the metadata.yaml File
The role of metadata.yaml has not changed, and it still tells Juju what the
Charm is called, what it does, who wrote it, what Ubuntu distribution it is
compatible with, and what interfaces are exposed and required to function.
name: minetest-server
summary: Minetest is a opensource voxel game designed to be modded.
maintainer: Matthew Ruffell <[email protected]>
description: |
    Minetest is a fun, opensource voxel game engine that can be customised with
    different game modes and mods.
    This charm installs Minetest with a PostgreSQL backend.
tags:
- social
series:
- hirsute
- focal
provides:
  server:
    interface: minetest
requires:
  db:
    interface: pgsql
Describe Configuration Options in config.yaml
Since we want users of our Charm to be able to configure the Minetest server
to suit their needs, such as changing the server message of the day, or the port
it is being served on, we need to define configuration variables in config.yaml.
This is also pretty straightforward.
The only thing to note is you should carefully consider what options you want to expose to your users. Users don’t really care about the fine details, so only expose what most people will understand and use.
Saying that, make sure you set sensible defaults. All Charms should work out of the box on first deployment. If people are interested in changing config, they will, otherwise they will leave everything alone.
An example config is: (inspired by the existing config.yaml in James Tait’s older minetest charm)
options:
    port:
        default: 30000
        description: Server port to listen on
        type: int
    server-name:
        default: "Minetest server"
        description: Name of the server
        type: string
    server-description:
        default: "Juju deployed Minetest server"
        description: Description of server
        type: string
    motd:
        default: "Welcome!"
        description: Message of the day
        type: string
    strict-protocol-version-checking:
        default: "false"
        description: Set to true to disallow old clients from connecting
        type: string
    creative-mode:
        default: "false"
        description: Set to true to enable creative mode (unlimited inventory)
        type: string
    enable-damage:
        default: "false"
        description: Enable players getting damage and dying
        type: string
    default-password:
        default: ""
        description: New users need to input this password
        type: string
    default-privs:
        default: "build,shout"
        description: |
            Available privileges: build, shout, teleport, settime, privs, ban
            See /privs in game for a full list on your server and mod configuration
        type: string
    enable-pvp:
        default: "true"
        description: Whether to enable players killing each other
        type: string
Set the Copyright of the Charm
All Charms should include a copyright file, which includes details about the copyright and licensing status of the files inside the Charm.
We will again use the debian/copyright
file format
to license our charm, by placing the following in a file called copyright.
We will take the OpenStack Keystone Charm copyright file as inspiration, so the below will do:
Format: http://www.debian.org/doc/packaging-manuals/copyright-format/1.0

Files: *
Copyright: 2021, Matthew Ruffell.
License: GPL-3

License: GPL-3
 This package is free software; you can redistribute it and/or modify
 it under the terms of the GNU General Public License as published by
 the Free Software Foundation; either version 3 of the License, or
 (at your option) any later version.
 .
 This package is distributed in the hope that it will be useful,
 but WITHOUT ANY WARRANTY; without even the implied warranty of
 MERCHANTABILITY or FITNESS FOR A PARTICULAR PURPOSE.  See the
 GNU General Public License for more details.
 .
 You should have received a copy of the GNU General Public License
 along with this package; if not, write to the Free Software
 Foundation, Inc., 51 Franklin St, Fifth Floor, Boston, MA  02110-1301 USA
 .
 On Debian systems, the complete text of the GNU General
 Public License can be found in `/usr/share/common-licenses/GPL-3'.
Make an Icon for the Charm Store
If you want your Charm to look nice on the Charm store listing or on the Juju GUI, then you should probably set an icon.
Open up icon.svg in Inkscape or whatever vector editor you like,
and make a nice icon:
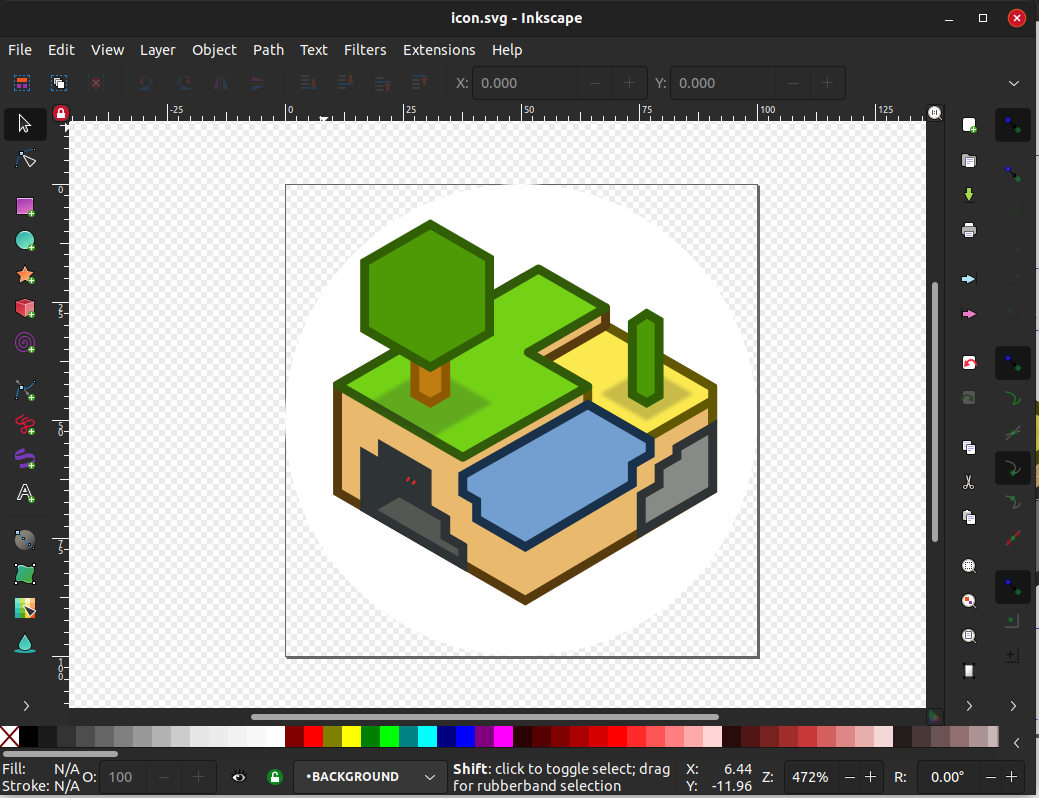
I used the icon found at /usr/share/icons/hicolor/scalable/apps/minetest.svg
to make this icon.
Defining Layers and Their Options
Layers are a mechanism to integrate related Charms into your own Charm. Think of them as libraries you can import and leverage to perform tasks correctly, so you don’t have to get into the specifics yourself.
For example, take the layer:apt layer. This implements package management via
apt, and it will automatically be called when the Charm is deployed in the
install phase. We can include some options in the options: section, and we can
tell it to automatically install minetest, without having to specify anything
more. The days of manually writing apt install minetest are over.
The layer:basic layer implements basic hooks like start, stop, and uses
magic to link different hooks and conditions to flags. This is the layer that
is also responsible for autogenerating our hooks directory when we run charm
build.
Finally, we also specify the interface:pgsql interface, which tells Juju that
we will be using the postgresql charm, and that we will be using related flags
like db.connected and db.database.available.
Our final layers.yaml looks like the following:
includes:
  - 'layer:basic'
  - 'layer:apt'
  - 'interface:pgsql'
options:
  apt:
    packages:
      - minetest
Creating Templates for Game Configuration and System Service Files
Templates are a wonderful new addition to Reactive Charms. They allow us to define our configuration files in one place, and fill out any unknown variables
$ mkdir templates
We will need two templates. One, a systemd service file to run minetest on boot, and the other will be the actual minetest configuration.
Let’s do the systemd service first.
Make a file called minetest.service and put the following service description in it:
[Unit]
Description=Minetest
Documentation=https://wiki.minetest.net/Main_Page

[Service]
Type=simple
User=minetest

ExecStart=/usr/games/minetest --server

ExecStop=/bin/kill -2 $MAINPID

[Install]
WantedBy=multi-user.target
Note, we can use the Jinja2 templating engine to fill variables for us when we
render the file later on. We can place values within '{{ object.attribute }}'
style syntax.
For example, we can fetch the server-name configuration from the Juju config
entries with '{{ config["server-name" }}'. We will pass
in database details later, and use my_database as an object placeholder for now.
Let’s use this information to create the minetest configuration file. Name it
world.mt and fill it with:
port =  {{ config["port"] }}
server_name =  {{ config["server-name"] }}
server_description =  {{ config["server_description"] }}
motd =  {{ config["motd"] }}
strict_protocol_version_checking =  {{ config["strict-protocol-version-checking"] }}
creative_mode =  {{ config["creative-mode"] }}
enable_damage =  {{ config["enable-damage"] }}
default_password =  {{ config["default-password"] }}
default_privs =  {{ config["default-privs"] }}
enable_pvp =  {{ config["enable-pvp"] }}
gameid = minetest
backend = postgresql
player_backend = postgresql
auth_backend = sqlite3
pgsql_connection = host= {{ database["private-address"] }}  port= {{ database["port"] }}  user= {{ database["user"] }}  password= {{ database["password"] }}  dbname= {{ database["database"] }}
pgsql_player_connection = host= {{ database["private-address"] }}  port= {{ database["port"] }}  user= {{ database["user"] }}  password= {{ database["password"] }}  dbname= {{ database["database"] }}
Writing the Actual Deployment and Management Code
In Reactive Charms, we implement the logic to manage the Charm in
reactive/charm_name.py, or in our case, reactive/minetest_server.py.
Have a read of the final code, and I’ll commentate how it works below.
from charms.reactive import when, when_not, set_flag
from charmhelpers.core.host import group_exists, add_group, user_exists, adduser, mkdir, service, service_restart, chownr
from charmhelpers.core.templating import render
from charmhelpers.core.hookenv import log, status_set, application_version_set, config, relations_of_type
from charmhelpers.fetch import get_upstream_version

@when('apt.installed.minetest')
@when_not('minetest-server.installed')
def install_minetest_server():
    log("Setting up users and groups", 'info')

    # Add minetest group to system if it doesn't exist
    if not group_exists('minetest'):
        add_group('minetest', system_group=True)

    # Add minetest user to system if it doesn't exist
    if not user_exists('minetest'):
        adduser('minetest', system_user=True, primary_group='minetest',
                home_dir='/home/minetest')

    # Ensure the minetest world directory exists
    mkdir(path='/home/minetest/.minetest/worlds/world',
          owner='minetest',
          group='minetest',
          perms=0o775)

    # Ensure permissions are correct
    chownr(path='/home/minetest',
           owner='minetest',
           group='minetest',
           chowntopdir=True)

    log("Installing systemd service files", 'info')

    # Install the systemd service file
    render(source='minetest.service',
           target='/etc/systemd/system/minetest.service',
           owner='root',
           group='root',
           perms=0o644,
           context={
           })

    # Set the version number in Juju to what was installed
    application_version_set(get_upstream_version('minetest'))

    # Enable the minetest service
    service('enable', 'minetest.service')

    # We are all installed now, we don't need to call this function again
    set_flag('minetest-server.installed')


@when('config.changed')
@when('minetest.database.configured')
def minetest_regenerate_configuration():
    status_set('maintenance', 'Configuring minetest')

    # Fetch our minetest and database configuration variables
    my_config = config()
    my_database = relations_of_type('db')[0]

    log("Installing minetest configuration file", 'info')

    # Populate the configuration file and install it in place
    render(source='world.mt',
           target='/home/minetest/.minetest/worlds/world/world.mt',
           owner='minetest',
           group='minetest',
           perms=0o664,
           context={
               'config':my_config,
               'database':my_database,
           })

    # Restart the minetest service to take on new config
    service_restart('minetest.service')

    # Tell Juju that minetest is good to go
    status_set('active', 'Configuration file written')

@when('db.database.available')
def database_connected():
    # We have a database now, so we can generate config anytime now
    set_flag('minetest.database.confgured')

    # Generate the config file with database credentials
    minetest_regenerate_configuration()

@when_not('db.connected')
def missing_database():
    status_set('blocked', 'Relation to postgresql required')
We first import all the functions we need from the charmhelpers python module,
which is actually quite a lot for our small piece of code, but it’s okay, since
we want charmhelpers to do our heavy lifting.
We next have a function install_minetest_server(), that acts as a singleton
like I described when I mentioned how flags work. It has an extra condition
though, and that is @when('apt.installed.minetest'). This ensures that
we only call install_minetest_server() once the apt layer has completed
installing the minetest package.
In install_minetest_server(), we set up the minetest user and group, set up
a /home directory and world directory, and install a systemd service file. We
also get the minetest package version and expose it to Juju for pretty
juju status prompts with our actual minetest version.
Next up we have minetest_regenerate_configuration() which collects the
Charms config parameters, and database relation parameters, and renders the
variables into the template config file we created above. Smart right? I thought
so. We also restart the systemd service to load the new configuration, and set
the Charm’s status to active.
We used two flags for minetest_regenerate_configuration(), which makes sure we
only call the function when both config.changed and minetest.database.confgured
is set. config.changed acts like a hook in reality, and minetest.database.confgured
is what actually stops the function from being run before a database is available.
To pull this off, we have two functions, missing_database() and
database_connected(). missing_database() sets the Charms status to blocked
when there isn’t a postgresql relation present, which is what we want, since
without a backing database, we can’t play minetest.
database_connected() is called when we have a postgresql relation, and the
database is created and we have user credientals available. This is from the
db.database.available flag that the postgresql interface sets. We take the
opportunity to set ‘minetest.database.confgured’ so we can go ahead and render
our configuration, and then manually call minetest_regenerate_configuration()
to make that happen.
Its not too complicated, and it actually turned out to be less code than the old hook based Charm.
Deploying the Charm
Now that everything is in place, let’s go ahead and deploy the Charm to our machines, and get our minetest server running.
Creating the Controller
We will be using LXD as the cloud backend for our Juju model today, so go ahead and deploy a juju controller with the “localhost” backend:
$ juju bootstrap --bootstrap-series=hirsute localhost lxd-controller
Creating Juju controller "lxd-controller" on localhost/localhost
Looking for packaged Juju agent version 2.9.12 for amd64
Located Juju agent version 2.9.12-ubuntu-amd64 at https://streams.canonical.com/juju/tools/agent/2.9.12/juju-2.9.12-ubuntu-amd64.tgz
To configure your system to better support LXD containers, please see: https://github.com/lxc/lxd/blob/master/doc/production-setup.md
Launching controller instance(s) on localhost/localhost...
 - juju-6b05e2-0 (arch=amd64)
Installing Juju agent on bootstrap instance
Fetching Juju Dashboard 0.8.1
Waiting for address
Attempting to connect to 10.29.181.61:22
Connected to 10.29.181.61
Running machine configuration script...
Host key fingerprint is SHA256:H0KFu2A5tmmM2blQ5dJ70iMhav+6RJ+4wKrkTp08y2M
+---[RSA 2048]----+
|         ..      |
|        o.       |
|       =..       |
|      X.=        |
|     X.OS=.      |
|  o.B.Bo=++.     |
| o *o+o.o+..     |
|+ .Eooo.         |
|o+oo. ++.        |
+----[SHA256]-----+
Bootstrap agent now started
Contacting Juju controller at 10.29.181.61 to verify accessibility...

Bootstrap complete, controller "lxd-controller" is now available
Controller machines are in the "controller" model
Initial model "default" added
Note, I used --bootstrap-series=hirsute to use Hirsute as the operating system
for the controller.
We can confirm our controller deployed properly with juju controllers:

Looking at juju status we now have a nice empty model:

Deploying the PostgreSQL Charm
Our Minetest Charm depends on postgresql as a database backend to store our player information and world data, so let’s go ahead and deploy it first.
Things have changed slightly from the last time I wrote a blog post, with Charms now being able to be found on Charmhub, instead of the Charm Store.
So, we go to Charmhub, and search for postgresql, and come across the entry postgresql at revision 235.
Deploying it is simple, we just run:
$ juju deploy postgresql
Located charm "postgresql" in charm-hub, revision 235
Deploying "postgresql" from charm-hub charm "postgresql", revision 235 in channel stable
and we can watch juju status while we wait.
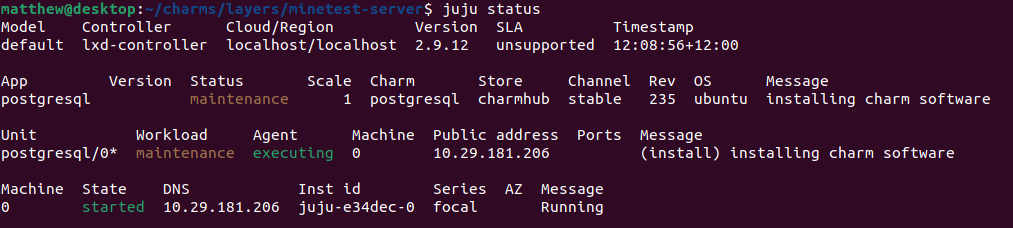
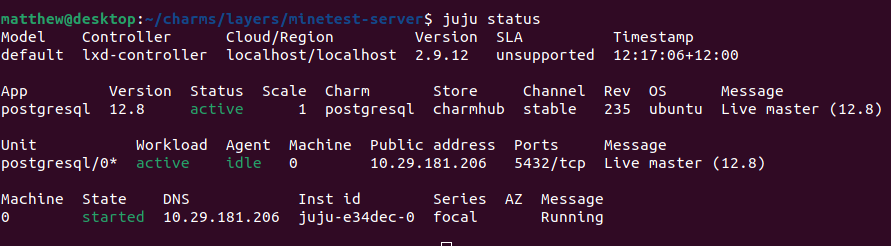
Eventually it will complete, and postgresql will be ready to use:
Proofing and Building our Minetest Charm
We can do a quick sanity check over our charm with charm proof, which tells us
if we are missing anything critical, or need to change some boilerplate code.
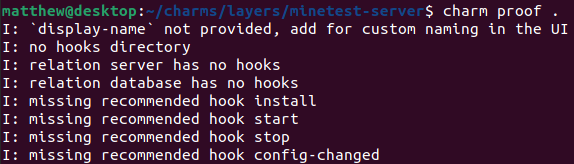
In our case, we are missing some hooks, which we will add later.
If everything looks okay, go ahead and build your charm with charm build:
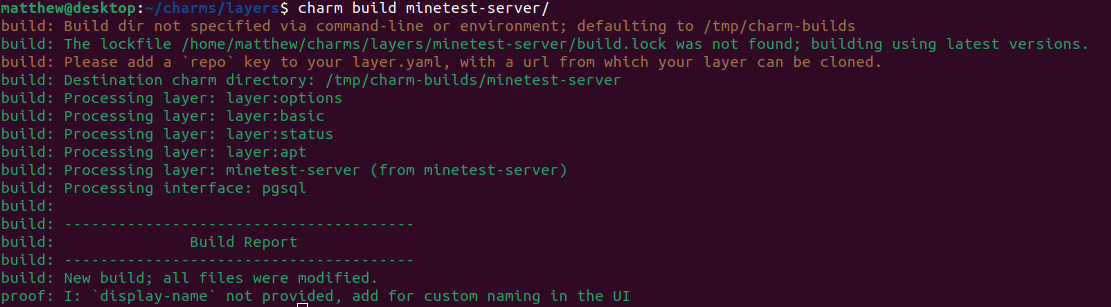
All green, fantastic! Time to deploy.
Deploying our Minetest Charm
Our Charm was built and placed into /tmp/charm-builds/minetest-server, so
point Juju at that location, and deploy away:
$ juju deploy /tmp/charm-builds/minetest-server
Located local charm "minetest-server", revision 0
Deploying "minetest-server" from local charm "minetest-server", revision 0
We can watch juju status like normal to see how it went:
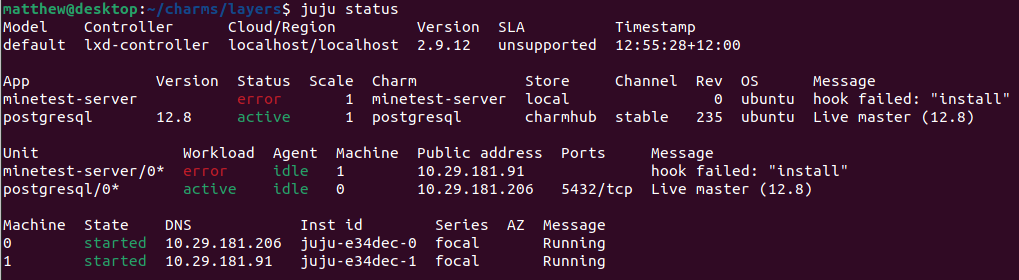
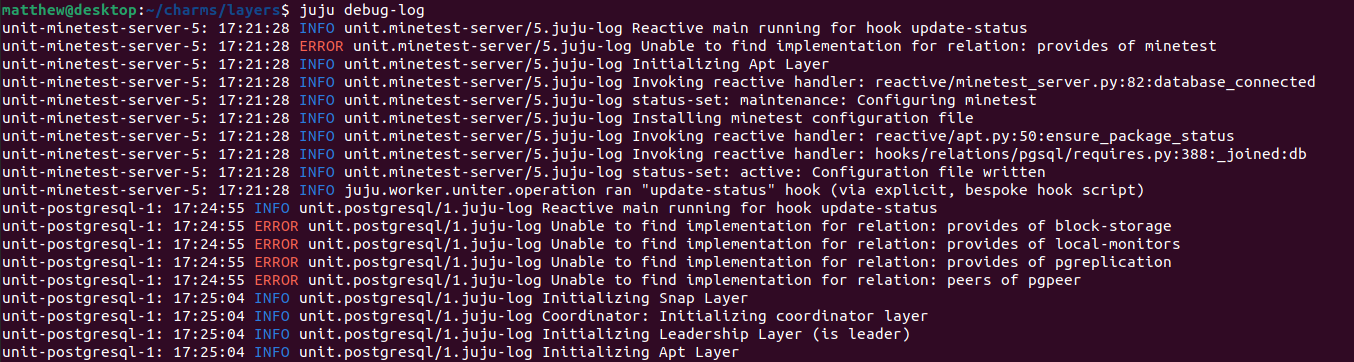
Ouch. Error in the install hook. Not a problem, Juju can tell us what went
wrong in an instant, with the juju debug-log command. Run that, and let’s see
what went wrong:
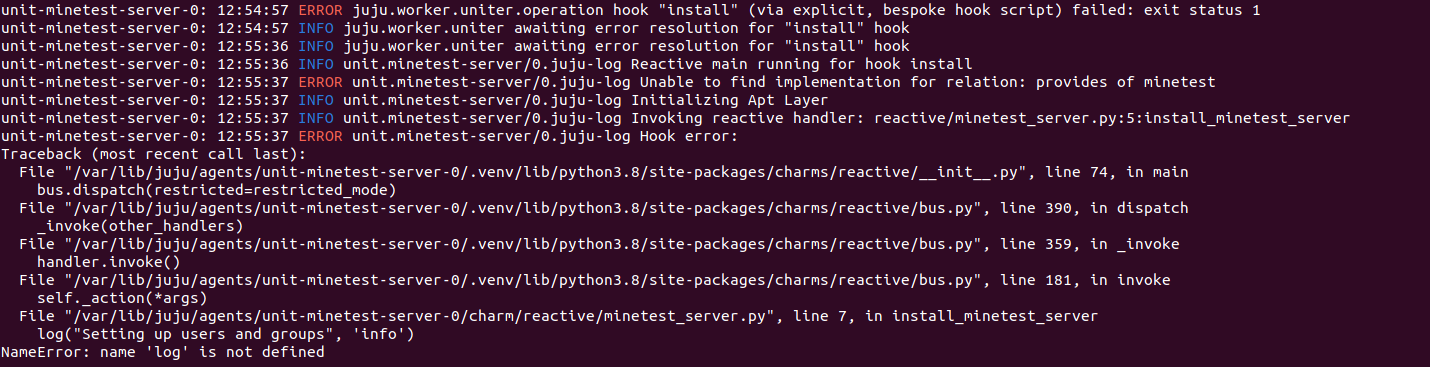
Silly me, seems I forgot to include a logger module, not to worry, we can fix that right up. Add the following to minetest-server.py at the top:
from charmhelpers.core.hookenv import log, status_set
and we should be good to go. But if you happen to have a different problem,
don’t forget you can juju ssh minetest-server/0 to get a shell inside the
minetest LXD container, where you can debug from there.
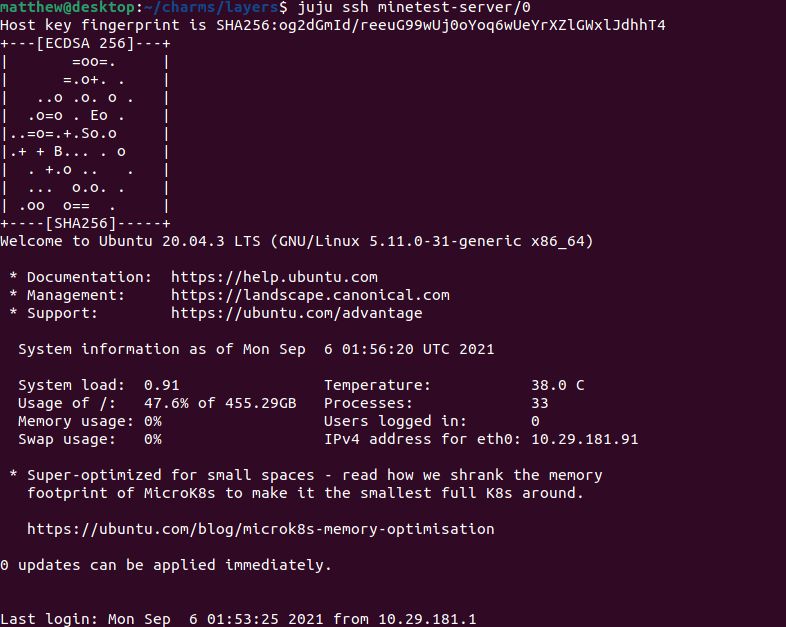
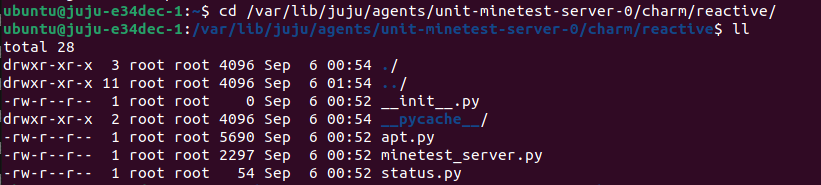
The charm itself lives in /var/lib/juju/agents/unit-minetest-server-0/charm/,
so cd into there, edit minetest-server.py in vim, save and exit.
We don’t have to redeploy the entire Charm to get small bugfixes, and production servers you might not have that luxury at all. Instead, we can run:
$ juju resolved minetest-server/0
and this tells Juju that we fixed the errors, and to re-try that hook again. If
we check juju status, it seems to have worked:
We are now waiting on our database connection, so let’s make the relation happen:
$ juju relate postgresql:db minetest-server:db
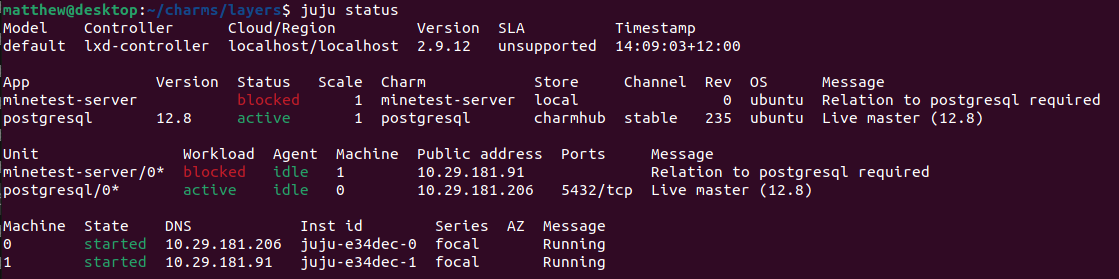
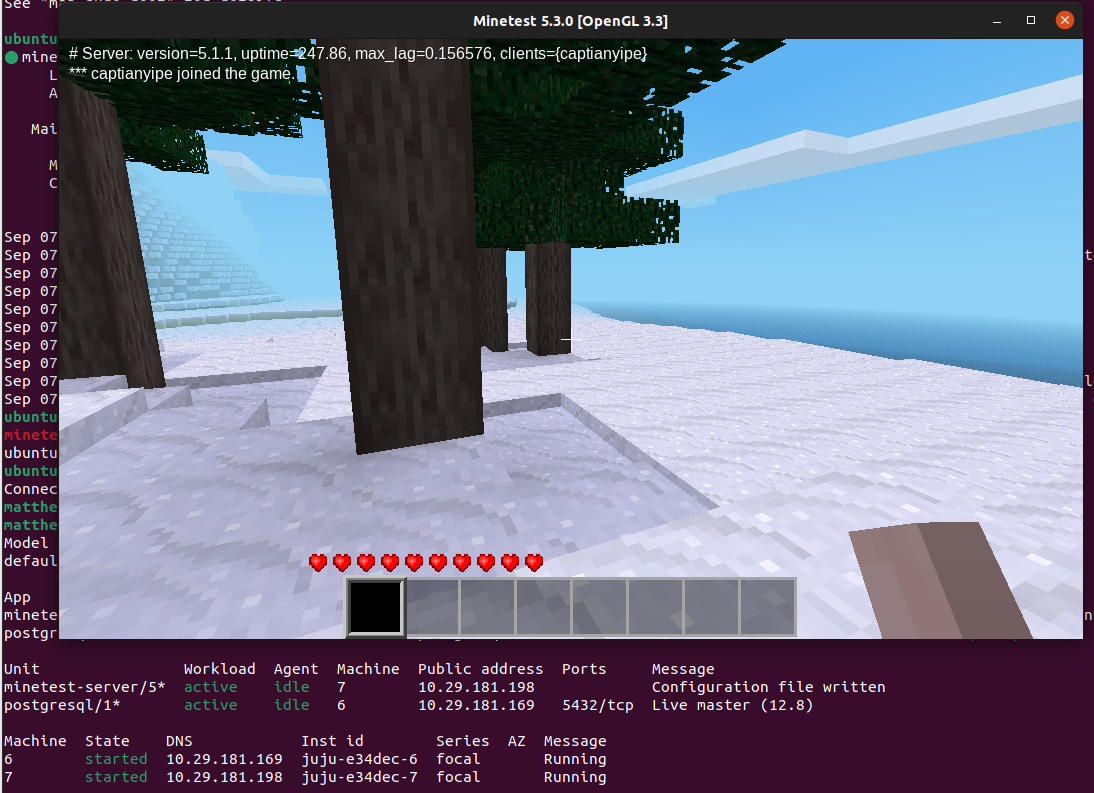
Checking juju status now, we see all green, and that our configuration file
has been written correctly:

This is promising! Let’s expose the port:
$ juju expose minetest-server
Open up minetest, and connect to the server listed at private-address in
juju status, which is 10.29.181.198 in my case, on port 30000, which we
set in our configuration:
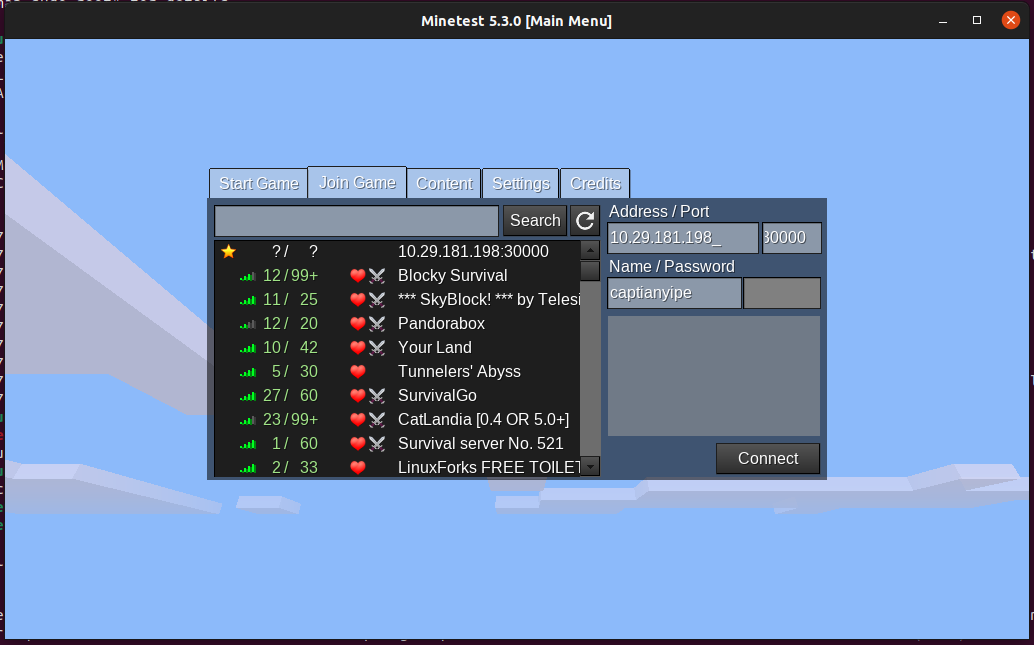
And click connect, and wow it works! We find ourselves in a snowy world, all powered by Minetest + Postgresql + Juju with Reactive Charms. Very fancy, and production ready.
Debugging the Charm
Now that we have written our Reactive Charm, we also need to be able to debug it and know what to do when things go wrong. These tips should help.
Getting Debug Logs
As mentioned when we were writing the Reactive code, your first port of call
when you run into a problem is to run juju debug-log. This gives you the log
outputs of all active running Charms, and any error messages like stack traces
are very prominent and repeated often, so you won’t miss anything.
Make sure to make use of log() from charmhelpers.core.hookenv, and use it
to write useful information to the Juju log, as well to print debug information
like a print statement or printk. I did this a lot when writing this charm,
so I could see the contents of relations_of_type() with Python’s dir().
It’s also very helpful to have juju debug-log running in a window on a second
screen so you can keep a detailed watch of deployment progress when you are
developing your charm.
Debugging Hooks and Examining Flags at Runtime
In the previous article, we used juju debug-hooks application-name/unit to
access a tmux session to see what data is exchanged during various hooks like
db-relation-joined and config-changed.
We can still do all of that, but juju debug-hooks has gotten more powerful
for Reactive Charms.
If you run:
$ juju debug-hooks minetest-server/5
You get the same tmux session:
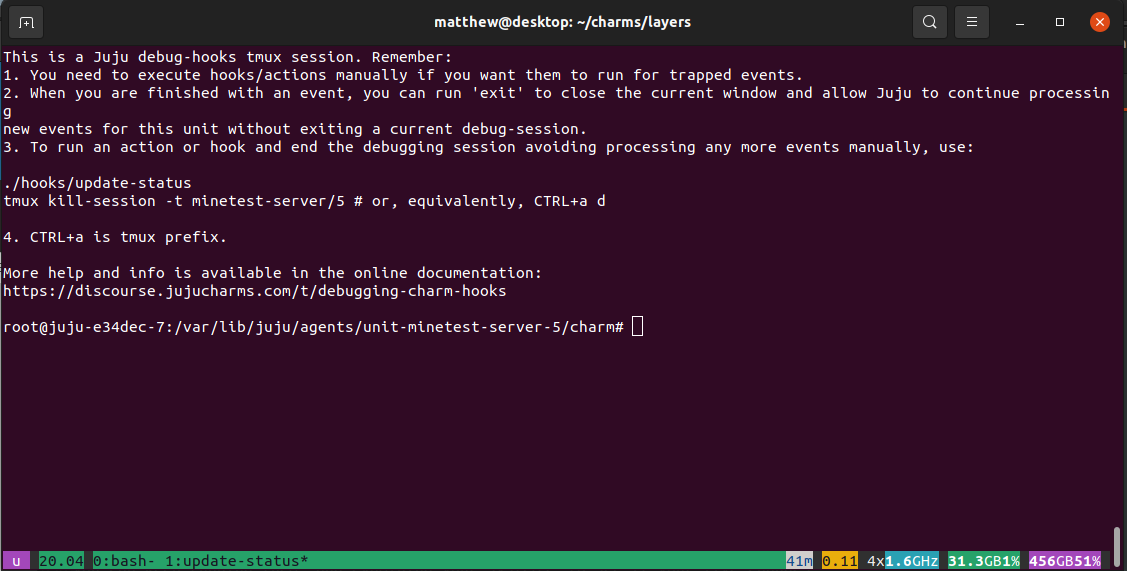
Now, we can run hooks manually by executing the python scripts that are
backing them, in the hooks directory of the Charm.
The session is opened to the Charm directory, at
var/lib/juju/agents/unit-minetest-server-5/charm, so we can ls hooks/
to see what we can run:

If we wanted to run config-changed manually, we can do this with:
$ python3 hooks/config-changed
and it runs. Very useful if you need to watch what is happening in
juju debug-log concurrently.
But what happens if your flags aren’t getting hit? No worries, we can see what the values for the flags are by running:
$ charms.reactive -p get_flags
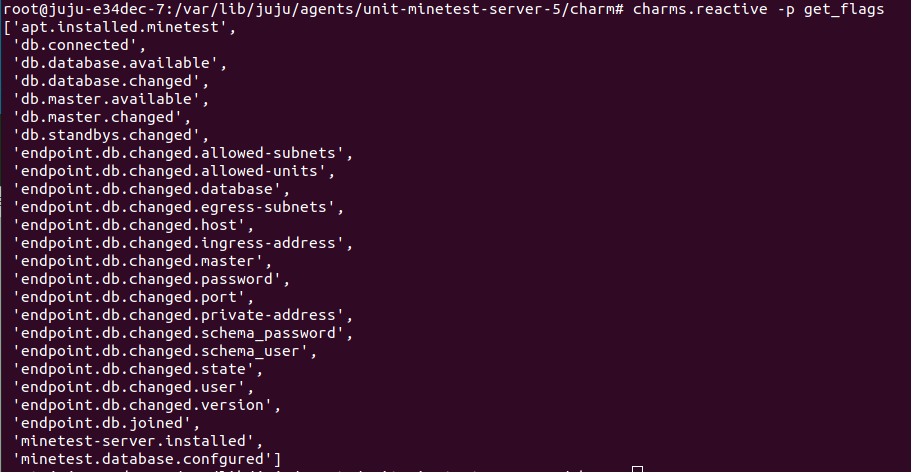
Not only can we see what they are actually called (which is useful in itself,
I thought db.available was a flag, but it was actually called
db.database.available instead, and get_flags() told me this), but we can
also see if they are set or unset, with commands like all_flags_set(),
get_unset_flags(), is_flag_set(), and we can also change flags with
set_flag(), clear_flag(), toggle_flag(). Very useful.
Cleaning Up
Once we have had our fun and want to reclaim some disk space back, we can tear down and remove the deployment with:
$ juju remove-application minetest-server
removing application minetest-server
$ juju remove-application postgresql
removing application postgresql
You can check juju status to keep an eye on progress. If anything gets stuck
you can forcefully remove the machine number 5 with:
$ juju remove-machine 5 --force
If you want to remove your controller, then run:
$ juju destroy-controller lxd-controller --destroy-all-models
WARNING! This command will destroy the "lxd-controller" controller.
This includes all machines, applications, data and other resources.

Continue? (y/N):y
Destroying controller
Waiting for hosted model resources to be reclaimed
Waiting for 1 model
All hosted models reclaimed, cleaning up controller machines
Conclusion
In this article we revisited writing Juju Charms, this time taking the more modern and robust Reactive Charms for a spin. We ported our simple Minetest Charm to Reactive, which was quite straightforward, and managed to make our code simpler than when had hook based Charms.
I enjoyed digging into all the new Charmhelper functionality and getting my head around how flags work, and I hope it has been useful with helping you to write your own Reactive Charms.
Hopefully you enjoyed the read, and as always feel free to contact me.
Matthew Ruffell