The next article in my series of learning about cloud computing is tackling one of the larger and more widely used cloud software packages - OpenStack.
OpenStack is a service which lets you provision and manage virtual machines across a pool of hardware which may have differing specifications and vendors.
Today, we will be deploying a small five node OpenStack cluster in Ubuntu 19.10 Eoan Ermine, so follow along, and let’s get this cluster running.
We will cover what OpenStack is, the services it is comprised of, how to deploy it, and using our cluster to provision some virtual machines.
Let’s get started.
What is OpenStack?
As mentioned previously, OpenStack is a service which lets you provision and manage virtual machines running across a pool of hardware that provide compute, networking or storage resources. This pool of hardware can be made up with differing specifications or multiple vendors, or even different geographical locations. OpenStack is the glue which connects these resources together in a easy to use, secure, cohesive system for provisioning virtual machines to public or private cloud environments.
What are OpenStacks Main Usages?
OpenStacks primary usage is to provide a platform for cloud computing. This can be in the form of public or private clouds. Public clouds are open to the public and anyone can sign up for an account on, and private clouds are typically private and local to a single company.
OpenStack allows users to provision virtual machines of various specifications, with various choices of operating systems in various geographical locations, or Availability Zones. OpenStack gives the users the ability to build virtual networks for their virtual machines to be connected to, and to specify how those networks operate with allowing easy configuration of virtual routers, switches and the like.
OpenStack takes care of all storage requirements, and offers backends for block and object storage, which can be utilised by the virtual machines themselves, and the applications running ontop of it.
OpenStack Architecture
Like Ceph, OpenStack is not a monolithic program. Instead, it is comprised of a set of specialised individual services, which are further split into a set of sub-services. The best way to grasp the complexity of OpenStack is by looking at an example logical architecture diagram provided in the OpenStack Documentation.

We are going to focus on the following core services:
- Horizon, a central dashboard where users can manage resource and provision virtual machines.
- Keystone, an identity and authentication service which implements fine tuned permissions and access control.
- Nova, a compute engine which hosts the virtual machines being provisioned.
- Neutron, which implements networking as a service, which can create virtual networks and virtual network interfaces that can be attached to virtual machines managed by nova.
- Glance, an image service which stores, fetches and provides operating system images for the virtual machines.
- Cinder, a block storage service which delivers highly available and fault tolerant block storage for use with virtual machines.
- Swift, a object storage backend which consumes and stores single objects quickly and efficiently.
Each of these core services appear on the example logical architecture diagram encased within dotted lines. These lines show the border between what we consider the logical unit for a service, like nova, and the smaller sub-services which nova is comprised of.
Every OpenStack service will have a API sub-service, which is the endpoint which OpenStack services use to communicate with each other. Most OpenStack services will also have its own database to store state and information required by the sub-services.
Otherwise, sub-services are specific to the service itself. If we look at Nova, we see sub-services nova-scheduler, nova-console, nova-cert, nova-compute, nova-consoleauth and nova-conductor. Each of there can communicate with other sub-services if necessary, and use central resources, like the Nova database and the work queue. Each of these sub-services are separated into their own process, and can be stopped, started and restarted independently of the other sub-services.
Architecture of the Cluster We Will Build
Today, we are going to deploy OpenStack on a small 5 node cluster which will be made of virtual machines. I highly recommend you use a desktop computer for this as we are going to need a lot of ram and disk space.
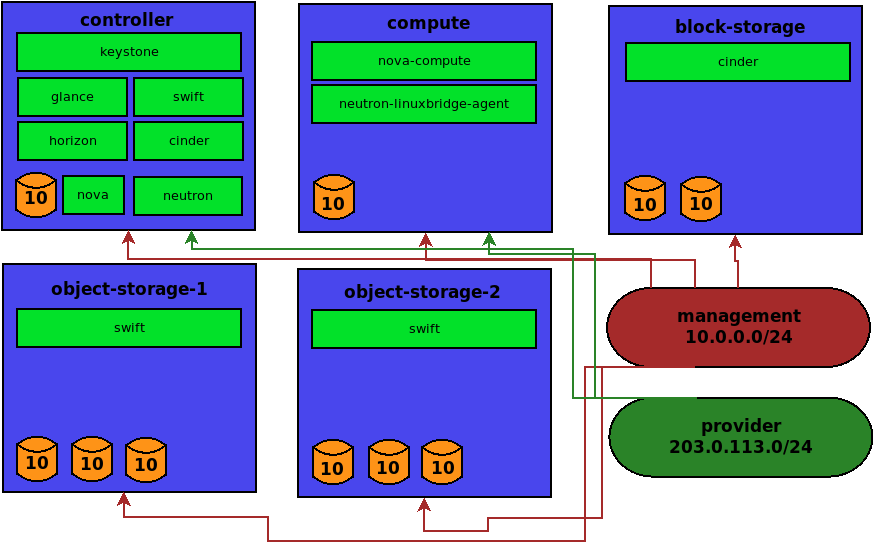
We will have five machines and two networks. Our machines will be controller, compute, block-storage, object-storage-1 and object-storage-2. The names are fairly self explanatory, and we can see the services each will be running in the diagram.
For the networks, we will have a management network and a provider network. The management network will be used for administrative tasks, such as OpenStack services communicating between themselves via their API endpoints. The provider network is the virtual network that instances will have their virtual NICs attached to.
Once the installation is done, we will be accessing the cluster through the horizon web interface through the controller machine.
Deploying the Cluster
Okay, let’s get moving. Time to fire up some virtual machines and start configuring our cluster.
Setting Up Internal Networks
As mentioned previously, we will have two networks, the management network and the provider network. I’m going to be using the defaults suggested in the OpenStack Installation Guide especially when it comes to the provider network.
The networks and their CIDRs will be:
- Management Network - 10.0.0.0/24
- Provider Network - 203.0.113.0/24
These networks need to be created in your virtualisation software. I’m using
virt-manager, and you can do this by going to Edit > Connection Details...
then making a new virtual network.
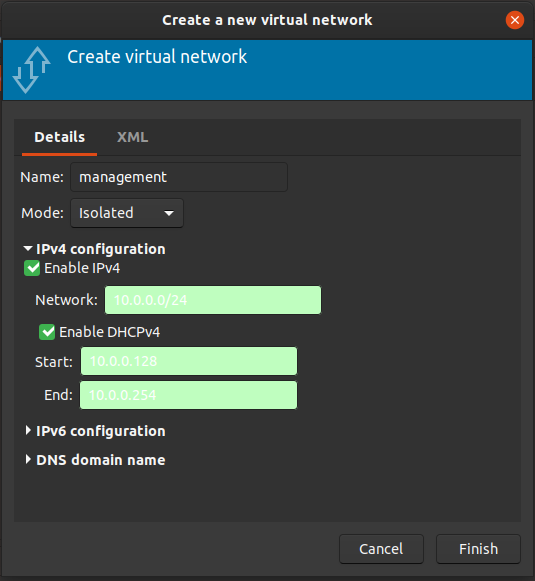
These networks will be internal networks for now. We will also attach a normal NAT network to our VMs while we get things up and running, but we will remove this when we are done, to leave us with an isolated cluster.
Go ahead and make both the management and provider networks.

When you are done, you will have three networks.
Install Ubuntu Server
Create five virtual machines with the following specs:
- controller: 4gb ram, 1 vcpu, 10gb disk.
- compute: 4gb ram, 1 vcpu, 10gb disk.
- block-storage: 4gb ram, 1 vcpu, 10gb disk, 10gb disk.
- object-storage-1: 4gb ram, 1 vcpu, 10gb disk, 10gb disk, 10gb disk.
- object-storage-2: 4gb ram, 1 vcpu, 10gb disk, 10gb disk, 10gb disk.
If you are low on ram or disk space, you can shave some specs off the block storage and object storage machines.
Attach the management network to all the machines. Attach the provider network to the controller and compute machines. Probably best to do this before you start the installation.
Go ahead and install Ubuntu 19.10 Eoan Ermine Server on them:
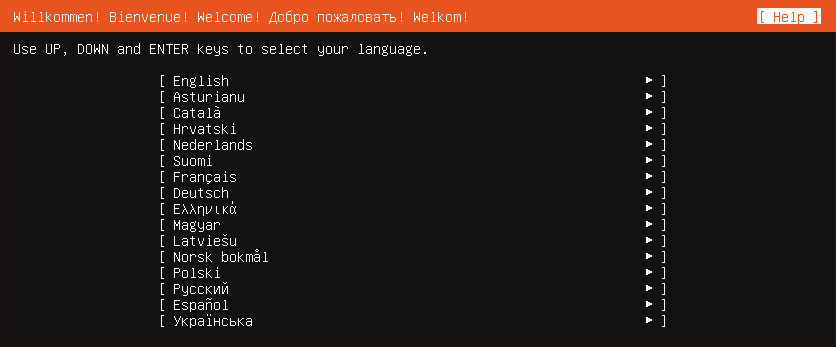
Make sure to say yes to installing openssh-server when asked. We will be needing it.
Configure Ubuntu Server
After the install is done, we need to configure some networking on our fresh installs.
Setting Up Machine Networking
Nothing too fancy here, we are going to set up a static IP for our interfaces.
Recent versions of Ubuntu server use netplan for its networking, which can take some getting used to. It’s okay though, its not hard.
If you go to /etc/netplan, there will be a file called 50-cloud-init.yaml.
cloud-init will have pre-populated it with all current network interfaces:
# This file is generated from information provided by
# the datasource.  Changes to it will not persist across an instance.
# To disable cloud-init's network configuration capabilities, write a file
# /etc/cloud/cloud.cfg.d/99-disable-network-config.cfg with the following:
# network: {config: disabled}
network:
    ethernets:
        enp1s0:
            dhcp4: true
        enp2s0:
            dhcp4: true
        enp3s0:
            dhcp4: true
    version: 2
We want our management and provider networks to have static IP addresses, so the first thing is to determine what these interfaces are.
If you run ip addr, you will see something like:
1: lo:
    inet 127.0.0.1/8 scope host lo
2: enp1s0:
    inet 192.168.122.13/24 brd 192.168.122.255 scope global dynamic enp1s0
3: enp2s0:
    inet 10.0.0.155/24 brd 10.0.0.255 scope global dynamic enp2s0
4: enp3s0:
    inet 203.0.113.249/24 brd 203.0.113.255 scope global dynamic enp3s0
I cleaned up the output, since let’s face it, ip addr gives us information
overload, while ifconfig had nice output. Rest in peace ifconfig.
We see enp1s0 is the NAT network, enp2s0 is management network and enp3s0 is the provider network.
Our nodes will have the following static IPs:
- controller: management: 10.0.0.11, provider: 203.0.113.11
- compute: management: 10.0.0.21, provider: 203.0.113.21
- block-storage: management: 10.0.0.31
- object-storage-1: management: 10.0.0.41
- object-storage-2: management: 10.0.0.51
So we need to edit our netplan configuration like this, for our controller:
# This file is generated from information provided by
# the datasource.  Changes to it will not persist across an instance.
# To disable cloud-init's network configuration capabilities, write a file
# /etc/cloud/cloud.cfg.d/99-disable-network-config.cfg with the following:
# network: {config: disabled}
network:
    ethernets:
        enp1s0:
            dhcp4: true
        enp2s0:
            dhcp4: true
            addresses: [10.0.0.11/24]
        enp3s0:
            dhcp4: true
            addresses: [203.0.113.11/24]
    version: 2
When we are done, we can apply the changes with:
$ sudo netplan apply
Reboot your machine, and when it comes back up, if we log in, we should see our static IPs in place:
Welcome to Ubuntu 19.10 (GNU/Linux 5.3.0-26-generic x86_64)

 * Documentation:  https://help.ubuntu.com
 * Management:     https://landscape.canonical.com
 * Support:        https://ubuntu.com/advantage

  System information as of Sun 26 Jan 2020 09:48:36 PM UTC

  System load:  0.98              Users logged in:       0
  Usage of /:   41.8% of 9.78GB   IP address for enp1s0: 192.168.122.13
  Memory usage: 4%                IP address for enp2s0: 10.0.0.11
  Swap usage:   0%                IP address for enp3s0: 203.0.113.11
  Processes:    131


0 updates can be installed immediately.
0 of these updates are security updates.


Last login: Sun Jan 26 21:39:04 2020 from 192.168.122.1
Not too bad at all! Now go and do the same for the rest of the machines.
Configure the Hosts File
Edit /etc/hosts on all the machines and place the following inside it:
10.0.0.11 controller
203.0.113.11 controller-api

10.0.0.21 compute
203.0.113.21 compute-api

10.0.0.31 block-storage

10.0.0.41 object-storage-1

10.0.0.51 object-storage-2
There will likely be an entry with the machine’s hostname at the top, that
redirects back to localhost. Something like 127.0.0.1 controller. Make sure
to comment out this line, because we want controller to mean 10.0.0.11
instead.
That should make things easier for us later on.
Set Up NTP For Stable Timekeeping
It can be useful for all our boxes have an aligned time, since OpenStack requires a consistent time across all machines. We will use chrony, with the controller as the master NTP server.
On all machines, install chrony:
$ sudo apt install chrony
The controller will have internet access, so we will configure the machines to connect to the controller for NTP.
On the controller, edit /etc/chrony/chrony.conf and place the following at
the end:
$ sudo vim /etc/chrony/chrony.conf
...
# Allow our internal networked machines access to our chrony server
allow 10.0.0.0/24
Now we can configure the other machines to connect to the controller for NTP.
For all the configured “pools”, we need to comment them out, and set the
server to be the controller instead.
$ sudo vim /etc/chrony/chrony.conf
...
# Comment out the default pools:
#pool ntp.ubuntu.com        iburst maxsources 4
#pool 0.ubuntu.pool.ntp.org iburst maxsources 1
#pool 1.ubuntu.pool.ntp.org iburst maxsources 1
#pool 2.ubuntu.pool.ntp.org iburst maxsources 2
# Use the controller as the NTP master server
server controller iburst
Save. Once that is done, we need to restart chrony on all systems:
$ sudo systemctl restart chrony
We can check the other machines get their time from the controller with:
$ chronyc sources
210 Number of sources = 1
MS Name/IP address         Stratum Poll Reach LastRx Last sample
===============================================================================
^* controller                    2   6    37    20    +20ns[ -214us] +/-   12ms
We should get something like this.
Installing OpenStack Client Packages
We will be using the python OpenStack client to deploy our cluster, so go ahead and install it on all machines:
$ sudo apt install python3-openstackclient
Installing a Database on the Controller
We need to install a database on the controller, so let’s use mariadb:
$ sudo apt install mariadb-server python3-pymysql
Let’s put some basic configuration in it:
$ sudo vim /etc/mysql/mariadb.conf.d/99-openstack.cnf
[mysqld]
bind-address = 10.0.0.11
default-storage-engine = innodb
innodb_file_per_table = on
max_connections = 4096
collation-server = utf8_general_ci
character-set-server = utf8
Then we restart the service:
$ sudo systemctl restart mysql
All that’s left is to clear out the demo users and set a root database password:
$ sudo mysql_secure_installation
When asked for the root password, it will be blank. When we want to set a root
password, use something decent, but if your doing this for fun, like I am,
then it probably doesn’t matter too much. We will use password123.
From there, say yes to the defaults.
Installing a Messaging Queue on the Controller
We also need a messaging queue on the controller, so let’s use rabbitmq.
$ sudo apt install rabbitmq-server
Let’s add a user:
$ sudo rabbitmqctl add_user openstack password123
Adding user "openstack" ...
And let the openstack user have all permissions to the queue:
$ sudo rabbitmqctl set_permissions openstack ".*" ".*" ".*"
Setting permissions for user "openstack" in vhost "/" ...
Installing Memcached to the Controller
We will be using memcached to cache parts of horizon, so go ahead and install it on the controller:
$ sudo apt install memcached python3-memcache
We need to edit the config to use the internal management network, so change the
listening address from 127.0.0.1 to 10.0.0.11:
sudo vim /etc/memcached.conf
#-l 127.0.0.1
-l 10.0.0.11
From there restart the memcached service:
$ sudo systemctl restart memcached
Installing OpenStack
OpenStack is a series of services, and we will install them one at a time.
Installing Keystone, the Identity Service
Keystone is the identity service for OpenStack, and it maintains user authentication, user authorisation and the catalogue of currently installed and running OpenStack services, as well as their endpoint information.
Every other OpenStack service has a hard dependency on Keystone for its authentication capabilities, and to get themselves enlisted into the catalogue, so naturally Keystone needs to be installed first.
I’m going to be following the Keystone Installation Tutorial
Making the Keystone Database
Keystone needs a backing database, so open up mysql with:
$ sudo mysql
Welcome to the MariaDB monitor.  Commands end with ; or \g.
Your MariaDB connection id is 44
Server version: 10.3.20-MariaDB-0ubuntu0.19.10.1 Ubuntu 19.10

Copyright (c) 2000, 2018, Oracle, MariaDB Corporation Ab and others.

Type 'help;' or '\h' for help. Type '\c' to clear the current input statement.

MariaDB [(none)]>
From there make a database:
MariaDB [(none)]> create database keystone;
Query OK, 1 row affected (0.001 sec)
We then need to make a keystone user, and let them have access to the database:
MariaDB [(none)]> grant all privileges on keystone.* to 'keystone'@'localhost'
identified by 'password123';
Query OK, 0 rows affected (0.001 sec)
MariaDB [(none)]> grant all privileges on keystone.* to 'keystone'@'%'
identified by 'password123';
Query OK, 0 rows affected (0.001 sec)
Installing Keystone Packages
Keystone is available in the Ubuntu main archive, so we can install it with:
$ sudo apt install keystone apache2 libapache2-mod-wsgi-py3
From there, we can configure it by adding some credentials to its configuration
file. You will want to jump to the database section, comment out the sqlite
connection, and add our mariadb database. Also, under the token section,
uncomment the provider = fernet line:
$ sudo vim /etc/keystone/keystone.conf
[database]
#connection = sqlite:////var/lib/keystone/keystone.db
connection = mysql+pymysql://keystone:password123@controller/keystone

[token]
provider = fernet
We can then populate the database with:
$ sudo -s
# su -s /bin/sh -c "keystone-manage db_sync" keystone
Once the database is populated, we need to initialise the fernet key repositories:
$ sudo keystone-manage fernet_setup --keystone-user keystone --keystone-group \
keystone
$ sudo keystone-manage credential_setup --keystone-user keystone --keystone-group \
keystone
After that, we can bootstrap keystone by telling it where it’s API endpoints will be accessed from, and what our region name will be.
$ sudo keystone-manage bootstrap --bootstrap-password openstack \
--bootstrap-admin-url http://controller:5000/v3/ \
--bootstrap-internal-url http://controller:5000/v3/ \
--bootstrap-public-url http://controller:5000/v3/ \
--bootstrap-region-id RegionOne
Most OpenStack services have three main endpoints, designed to be accessed by users of differing permissions. The admin endpoint is intended by OpenStack administrators, the internal endpoint is for service to service communication, for example, between keystone and nova, and lastly, the public endpoint is for anyone to query.
I used the password “openstack” here, and we will use it for front end OpenStack services. You can use whatever you like, as long as you are consistent.
Just a few last things now. We need to add some configuration to apache:
$ sudo vim /etc/apache2/apache2.conf
ServerName controller
Save, and restart the apache service:
$ sudo systemctl restart apache2
Creating Users, Roles and Projects in Keystone
First up is creating a project. We need to set some environment variables to feed into keystone, like so:
$ export OS_USERNAME=admin
$ export OS_PASSWORD=openstack
$ export OS_PROJECT_NAME=admin
$ export OS_USER_DOMAIN_NAME=Default
$ export OS_PROJECT_DOMAIN_NAME=Default
$ export OS_AUTH_URL=http://controller:5000/v3
$ export OS_IDENTITY_API_VERSION=3
After that, we can go and create some projects:
$ openstack project create --domain default --description "Service Project" service
+-------------+----------------------------------+
| Field       | Value                            |
+-------------+----------------------------------+
| description | Service Project                  |
| domain_id   | default                          |
| enabled     | True                             |
| id          | c050173209284c80816cab4a42e829bb |
| is_domain   | False                            |
| name        | service                          |
| options     | {}                               |
| parent_id   | default                          |
| tags        | []                               |
+-------------+----------------------------------+
$ openstack project create --domain default --description "Demo Project" demo
+-------------+----------------------------------+
| Field       | Value                            |
+-------------+----------------------------------+
| description | Demo Project                     |
| domain_id   | default                          |
| enabled     | True                             |
| id          | 33569bb56110474db2d584b4a1936c6b |
| is_domain   | False                            |
| name        | demo                             |
| options     | {}                               |
| parent_id   | default                          |
| tags        | []                               |
+-------------+----------------------------------+
We should make some users that are not administrators to use things normally, so we can make them like so:
$ openstack user create --domain default --password-prompt demo
User Password:
Repeat User Password:
+---------------------+----------------------------------+
| Field               | Value                            |
+---------------------+----------------------------------+
| domain_id           | default                          |
| enabled             | True                             |
| id                  | bf0cfff44d3c49cb92d10e5977a9decc |
| name                | demo                             |
| options             | {}                               |
| password_expires_at | None                             |
+---------------------+----------------------------------+
$ openstack role create user
+-------------+----------------------------------+
| Field       | Value                            |
+-------------+----------------------------------+
| description | None                             |
| domain_id   | None                             |
| id          | 591b3b65831847a5b7eb60e9bcef0f1c |
| name        | user                             |
| options     | {}                               |
+-------------+----------------------------------+
$ openstack role add --project demo --user demo user
We made a project called demo, and inside that, we made a role called user, and added our account, demo, to that role.
Verifying that Keystone was Installed Correctly
We can check to see if our users and projects are created properly, by unsetting the environment variables we set.
$ unset OS_AUTH_URL OS_PASSWORD
From there, we can request a token for both of our users, admin and demo.
$ openstack --os-auth-url http://controller:5000/v3 \
  --os-project-domain-name Default --os-user-domain-name Default \
  --os-project-name admin --os-username admin token issue
Password:
+------------+-----------------------------------------------------------------+
| Field      | Value                                                           |
+------------+-----------------------------------------------------------------+
| expires    | 2020-01-27T03:23:56+0000                                        |
| id         | gAAAAABeLkm86gLK4PJXGCrFytreNRz68VT_10sfa9aG8kBWhvWGFM36y9tSrBO |
|            | 8-QagpervkRxePXB0ZgriZ4K7Lh5Ozoe2_JNj9wtlVs4VAfSyb66c35YOGIMaQs |
|            | oKfBGEuYjrfG-22UbT9zWHUw3GoRx37_VBpr13inGQhIBm7HVE9AWv0KI       |
| project_id | a45f9c52c6964c5da7585f5c8a70fdc7                                |
| user_id    | c23d6d5a0b8f4dae96f5156d62d62dbd                                |
+------------+-----------------------------------------------------------------+
And the demo user:
$ openstack --os-auth-url http://controller:5000/v3 \
  --os-project-domain-name Default --os-user-domain-name Default \
  --os-project-name demo --os-username demo token issue
Password:
+------------+-----------------------------------------------------------------+
| Field      | Value                                                           |
+------------+-----------------------------------------------------------------+
| expires    | 2020-01-27T03:28:07+0000                                        |
| id         | gAAAAABeLkq30a-m6Cpcv3U9tBpZyJia4dQXoUhV73QzW9kH08cGzhnIUvWeCv8 |
|            | BE0Nag6Lb4DKgiWXtiSpzSyJaXARwJsWN8U1lHIUG8FA2nQHDHPeVBao8GJgSec |
|            | n9thhc19CMPcK7UUZqlrMm84i8bC4baU08LsG7JvGZ4cPRoEiB-OZVgg        |
| project_id | 33569bb56110474db2d584b4a1936c6b                                |
| user_id    | bf0cfff44d3c49cb92d10e5977a9decc                                |
+------------+-----------------------------------------------------------------+
To make things easier when dealing with different users in our OpenStack cluster, OpenStack has this idea of saving a collection of environment variables for a user into a bash script, and we can source them, and then use them for anything we want.
This is known as “OpenStack client environment scripts”, so let’s take a look.
Make two files, one called admin-openrc and the other demo-openrc:
$ vim admin-openrc
export OS_USERNAME=admin
export OS_PASSWORD=openstack
export OS_PROJECT_NAME=admin
export OS_USER_DOMAIN_NAME=Default
export OS_PROJECT_DOMAIN_NAME=Default
export OS_AUTH_URL=http://controller:5000/v3
export OS_IDENTITY_API_VERSION=3
export OS_IMAGE_API_VERSION=2
$ vim demo-openrc
export OS_USERNAME=demo
export OS_PASSWORD=openstack
export OS_PROJECT_NAME=demo
export OS_USER_DOMAIN_NAME=Default
export OS_PROJECT_DOMAIN_NAME=Default
export OS_AUTH_URL=http://controller:5000/v3
export OS_IDENTITY_API_VERSION=3
export OS_IMAGE_API_VERSION=2
Then if we want to change to the admin user, we can just source it:
$ . admin-openrc
$ openstack token issue
+------------+-----------------------------------------------------------------+
| Field      | Value                                                           |
+------------+-----------------------------------------------------------------+
| expires    | 2020-01-27T03:44:52+0000                                        |
| id         | gAAAAABeLk6k6b6CVGwnigP8DF6iZUieU1H_J_Sdhdr0KZaFN4OULhVndFvPt1N |
|            | 5EAReAiAZl7Kmx_16KXkB3fQ4dFr_N5_id3UyEjcqWFsFp2kN5EjtA674ubG4CL |
|            | 3auzXEvlrx5pmS0pl_hd0UQQGO7DfF3vHo-ksvcA9x7rETUS1UfWYXMXE       |
| project_id | a45f9c52c6964c5da7585f5c8a70fdc7                                |
| user_id    | c23d6d5a0b8f4dae96f5156d62d62dbd                                |
+------------+-----------------------------------------------------------------+
That actually makes switching user’s pretty easy. Still, you leave creds lying around on your machines the whole time, which makes me uneasy. For our toy cluster it doesn’t matter, but for bigger deployments it is concerning.
Installing Glance, the Image Service
Glance is the image service for OpenStack. It is in charge of discovering, registering and retrieving virtual machine operating system images.
Glance also allows users to build their own images, and take snapshots.
I will be following the Glance Installation Documentation.
Creating the Glance Database
Back to the controller node, since Glance will be installed there as well.
We need to create a database for Glance, so go ahead and open up the mysql monitor, and issue:
$ sudo mysql
MariaDB [(none)]> create database glance;
Query OK, 1 row affected (0.000 sec)
From there, just like with Keystone, we need to make a user, and grant them access the glance database.
MariaDB [(none)]> grant all privileges on glance.* to 'glance'@'localhost' identified by 'password123';
Query OK, 0 rows affected (0.001 sec)
MariaDB [(none)]> grant all privileges on glance.* to 'glance'@'%' identified by 'password123';
Query OK, 0 rows affected (0.001 sec)
Now we need to make the glance user in OpenStack. To do this, we need to become
the admin user, so source the admin-openrc file:
$ . admin-openrc
$ openstack user create --domain default --password-prompt glance
User Password:
Repeat User Password:
+---------------------+----------------------------------+
| Field               | Value                            |
+---------------------+----------------------------------+
| domain_id           | default                          |
| enabled             | True                             |
| id                  | 7238c0c8862d4a63b95143e6a42d683b |
| name                | glance                           |
| options             | {}                               |
| password_expires_at | None                             |
+---------------------+----------------------------------+
Next, we need to add the glance user to the admin role of the services project:
$ openstack role add --project service --user glance admin
Now we need to define the service to add, and set up the endpoints:
$ openstack service create --name glance --description "OpenStack Image" image
+-------------+----------------------------------+
| Field       | Value                            |
+-------------+----------------------------------+
| description | OpenStack Image                  |
| enabled     | True                             |
| id          | 062afb3d1c4345c89d808548c2ec53f9 |
| name        | glance                           |
| type        | image                            |
+-------------+----------------------------------+
We can set up our endpoints with:
$ openstack endpoint create --region RegionOne image public http://controller:9292
+--------------+----------------------------------+
| Field        | Value                            |
+--------------+----------------------------------+
| enabled      | True                             |
| id           | 31b50e9589e74c9b839091f3a5e41688 |
| interface    | public                           |
| region       | RegionOne                        |
| region_id    | RegionOne                        |
| service_id   | 062afb3d1c4345c89d808548c2ec53f9 |
| service_name | glance                           |
| service_type | image                            |
| url          | http://controller:9292           |
+--------------+----------------------------------+
$ openstack endpoint create --region RegionOne image internal http://controller:9292
+--------------+----------------------------------+
| Field        | Value                            |
+--------------+----------------------------------+
| enabled      | True                             |
| id           | ba685939d6344808828a6cb6a5426dee |
| interface    | internal                         |
| region       | RegionOne                        |
| region_id    | RegionOne                        |
| service_id   | 062afb3d1c4345c89d808548c2ec53f9 |
| service_name | glance                           |
| service_type | image                            |
| url          | http://controller:9292           |
+--------------+----------------------------------+
$ openstack endpoint create --region RegionOne image admin http://controller:9292
+--------------+----------------------------------+
| Field        | Value                            |
+--------------+----------------------------------+
| enabled      | True                             |
| id           | 53dcf790c16d4275a1ddf52556eccbed |
| interface    | admin                            |
| region       | RegionOne                        |
| region_id    | RegionOne                        |
| service_id   | 062afb3d1c4345c89d808548c2ec53f9 |
| service_name | glance                           |
| service_type | image                            |
| url          | http://controller:9292           |
+--------------+----------------------------------+
From the URL, we can see that glance will use the 9292 port.
Now that the endpoint is created, we can install the glance package:
$ sudo apt install glance
Just like keystone, we need to edit the API file to enter the credentials glance will use to access its database.
Mine already has sqlite configured, so comment it out and add:
$ sudo vim /etc/glance/glance-api.conf
[database]
#connection = sqlite:////var/lib/glance/glance.sqlite
#backend = sqlalchemy
connection = mysql+pymysql://glance:password123@controller/glance
Next, we need to modify the [keystone_authtoken] sections:
[keystone_authtoken]
www_authenticate_uri = http://controller:5000
auth_url = http://controller:5000
memcached_servers = controller:11211
auth_type = password
project_domain_name = Default
user_domain_name = Default
project_name = service
username = glance
password = openstack
A small edit for [paste_deploy]:
[paste_deploy]
flavor = keystone
Another edit for [glance_store] to say we will use the file system to store
our images:
[glance_store]
stores = file,http
default_store = file
filesystem_store_datadir = /var/lib/glance/images/
Finally, save and exit your editor.
We can populate the database with:
$ sudo -s
# su -s /bin/sh -c "glance-manage db_sync" glance
There is going to be a lot of scary output, but you can ignore it. It is mostly statements saying that database upgrade completed successfully across any older glance versions.
From there, we can restart the glance service to reload the config:
$ sudo systemctl restart glance-api
Verifying that Glance was Installed Correctly
All the OpenStack tutorials seem to use Cirros to their deployments, so we will go see what all the fuss is about.
Source the admin creds since we will need administrative permissions:
$ . admin-openrc
Download the ISO image:
$ wget http://download.cirros-cloud.net/0.4.0/cirros-0.4.0-x86_64-disk.img
Woah! Its only 12.13 megabytes! That’s crazy! Maybe its popular since its small.
We can upload the image to glance with the following command:
$ openstack image create --file cirros-0.4.0-x86_64-disk.img --disk-format \
qcow2 --container-format bare --public cirros
+------------------+------------------------------------------------------+
| Field            | Value                                                |
+------------------+------------------------------------------------------+
| checksum         | 443b7623e27ecf03dc9e01ee93f67afe                     |
| container_format | bare                                                 |
| created_at       | 2020-01-27T04:17:35Z                                 |
| disk_format      | qcow2                                                |
| file             | /v2/images/5ad293f2-1d07-44ae-8a23-19d619885a3b/file |
| id               | 5ad293f2-1d07-44ae-8a23-19d619885a3b                 |
| min_disk         | 0                                                    |
| min_ram          | 0                                                    |
| name             | cirros                                               |
| owner            | a45f9c52c6964c5da7585f5c8a70fdc7                     |
| properties       | os_hash_algo='sha512', os_hash_value='6513f21e44aa3d |
|                  | a349f248188a44bc304a3653a04122d8fb4535423c8e1d14cd6a |
|                  | 153f735bb0982e2161b5b5186106570c17a9e58b64dd39390617 |
|                  | cd5a350f78', os_hidden='False'                       |
| protected        | False                                                |
| schema           | /v2/schemas/image                                    |
| size             | 12716032                                             |
| status           | active                                               |
| tags             |                                                      |
| updated_at       | 2020-01-27T04:17:36Z                                 |
| virtual_size     | None                                                 |
| visibility       | public                                               |
+------------------+------------------------------------------------------+
We can check to see if it was imported correctly with:
$ openstack image list
+--------------------------------------+--------+--------+
| ID                                   | Name   | Status |
+--------------------------------------+--------+--------+
| 5ad293f2-1d07-44ae-8a23-19d619885a3b | cirros | active |
+--------------------------------------+--------+--------+
That’s it! We have Glance installed and configured now.
Installing Placement, the Resource Tracking Service
Placement allows OpenStack services to track resources within themselves, and when seeing how many resource they have left to consume, you can sets traits about those resources, such as if they have any machines with a SSD, or a SR_IOV network capable NIC, for example.
Placement used to be a part of Nova, but it was split out in the Stein release, so we need to go ahead and install it before we can install Nova.
I’m going to be following the Placement Install Documentation
Setting Up the Database On the Controller
Placement has its own database, so let’s go ahead and make one:
$ sudo mysql
MariaDB [(none)]> CREATE DATABASE placement;
Query OK, 1 row affected (0.001 sec)
MariaDB [(none)]> GRANT ALL PRIVILEGES ON placement.* TO 'placement'@'localhost' \
  IDENTIFIED BY 'password123';
Query OK, 0 rows affected (0.000 sec)
MariaDB [(none)]> GRANT ALL PRIVILEGES ON placement.* TO 'placement'@'%' \
  IDENTIFIED BY 'password123';
Query OK, 0 rows affected (0.000 sec)
Creating a User and the Endpoints
Let’s make a user for placement and add it to the admin role:
$ openstack user create --domain default --password-prompt placement
User Password:
Repeat User Password:
+---------------------+----------------------------------+
| Field               | Value                            |
+---------------------+----------------------------------+
| domain_id           | default                          |
| enabled             | True                             |
| id                  | aca47b0613d443118363f40e59b4870d |
| name                | placement                        |
| options             | {}                               |
| password_expires_at | None                             |
+---------------------+----------------------------------+
$ openstack role add --project service --user placement admin
We can then create the Placement service and set up its endpoints:
$ openstack service create --name placement --description "Placement API" placement
+-------------+----------------------------------+
| Field       | Value                            |
+-------------+----------------------------------+
| description | Placement API                    |
| enabled     | True                             |
| id          | b1c3c8a8441d456a9c8ac34c668e39f6 |
| name        | placement                        |
| type        | placement                        |
+-------------+----------------------------------+
Making the public, internal and admin endpoints:
$ openstack endpoint create --region RegionOne placement public http://controller:8778
+--------------+----------------------------------+
| Field        | Value                            |
+--------------+----------------------------------+
| enabled      | True                             |
| id           | b018157a7c2b46da8aa8d99d2477cc54 |
| interface    | public                           |
| region       | RegionOne                        |
| region_id    | RegionOne                        |
| service_id   | b1c3c8a8441d456a9c8ac34c668e39f6 |
| service_name | placement                        |
| service_type | placement                        |
| url          | http://controller:8778           |
+--------------+----------------------------------+
$ openstack endpoint create --region RegionOne placement internal http://controller:8778
+--------------+----------------------------------+
| Field        | Value                            |
+--------------+----------------------------------+
| enabled      | True                             |
| id           | 4aa4ff0b45fc48ae8f456fcf40ed7e8e |
| interface    | internal                         |
| region       | RegionOne                        |
| region_id    | RegionOne                        |
| service_id   | b1c3c8a8441d456a9c8ac34c668e39f6 |
| service_name | placement                        |
| service_type | placement                        |
| url          | http://controller:8778           |
+--------------+----------------------------------+
$ openstack endpoint create --region RegionOne placement admin http://controller:8778
+--------------+----------------------------------+
| Field        | Value                            |
+--------------+----------------------------------+
| enabled      | True                             |
| id           | d475a4976eb34f6d9619dc72e4591736 |
| interface    | admin                            |
| region       | RegionOne                        |
| region_id    | RegionOne                        |
| service_id   | b1c3c8a8441d456a9c8ac34c668e39f6 |
| service_name | placement                        |
| service_type | placement                        |
| url          | http://controller:8778           |
+--------------+----------------------------------+
Installing and Configuring the Placement Packages
We can install placement with:
$ sudo apt install placement-api
From there, we can enable access to its database by editing its configuration file. Comment out the sqlite connection and add our mysql connection:
$ sudo vim /etc/placement/placement.conf
[placement_database]
#connection = sqlite:////var/lib/placement/placement.sqlite
connection = mysql+pymysql://placement:password123@controller/placement
Next head to the [api] and [keystone_authentication] sections and add the
following:
[api]
auth_strategy = keystone

[keystone_authtoken]
auth_url = http://controller:5000/v3
memcached_servers = controller:11211
auth_type = password
project_domain_name = Default
user_domain_name = Default
project_name = service
username = placement
password = openstack
Note the password is the same as the one you used when you created the placement user earlier.
From there, we can populate the database with:
$ sudo -s
# su -s /bin/sh -c "placement-manage db sync" placement
# exit
$ sudo systemctl restart apache2
Verify that Placement Works
The osc-placement plugin allows us to query the placement API for its internal data, so let’s install it and give it a go:
$ sudo apt install python3-osc-placement
Once that is done, we can query the placement API with:
$ openstack --os-placement-api-version 1.2 resource class list --sort-column name
+----------------------------+
| name                       |
+----------------------------+
| DISK_GB                    |
| FPGA                       |
| IPV4_ADDRESS               |
| MEMORY_MB                  |
| MEM_ENCRYPTION_CONTEXT     |
| NET_BW_EGR_KILOBIT_PER_SEC |
| NET_BW_IGR_KILOBIT_PER_SEC |
| NUMA_CORE                  |
| NUMA_MEMORY_MB             |
| NUMA_SOCKET                |
| NUMA_THREAD                |
| PCI_DEVICE                 |
| PCPU                       |
| PGPU                       |
| SRIOV_NET_VF               |
| VCPU                       |
| VGPU                       |
| VGPU_DISPLAY_HEAD          |
+----------------------------+
It seems like it is working. Great!
Installing Nova, the Compute Service
Nova is the compute service for OpenStack. It is responsible for taking requests to provision a virtual machine, deciding on what compute host the instance will be launched by looking at resources available in the pool, and interacting with the underlying hypervisor to create and manage the virtual machine.
Nova supports many different hypervisors, and in this deployment, we will have a single compute node which uses QEMU / KVM.
I’m going to be following the Nova Controller Install Documentation.
Setting up the Databases, Services and Endpoints for Nova
We need to configure Nova services on the controller and the compute node, so we will begin by setting up some databases.
On the controller, open up the mysql monitor, and make databases for nova_api,
nova and nova_cell0.
$ sudo mysql
MariaDB [(none)]> CREATE DATABASE nova_api;
Query OK, 1 row affected (0.001 sec)

MariaDB [(none)]> CREATE DATABASE nova;
Query OK, 1 row affected (0.000 sec)

MariaDB [(none)]> CREATE DATABASE nova_cell0;
Query OK, 1 row affected (0.000 sec)
As usual, we also need to grant some privileges:
MariaDB [(none)]> GRANT ALL PRIVILEGES ON nova_api.* TO 'nova'@'localhost' \
  IDENTIFIED BY 'password123';
MariaDB [(none)]> GRANT ALL PRIVILEGES ON nova_api.* TO 'nova'@'%' \
  IDENTIFIED BY 'password123';

MariaDB [(none)]> GRANT ALL PRIVILEGES ON nova.* TO 'nova'@'localhost' \
  IDENTIFIED BY 'password123';
MariaDB [(none)]> GRANT ALL PRIVILEGES ON nova.* TO 'nova'@'%' \
  IDENTIFIED BY 'password123';

MariaDB [(none)]> GRANT ALL PRIVILEGES ON nova_cell0.* TO 'nova'@'localhost' \
  IDENTIFIED BY 'password123';
MariaDB [(none)]> GRANT ALL PRIVILEGES ON nova_cell0.* TO 'nova'@'%' \
  IDENTIFIED BY 'password123';
Next, we need to create a nova user and add it to the admin role:
$ openstack user create --domain default --password-prompt nova
User Password:
Repeat User Password:
+---------------------+----------------------------------+
| Field               | Value                            |
+---------------------+----------------------------------+
| domain_id           | default                          |
| enabled             | True                             |
| id                  | d6f43252051e43fe9cf7dbcc9b538751 |
| name                | nova                             |
| options             | {}                               |
| password_expires_at | None                             |
+---------------------+----------------------------------+
$ openstack role add --project service --user nova admin
From there we need to create the Nova service, and set up its endpoints:
$ openstack service create --name nova --description "OpenStack Compute" compute
+-------------+----------------------------------+
| Field       | Value                            |
+-------------+----------------------------------+
| description | OpenStack Compute                |
| enabled     | True                             |
| id          | 2364a25accfc4f8e9925009b152262f9 |
| name        | nova                             |
| type        | compute                          |
+-------------+----------------------------------+
Public, internal and admin endpoints:
$ openstack endpoint create --region RegionOne compute public http://controller:8774/v2.1
+--------------+----------------------------------+
| Field        | Value                            |
+--------------+----------------------------------+
| enabled      | True                             |
| id           | ed31df66c2ce45c981070395bf32eed4 |
| interface    | public                           |
| region       | RegionOne                        |
| region_id    | RegionOne                        |
| service_id   | 2364a25accfc4f8e9925009b152262f9 |
| service_name | nova                             |
| service_type | compute                          |
| url          | http://controller:8774/v2.1      |
+--------------+----------------------------------+
$ openstack endpoint create --region RegionOne compute internal http://controller:8774/v2.1
+--------------+----------------------------------+
| Field        | Value                            |
+--------------+----------------------------------+
| enabled      | True                             |
| id           | 2429b84a9157442688867c80863373f9 |
| interface    | internal                         |
| region       | RegionOne                        |
| region_id    | RegionOne                        |
| service_id   | 2364a25accfc4f8e9925009b152262f9 |
| service_name | nova                             |
| service_type | compute                          |
| url          | http://controller:8774/v2.1      |
+--------------+----------------------------------+
$ openstack endpoint create --region RegionOne compute admin http://controller:8774/v2.1
+--------------+----------------------------------+
| Field        | Value                            |
+--------------+----------------------------------+
| enabled      | True                             |
| id           | 27d6020c0c49436480febef5273a5b37 |
| interface    | admin                            |
| region       | RegionOne                        |
| region_id    | RegionOne                        |
| service_id   | 2364a25accfc4f8e9925009b152262f9 |
| service_name | nova                             |
| service_type | compute                          |
| url          | http://controller:8774/v2.1      |
+--------------+----------------------------------+
Installing Nova on the Controller
Time to actually get some packages installed to the controller:
$ sudo apt install nova-api nova-conductor nova-novncproxy nova-scheduler
From there, we will need to edit the configuration file and add database creds:
$ sudo vim /etc/nova/nova.conf
[api_database]
#connection = sqlite:////var/lib/nova/nova_api.sqlite
connection = mysql+pymysql://nova:password123@controller/nova_api

[database]
#connection = sqlite:////var/lib/nova/nova.sqlite
connection = mysql+pymysql://nova:password123@controller/nova
Then in the [DEFAULT] section, add:
[DEFAULT]
...
transport_url = rabbit://openstack:password123@controller:5672/
my_ip = 10.0.0.11
use_neutron = true
firewall_driver = nova.virt.firewall.NoopFirewallDriver
This sets rabbitmq as our messaging queue, and enables Neutron for networking.
Let’s set up Keystone authentication now:
[api]
auth_strategy = keystone

[keystone_authtoken]
www_authenticate_uri = http://controller:5000/
auth_url = http://controller:5000/
memcached_servers = controller:11211
auth_type = password
project_domain_name = Default
user_domain_name = Default
project_name = service
username = nova
password = openstack
While we are at it, set up Placement authentication:
[placement]
region_name = RegionOne
project_domain_name = Default
project_name = service
auth_type = password
user_domain_name = Default
auth_url = http://controller:5000/v3
username = placement
password = openstack
Only some more small changes left now. Lets configure the VNC proxy and glance:
[vnc]
enabled = true
server_listen = $my_ip
server_proxyclient_address = $my_ip

[glance]
api_servers = http://controller:9292

[oslo_concurrency]
lock_path = /var/lib/nova/tmp
Finally, we can populate the database with:
$ sudo -s
# su -s /bin/sh -c "nova-manage api_db sync" nova
# su -s /bin/sh -c "nova-manage cell_v2 map_cell0" nova
# su -s /bin/sh -c "nova-manage cell_v2 create_cell --name=cell1 --verbose" nova
95c6eb23-8e22-43d0-b833-2c9c1758f4a6
# su -s /bin/sh -c "nova-manage db sync" nova
We can see if the two nova cell0 and cell1 cells are registered:
# su -s /bin/sh -c "nova-manage cell_v2 list_cells" nova
+-------+--------------------------------------+------------------------------------------+-------------------------------------------------+----------+
|  Name |                 UUID                 |              Transport URL               |               Database Connection               | Disabled |
+-------+--------------------------------------+------------------------------------------+-------------------------------------------------+----------+
| cell0 | 00000000-0000-0000-0000-000000000000 |                  none:/                  | mysql+pymysql://nova:****@controller/nova_cell0 |  False   |
| cell1 | 95c6eb23-8e22-43d0-b833-2c9c1758f4a6 | rabbit://openstack:****@controller:5672/ |    mysql+pymysql://nova:****@controller/nova    |  False   |
+-------+--------------------------------------+------------------------------------------+-------------------------------------------------+----------+
If everything went smoothly, We can finalise the install by restarting all the nova services:
$ sudo systemctl restart nova-api
$ sudo systemctl restart nova-scheduler
$ sudo systemctl restart nova-conductor
$ sudo systemctl restart nova-novncproxy
Installing Nova to the Compute Host
Now we have Nova all set up on the controller, we need to get things running on the compute host.
I’m going to be following the Nova Compute Documentation.
We can install the nova-compute package with:
$ sudo apt install nova-compute
After that, we will need to edit the nova configuration file:
$ sudo vim /etc/nova/nova.conf
In the [DEFAULT] section, add rabbitmq creds as well as some other options
for Neutron networking:
[DEFAULT]
transport_url = rabbit://openstack:password123@controller
my_ip = 10.0.0.21
use_neutron = true
firewall_driver = nova.virt.firewall.NoopFirewallDriver
Let’s set up Keystone authentication:
[api]
auth_strategy = keystone

[keystone_authtoken]
www_authenticate_uri = http://controller:5000/
auth_url = http://controller:5000/
memcached_servers = controller:11211
auth_type = password
project_domain_name = Default
user_domain_name = Default
project_name = service
username = nova
password = openstack
While we are at it, Placement authentication:
[placement]
region_name = RegionOne
project_domain_name = Default
project_name = service
auth_type = password
user_domain_name = Default
auth_url = http://controller:5000/v3
username = placement
password = openstack
Next we can configure Glance, and the lockfile:
[glance]
api_servers = http://controller:9292

[oslo_concurrency]
lock_path = /var/lib/nova/tmp
Finally, we need configure the VNC proxy:
[vnc]
enabled = true
server_listen = 0.0.0.0
server_proxyclient_address = $my_ip
novncproxy_base_url = http://controller:6080/vnc_auto.html
For some virtual machines, we need to determine if it supports the virtualisation extensions shipped in modern processors.
If you run:
$ egrep -c '(vmx|svm)' /proc/cpuinfo
1
You can see if the compute host supports these extensions. Mine returns 1, which
means I am either lucky or I have a bug, but anyway, my compute machine supports
hardware acceleration. If you get value of zero, you will need to add the
following to /etc/nova/nova-compute.conf:
$ sudo vim /etc/nova/nova-compute.conf
[libvirt]
virt_type = qemu
I’m not doing this on my install, since my compute machine supports vmx.
When we are all done, we can finalise the install by restarting the nova-compute service:
$ sudo systemctl restart nova-compute
Discovering the Compute Node and Adding it to the Controller
We are nearly done installing Nova, I promise. We need to go back to the controller and discover the newly created compute host.
We need to be an admin for these tasks, so source the creds:
$ . admin-openrc
We can ensure we can see the compute host and its nova-compute service by running:
$ openstack compute service list
+----+----------------+------------+----------+---------+-------+----------------------------+
| ID | Binary         | Host       | Zone     | Status  | State | Updated At                 |
+----+----------------+------------+----------+---------+-------+----------------------------+
|  3 | nova-scheduler | controller | internal | enabled | up    | 2020-01-28T00:22:25.000000 |
|  4 | nova-conductor | controller | internal | enabled | up    | 2020-01-28T00:22:30.000000 |
|  5 | nova-compute   | compute    | nova     | enabled | up    | 2020-01-28T00:22:32.000000 |
+----+----------------+------------+----------+---------+-------+----------------------------+
We see the compute host, next to the controller host. Great. Let’s enlist this nova-compute service.
# su -s /bin/sh -c "nova-manage cell_v2 discover_hosts --verbose" nova
Found 2 cell mappings.
Skipping cell0 since it does not contain hosts.
Getting computes from cell 'cell1': 95c6eb23-8e22-43d0-b833-2c9c1758f4a6
Checking host mapping for compute host 'compute': 3098b6f9-5ea0-4085-838e-a269358bf8fb
Creating host mapping for compute host 'compute': 3098b6f9-5ea0-4085-838e-a269358bf8fb
Found 1 unmapped computes in cell: 95c6eb23-8e22-43d0-b833-2c9c1758f4a6
Each time we want to add a compute host, we need to run the above command.
We can also see a list of all currently installed and configured services by querying the catalogue:
$ openstack catalog list
+-----------+-----------+-----------------------------------------+
| Name      | Type      | Endpoints                               |
+-----------+-----------+-----------------------------------------+
| glance    | image     | RegionOne                               |
|           |           |   public: http://controller:9292        |
|           |           | RegionOne                               |
|           |           |   admin: http://controller:9292         |
|           |           | RegionOne                               |
|           |           |   internal: http://controller:9292      |
|           |           |                                         |
| nova      | compute   | RegionOne                               |
|           |           |   internal: http://controller:8774/v2.1 |
|           |           | RegionOne                               |
|           |           |   admin: http://controller:8774/v2.1    |
|           |           | RegionOne                               |
|           |           |   public: http://controller:8774/v2.1   |
|           |           |                                         |
| placement | placement | RegionOne                               |
|           |           |   internal: http://controller:8778      |
|           |           | RegionOne                               |
|           |           |   public: http://controller:8778        |
|           |           | RegionOne                               |
|           |           |   admin: http://controller:8778         |
|           |           |                                         |
| keystone  | identity  | RegionOne                               |
|           |           |   public: http://controller:5000/v3/    |
|           |           | RegionOne                               |
|           |           |   internal: http://controller:5000/v3/  |
|           |           | RegionOne                               |
|           |           |   admin: http://controller:5000/v3/     |
|           |           |                                         |
+-----------+-----------+-----------------------------------------+
We currently have keystone, glance, placement and nova configured, and we can see their endpoints.
Installing Neutron, the Networking Service
Neutron is the networking service for OpenStack. Neutron leverages built in Linux networking functions through plugins and sub-services to provide virtual networking to instances created by Nova.
I’m going to be following the Installation Documentation for Ubuntu.
Setting up the Database and Service Accounts
For each OpenStack service we set up, we have to create a database, grant privileges, and create service accounts. Neutron is no different. Head to the controller node, and run:
$ sudo mysql
MariaDB [(none)]> CREATE DATABASE neutron;
Query OK, 1 row affected (0.001 sec)
This makes the Neturon database. Let’s set up privileges:
MariaDB [(none)]> GRANT ALL PRIVILEGES ON neutron.* TO 'neutron'@'localhost' \
  IDENTIFIED BY 'password123';
Query OK, 1 row affected (0.001 sec)
MariaDB [(none)]> GRANT ALL PRIVILEGES ON neutron.* TO 'neutron'@'%' \
  IDENTIFIED BY 'password123';
Query OK, 1 row affected (0.001 sec)
From there, lets create some users and to set up the service:
$ . admin-openrc
$ openstack user create --domain default --password-prompt neutron
User Password:
Repeat User Password:
+---------------------+----------------------------------+
| Field               | Value                            |
+---------------------+----------------------------------+
| domain_id           | default                          |
| enabled             | True                             |
| id                  | ab6782079b3146eaa05d37e65e23cb43 |
| name                | neutron                          |
| options             | {}                               |
| password_expires_at | None                             |
+---------------------+----------------------------------+
$ openstack role add --project service --user neutron admin
Let’s set up the service and the endpoints:
$ openstack service create --name neutron --description "OpenStack Networking" network
+-------------+----------------------------------+
| Field       | Value                            |
+-------------+----------------------------------+
| description | OpenStack Networking             |
| enabled     | True                             |
| id          | 791b51052a5546a18f34b0d88b1ad55f |
| name        | neutron                          |
| type        | network                          |
+-------------+----------------------------------+
For the endpoints:
$ openstack endpoint create --region RegionOne network public http://controller:9696
+--------------+----------------------------------+
| Field        | Value                            |
+--------------+----------------------------------+
| enabled      | True                             |
| id           | 02eaa3bda2c14776b78c219869e21c9f |
| interface    | public                           |
| region       | RegionOne                        |
| region_id    | RegionOne                        |
| service_id   | 791b51052a5546a18f34b0d88b1ad55f |
| service_name | neutron                          |
| service_type | network                          |
| url          | http://controller:9696           |
+--------------+----------------------------------+
$ openstack endpoint create --region RegionOne network internal http://controller:9696
+--------------+----------------------------------+
| Field        | Value                            |
+--------------+----------------------------------+
| enabled      | True                             |
| id           | 3b676e8beaaa4a5cbf90a4fc2fe4690f |
| interface    | internal                         |
| region       | RegionOne                        |
| region_id    | RegionOne                        |
| service_id   | 791b51052a5546a18f34b0d88b1ad55f |
| service_name | neutron                          |
| service_type | network                          |
| url          | http://controller:9696           |
+--------------+----------------------------------+
$ openstack endpoint create --region RegionOne network admin http://controller:9696
+--------------+----------------------------------+
| Field        | Value                            |
+--------------+----------------------------------+
| enabled      | True                             |
| id           | dcd64f08a346410aa1af89fdd3405406 |
| interface    | admin                            |
| region       | RegionOne                        |
| region_id    | RegionOne                        |
| service_id   | 791b51052a5546a18f34b0d88b1ad55f |
| service_name | neutron                          |
| service_type | network                          |
| url          | http://controller:9696           |
+--------------+----------------------------------+
Installing Neutron to the Controller
Let’s get some packages installed:
$ sudo apt install neutron-server neutron-plugin-ml2 neutron-linuxbridge-agent \
neutron-dhcp-agent neutron-metadata-agent
Once everything is installed, we can edit the Neutron configuration file to add database creds and change some basic settings.
$ sudo vim /etc/neutron/neutron.conf
[database]
#connection = sqlite:////var/lib/neutron/neutron.sqlite
connection = mysql+pymysql://neutron:password123@controller/neutron
Add the rabbitmq settings, and we also need to define the authentication scheme:
[DEFAULT]
core_plugin = ml2
service_plugins =
transport_url = rabbit://openstack:password123@controller
auth_strategy = keystone
From there, we need to set up Keystone accounts:
[keystone_authtoken]
www_authenticate_uri = http://controller:5000
auth_url = http://controller:5000
memcached_servers = controller:11211
auth_type = password
project_domain_name = default
user_domain_name = default
project_name = service
username = neutron
password = openstack
As always, make sure to use the correct password for the neutron account.
Since we will be using Neutron with Nova, we will configure Neutron to notify Nova on any port status or configuration changes:
[DEFAULT]
# ...
notify_nova_on_port_status_changes = true
notify_nova_on_port_data_changes = true
Now, lets add the Nova account information in:
[nova]
auth_url = http://controller:5000
auth_type = password
project_domain_name = default
user_domain_name = default
region_name = RegionOne
project_name = service
username = nova
password = openstack
We also need to set a lockfile path:
[oslo_concurrency]
lock_path = /var/lib/neutron/tmp
Configuring the ML2 Networking Plugin
Our deployment will use the Modular Layer 2 plugin, since it uses underlying Linux bridges to make layer 2 devices, such as bridges and switches in the virtual network for instances.
Let’s edit some configuration:
$ sudo vim /etc/neutron/plugins/ml2/ml2_conf.ini

[ml2]
type_drivers = flat,vlan
tenant_network_types =
mechanism_drivers = linuxbridge
extension_drivers = port_security

[ml2_type_flat]
flat_networks = provider

[securitygroup]
enable_ipset = true
This sets things up such that the provider network is a flat network provided by Linux bridges, and tenants cannot create their own networks.
Configuring the Linux Bridge Agent
When configuring the Linux bridge agent, we need to know what interface our
provider network is on. So go back to /etc/netplan/50-cloud-init.yaml, and
we can see that our provider network is enp3s0, since it has the 203.0.113.11
IP address.
        enp3s0:
            dhcp4: true
            addresses: [203.0.113.11/24]
Great. From there, lets configure the bridge agent:
[linux_bridge]
physical_interface_mappings = provider:enp3s0

[vxlan]
enable_vxlan = false

[securitygroup]
enable_security_group = true
firewall_driver = neutron.agent.linux.iptables_firewall.IptablesFirewallDriver
We also need to check the br_netfilter kernel module is loaded, since that
is what implements bridges:
$ lsmod | grep br_netfilter
br_netfilter           28672  0
bridge                176128  1 br_netfilter
br_netfilter is already loaded for me.
We also need to make sure the following sysctl values are set, but they will be on any Ubuntu release:
$ sysctl net.bridge.bridge-nf-call-iptables
net.bridge.bridge-nf-call-iptables = 1
$ sysctl net.bridge.bridge-nf-call-ip6tables
net.bridge.bridge-nf-call-ip6tables = 1
Configuring the DHCP Agent
We want our virtual network to provide a DHCP lease to our instances, so we need to configure the DHCP agent:
$ sudo vim /etc/neutron/dhcp_agent.ini
[DEFAULT]
interface_driver = linuxbridge
dhcp_driver = neutron.agent.linux.dhcp.Dnsmasq
enable_isolated_metadata = true
Configuring the Metadata Agent
The metadata agent is quite an important agent - it provides run time
configuration information to instances, things that can be consumed by services
like cloud-init, such as SSH keys and autostart scripts.
The metadata agent requires a shared secret, so we can generate one with openssl:
$ openssl rand -hex 10
9de15dd7b515ab242d20
This generates us a 10 byte long random secret, which we can use in our configuration:
$ sudo vim /etc/neutron/metadata_agent.ini
[DEFAULT]
nova_metadata_host = controller
metadata_proxy_shared_secret = 9de15dd7b515ab242d20
Configure Nova to use Neutron for Networking
Time to add some creds to Nova so it can communicate with Neutron:
$ sudo vim /etc/nova/nova.conf

[neutron]
auth_url = http://controller:5000
auth_type = password
project_domain_name = default
user_domain_name = default
region_name = RegionOne
project_name = service
username = neutron
password = openstack
service_metadata_proxy = true
metadata_proxy_shared_secret = 9de15dd7b515ab242d20
Finalise by Populating Database and Restarting Services
We can populate the database on the controller with:
$ sudo -s
# su -s /bin/sh -c "neutron-db-manage --config-file /etc/neutron/neutron.conf \
  --config-file /etc/neutron/plugins/ml2/ml2_conf.ini upgrade head" neutron
Restart the Nova service:
$ sudo systemctl restart nova-api
Restart the Neutron services:
$ sudo systemctl restart neutron-server
$ sudo systemctl restart neutron-linuxbridge-agent
$ sudo systemctl restart neutron-dhcp-agent
$ sudo systemctl restart neutron-metadata-agent
Installing Neutron to the Compute Machine
Most of the heavy lifting when installing Neutron was setting up the controller, and like nova-compute, installing neutron to the compute machine seems straightforward.
Let’s install the package:
$ sudo apt install neutron-linuxbridge-agent
And start some configuration. Note, we need to comment out the database section since compute nodes do not directly connect to the Neutron database.
$ sudo vim /etc/neutron/neutron.conf
[database]
#connection = sqlite:////var/lib/neutron/neutron.sqlite

[DEFAULT]
core_plugin = ml2
transport_url = rabbit://openstack:password123@controller
auth_strategy = keystone
Let’s set up Keystone:
[keystone_authtoken]
www_authenticate_uri = http://controller:5000
auth_url = http://controller:5000
memcached_servers = controller:11211
auth_type = password
project_domain_name = default
user_domain_name = default
project_name = service
username = neutron
password = openstack
And configure the lock path:
[oslo_concurrency]
lock_path = /var/lib/neutron/tmp
Configure the Linux Bridge Agent in the Compute Machine
Similar to the controller, we need to tell Neutron the network interface we
are using. Again, check /etc/netplan-50-cloud-init.yaml:
        enp3s0:
            dhcp4: true
            addresses: [203.0.113.21/24]
Mine says enp3s0 like last time.
[linux_bridge]
physical_interface_mappings = provider:enp3s0

[vxlan]
enable_vxlan = false

[securitygroup]
enable_security_group = true
firewall_driver = neutron.agent.linux.iptables_firewall.IptablesFirewallDriver
Again, we need to ensure the br_netfilter module is loaded:
$ lsmod | grep "br_netfilter"
br_netfilter           28672  0
bridge                176128  1 br_netfilter
And that the following sysctl entries are set to 1:
$ sysctl net.bridge.bridge-nf-call-iptables
net.bridge.bridge-nf-call-iptables = 1
$ sysctl net.bridge.bridge-nf-call-ip6tables
net.bridge.bridge-nf-call-ip6tables = 1
Configure Nova to use Neutron for Networking on the Compute Machine
Some quick config to link Nova up with Neutron:
$ sudo vim /etc/nova/nova.conf

[neutron]
auth_url = http://controller:5000
auth_type = password
project_domain_name = default
user_domain_name = default
region_name = RegionOne
project_name = service
username = neutron
password = openstack
Restart Services
We need to restart both the Nova and Neutron services:
$ sudo systemctl restart nova-compute
$ sudo systemctl restart neutron-linuxbridge-agent
Verifying that Neutron was Installed Successfully
We can do a quick check to check the status of the Neutron services. Head back to the controller, and source the admin creds. From there run:
$ . admin-openrc
$ openstack network agent list
+--------------------------------------+--------------------+------------+-------------------+-------+-------+---------------------------+
| ID                                   | Agent Type         | Host       | Availability Zone | Alive | State | Binary                    |
+--------------------------------------+--------------------+------------+-------------------+-------+-------+---------------------------+
| 64f8361f-8948-4eec-9950-bf825923f250 | Metadata agent     | controller | None              | :-)   | UP    | neutron-metadata-agent    |
| 898b76b2-da96-4ae3-838e-7aaf2d20a10b | Linux bridge agent | controller | None              | :-)   | UP    | neutron-linuxbridge-agent |
| 97e09a16-ba6a-457e-9b35-866a36b4db52 | DHCP agent         | controller | nova              | :-)   | UP    | neutron-dhcp-agent        |
| e49601df-6481-4e25-aee6-58256f4eae0d | Linux bridge agent | compute    | None              | :-)   | UP    | neutron-linuxbridge-agent |
+--------------------------------------+--------------------+------------+-------------------+-------+-------+---------------------------+
We can see our Neutron services listed, and alive. Great!
Installing Horizon, the Dashboard Service
When most end users interact with OpenStack, they think of Horizon, which is the graphical webapp that users can use to interact with their OpenStack cluster.
Horizon pulls information in from other sources, and doesn’t have its own database or other persistence mechanisms, so we can install it, configure it and go.
I’m going to be following the Horizon Install Documentation
We are going to install Horizon to the controller.
The package is a simple apt install:
$ sudo apt install openstack-dashboard
From there, we can do some configuration:
$ sudo vim /etc/openstack-dashboard/local_settings.py

OPENSTACK_HOST = "controller"
OPENSTACK_KEYSTONE_URL = "http://%s:5000/v3" % OPENSTACK_HOST
From there we need to allow any host to connect, note, leave the ALLOWED_HOSTS
in the Ubuntu section intact. At the commented one out at the top of the file,
make a new entry with:
#ALLOWED_HOSTS = ['horizon.example.com', ]
ALLOWED_HOSTS = ['*', ]
You probably don’t want to do that for a production cluster, but we are just making a toy cluster to learn how OpenStack works.
Onward to configuring memcached:
SESSION_ENGINE = 'django.contrib.sessions.backends.cache'

CACHES = {
    'default': {
        'BACKEND': 'django.core.cache.backends.memcached.MemcachedCache',
        'LOCATION': 'controller:11211',
    },
}
The main changes here is adding the “controller” location, and setting the
SESSION_ENGINE.
Back to some more changes:
OPENSTACK_API_VERSIONS = {
    "identity": 3,
    "image": 2,
    "volume": 3,
}

OPENSTACK_KEYSTONE_DEFAULT_DOMAIN = "Default"

OPENSTACK_KEYSTONE_DEFAULT_ROLE = "user"
Since we configured a provider network and disallow users from creating their own L3 network topologies, we need to disable L3 networking services:
OPENSTACK_NEUTRON_NETWORK = {
    'enable_auto_allocated_network': False,
    'enable_distributed_router': False,
    'enable_fip_topology_check': False,
    'enable_ha_router': False,
    'enable_ipv6': False,
    # TODO(amotoki): Drop OPENSTACK_NEUTRON_NETWORK completely from here.
    # enable_quotas has the different default value here.
    'enable_quotas': False,
    'enable_rbac_policy': True,
    'enable_router': False,
    'enable_lb': False,
    'enable_firewall': False,
    'enable_vpn': False,
}
From there we have one small change to apache2:
$ /etc/apache2/conf-available/openstack-dashboard.conf
WSGIApplicationGroup %{GLOBAL}
In my case, the line was already present and I did not need to do anything.
To get Horizon up and running, we just need to restart the service:
$ sudo systemctl restart apache2
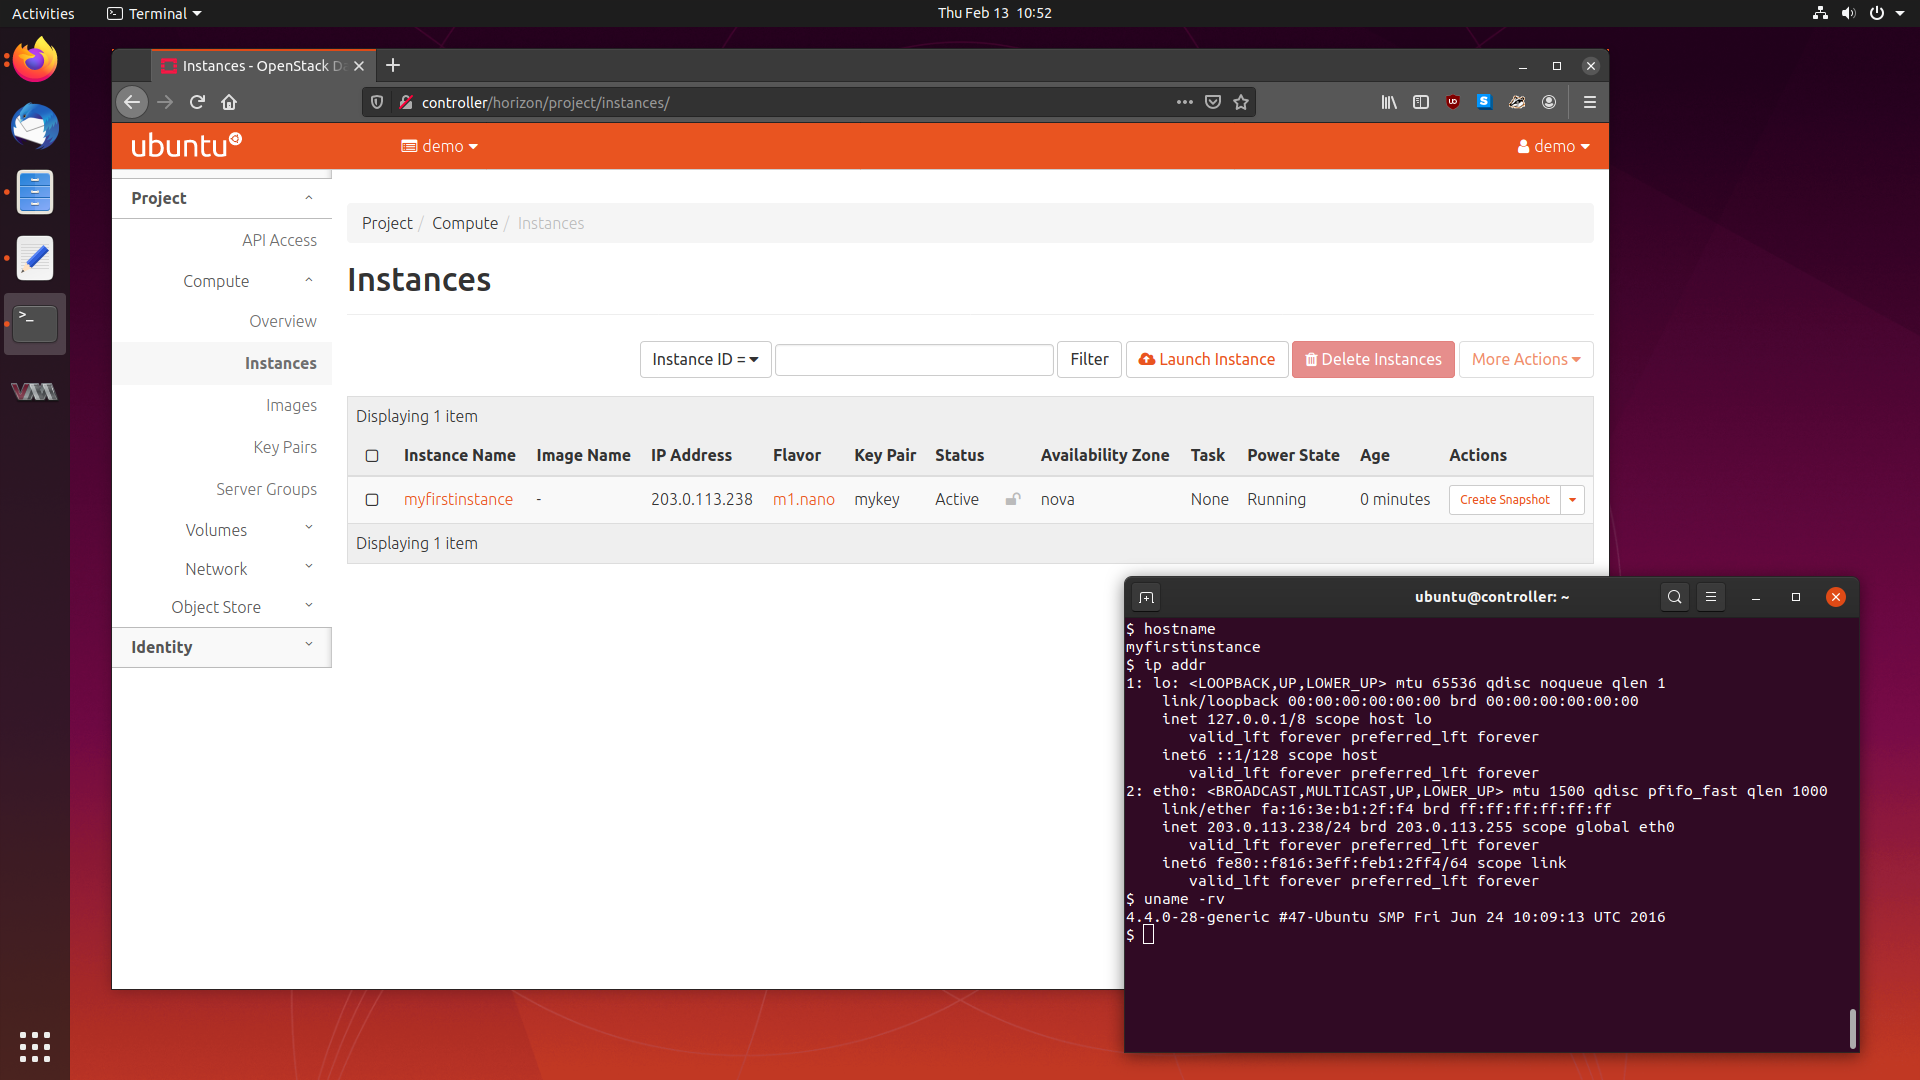
Let’s test Horizon out. Open up a web browser, and head to: http://10.0.0.11/horizon. Hopefully you see:
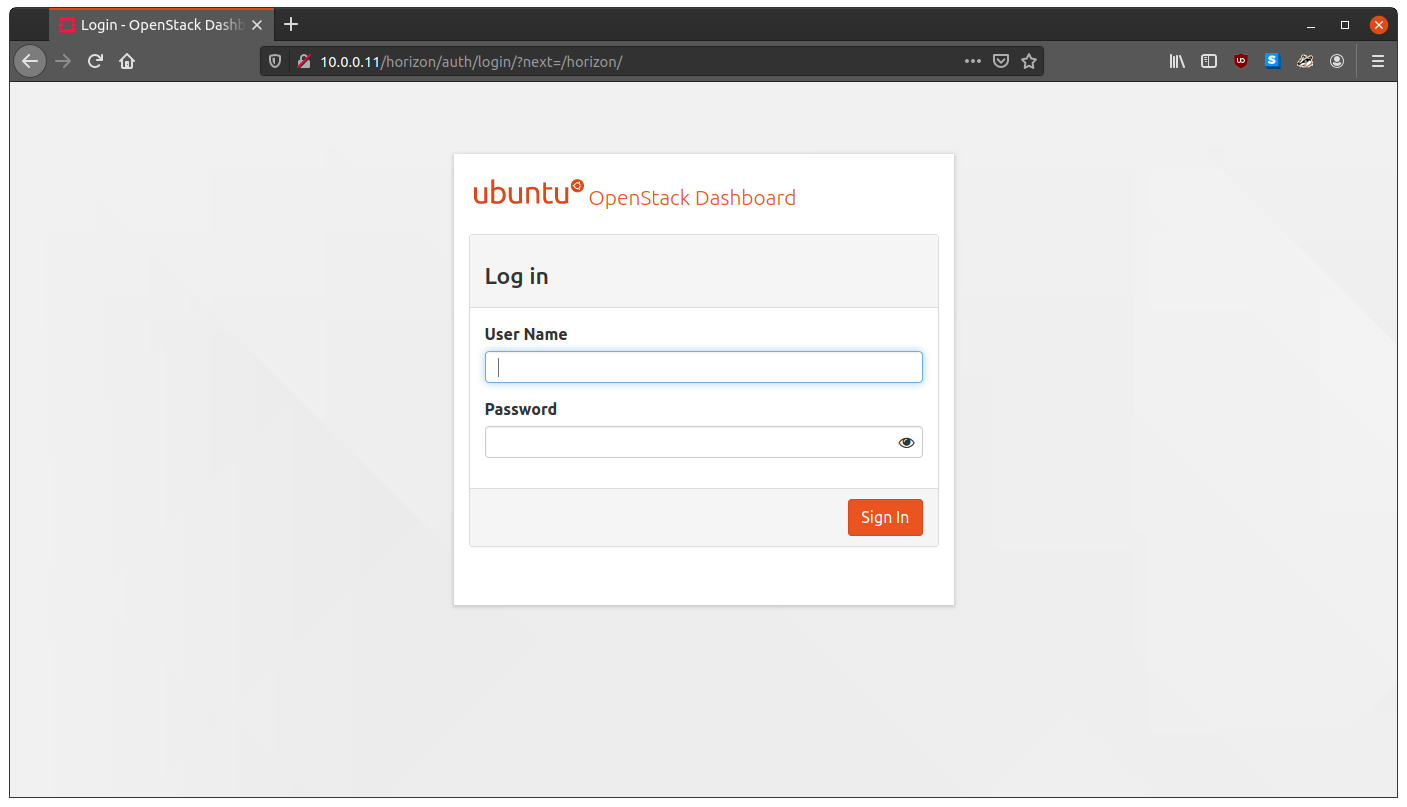
Woohoo! Now we are getting places. Do you like that branded dashboard. I do.
Lets login. Log in with the admin user, aka admin and openstack.
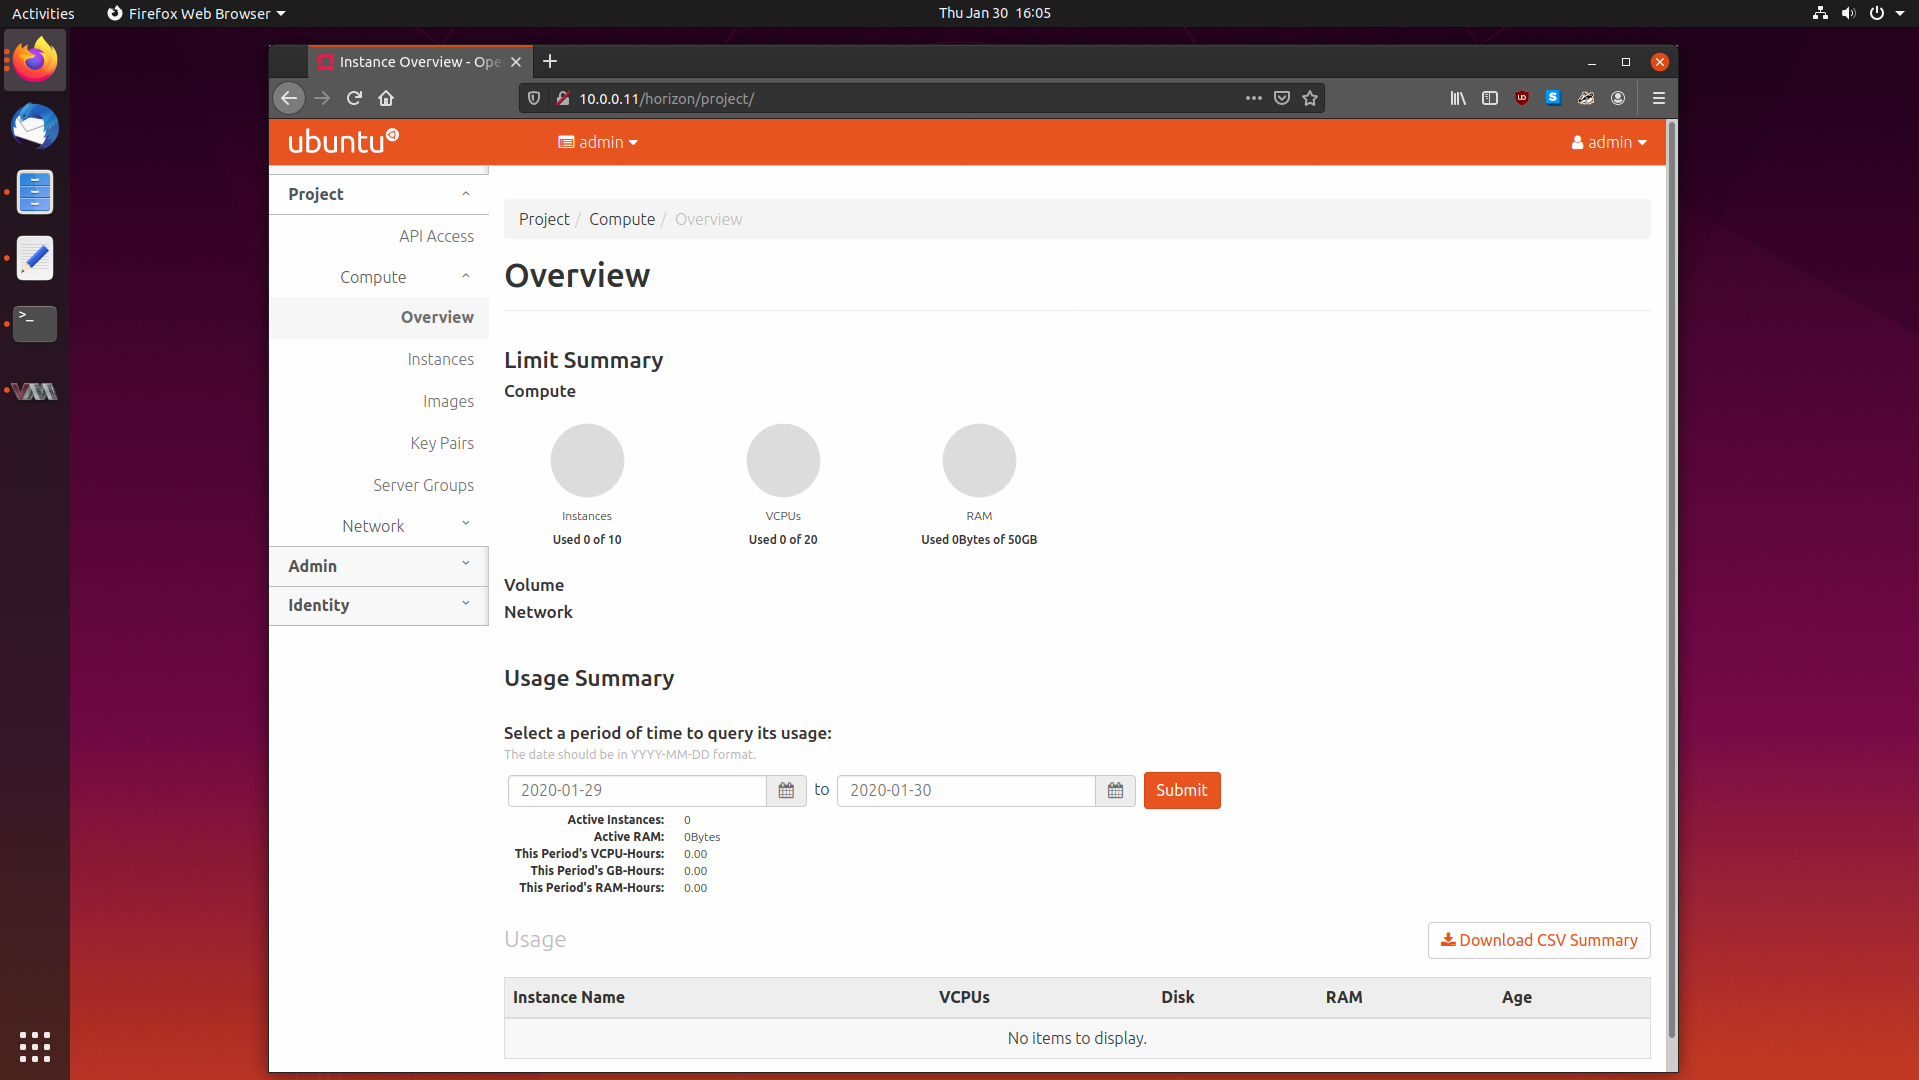
Isn’t that a sight for sore eyes? Soon we will be rewarded by being able to launch our first instance from Horizon. Only a few more services to go now.
Installing Cinder, the Block Storage Service
Cinder is OpenStack’s block storage service, and it offers persistent block storage devices for virtual machines. It implements a simple scheduler to determine which storage node a particular block storage request should be fulfilled on, much like nova-scheduler.
I’m going to be following the Cinder Install Documentation.
Setting Up Cinder Databases and Services on the Controller
We need to establish the Cinder database and create the OpenStack service definitions on the controller.
Let’s make the database and grant privileges:
$ sudo mysql
MariaDB [(none)]> CREATE DATABASE cinder;
Query OK, 1 row affected (0.013 sec)
MariaDB [(none)]> GRANT ALL PRIVILEGES ON cinder.* TO 'cinder'@'localhost' \
  IDENTIFIED BY 'password123';
Query OK, 0 rows affected (0.001 sec)
MariaDB [(none)]> GRANT ALL PRIVILEGES ON cinder.* TO 'cinder'@'%' \
  IDENTIFIED BY 'password123';
Query OK, 0 rows affected (0.001 sec)
From there, create a user and add it to the service role:
$ openstack user create --domain default --password-prompt cinder
User Password:
Repeat User Password:
+---------------------+----------------------------------+
| Field               | Value                            |
+---------------------+----------------------------------+
| domain_id           | default                          |
| enabled             | True                             |
| id                  | c3829e1a25074642bd1602bfbf2e5ec3 |
| name                | cinder                           |
| options             | {}                               |
| password_expires_at | None                             |
+---------------------+----------------------------------+
$ openstack role add --project service --user cinder admin
Now we can create the service. Note that we are actually going to create two services, one for Cinder API v2, and one for v3. Not all OpenStack services and client tools have been updated to fully support newer API versions, and in this case, we need both versions of the Cinder API to be around.
$ openstack service create --name cinderv2 --description "OpenStack Block Storage" volumev2
+-------------+----------------------------------+
| Field       | Value                            |
+-------------+----------------------------------+
| description | OpenStack Block Storage          |
| enabled     | True                             |
| id          | e78b48b9847b480ab0f24c1a83d33000 |
| name        | cinderv2                         |
| type        | volumev2                         |
+-------------+----------------------------------+
$ openstack service create --name cinderv3 --description "OpenStack Block Storage" volumev3
+-------------+----------------------------------+
| Field       | Value                            |
+-------------+----------------------------------+
| description | OpenStack Block Storage          |
| enabled     | True                             |
| id          | 898b8bd404df4c45b44cab44ee8dc16a |
| name        | cinderv3                         |
| type        | volumev3                         |
+-------------+----------------------------------+
Lets define the two sets of API endpoints:
For v2:
$ openstack endpoint create --region RegionOne volumev2 public http://controller:8776/v2/%\(project_id\)s
+--------------+------------------------------------------+
| Field        | Value                                    |
+--------------+------------------------------------------+
| enabled      | True                                     |
| id           | 1d937d8c869c42b2aee7d18362205693         |
| interface    | public                                   |
| region       | RegionOne                                |
| region_id    | RegionOne                                |
| service_id   | e78b48b9847b480ab0f24c1a83d33000         |
| service_name | cinderv2                                 |
| service_type | volumev2                                 |
| url          | http://controller:8776/v2/%(project_id)s |
+--------------+------------------------------------------+
$ openstack endpoint create --region RegionOne volumev2 internal http://controller:8776/v2/%\(project_id\)s
+--------------+------------------------------------------+
| Field        | Value                                    |
+--------------+------------------------------------------+
| enabled      | True                                     |
| id           | 005a0f43cd1e45c3bbc5298fdd3ae7ed         |
| interface    | internal                                 |
| region       | RegionOne                                |
| region_id    | RegionOne                                |
| service_id   | e78b48b9847b480ab0f24c1a83d33000         |
| service_name | cinderv2                                 |
| service_type | volumev2                                 |
| url          | http://controller:8776/v2/%(project_id)s |
+--------------+------------------------------------------+
$ openstack endpoint create --region RegionOne volumev2 admin http://controller:8776/v2/%\(project_id\)s
+--------------+------------------------------------------+
| Field        | Value                                    |
+--------------+------------------------------------------+
| enabled      | True                                     |
| id           | 8a048cac157c4bb094bc529b9d8eede3         |
| interface    | admin                                    |
| region       | RegionOne                                |
| region_id    | RegionOne                                |
| service_id   | e78b48b9847b480ab0f24c1a83d33000         |
| service_name | cinderv2                                 |
| service_type | volumev2                                 |
| url          | http://controller:8776/v2/%(project_id)s |
+--------------+------------------------------------------+
For v3:
$ openstack endpoint create --region RegionOne volumev3 public http://controller:8776/v3/%\(project_id\)s
+--------------+------------------------------------------+
| Field        | Value                                    |
+--------------+------------------------------------------+
| enabled      | True                                     |
| id           | 4d1f8bd850e04220808674a9ad81fd52         |
| interface    | public                                   |
| region       | RegionOne                                |
| region_id    | RegionOne                                |
| service_id   | 898b8bd404df4c45b44cab44ee8dc16a         |
| service_name | cinderv3                                 |
| service_type | volumev3                                 |
| url          | http://controller:8776/v3/%(project_id)s |
+--------------+------------------------------------------+
$ openstack endpoint create --region RegionOne volumev3 internal http://controller:8776/v3/%\(project_id\)s
+--------------+------------------------------------------+
| Field        | Value                                    |
+--------------+------------------------------------------+
| enabled      | True                                     |
| id           | ca49e233d0fa4ff7b1554d01afbc68ce         |
| interface    | internal                                 |
| region       | RegionOne                                |
| region_id    | RegionOne                                |
| service_id   | 898b8bd404df4c45b44cab44ee8dc16a         |
| service_name | cinderv3                                 |
| service_type | volumev3                                 |
| url          | http://controller:8776/v3/%(project_id)s |
+--------------+------------------------------------------+
$ openstack endpoint create --region RegionOne volumev3 admin http://controller:8776/v3/%\(project_id\)s
+--------------+------------------------------------------+
| Field        | Value                                    |
+--------------+------------------------------------------+
| enabled      | True                                     |
| id           | 3d5ed2a3b6e347a08f8ec79a98f7e95f         |
| interface    | admin                                    |
| region       | RegionOne                                |
| region_id    | RegionOne                                |
| service_id   | 898b8bd404df4c45b44cab44ee8dc16a         |
| service_name | cinderv3                                 |
| service_type | volumev3                                 |
| url          | http://controller:8776/v3/%(project_id)s |
+--------------+------------------------------------------+
Installing Cinder to the Controller
Now that the databases and service descriptions have been created we can go ahead and install some packages:
$ sudo apt install cinder-api cinder-scheduler
Once that is done, we can do some configuration. Lets add the database creds:
$ sudo vim /etc/cinder/cinder.conf
[DEFAULT]
...
transport_url = rabbit://openstack:password123@controller
auth_strategy = keystone
my_ip = 10.0.0.11

[database]
#connection = sqlite:////var/lib/cinder/cinder.sqlite
connection = mysql+pymysql://cinder:password123@controller/cinder
Now we can configure Keystone:
[keystone_authtoken]
www_authenticate_uri = http://controller:5000
auth_url = http://controller:5000
memcached_servers = controller:11211
auth_type = password
project_domain_name = default
user_domain_name = default
project_name = service
username = cinder
password = openstack
Also configure the lockfile:
[oslo_concurrency]
lock_path = /var/lib/cinder/tmp
We can then populate the database with:
$ sudo -s
# su -s /bin/sh -c "cinder-manage db sync" cinder
After that, we need to tell Nova to use Cinder for block storage.
$ sudo vim /etc/nova/nova.conf
[cinder]
os_region_name = RegionOne
From there, we need to restart the Nova and Cinder services:
$ sudo systemctl restart nova-api
$ sudo systemctl restart cinder-scheduler
$ sudo systemctl restart apache2
Installing Cinder to the Block Storage Machine
Set Up LVM For the Cinder Disk
Time to get Cinder installed to our block storage node. We are going to be using LVM to manage the storage disk, which requires some setup.
Install some LVM tools:
$ sudo apt install lvm2 thin-provisioning-tools
From there, we need to determine what device to use. Run lsblk and we see:
$ lsblk
vda    252:0    0   10G  0 disk
├─vda1 252:1    0    1M  0 part
└─vda2 252:2    0   10G  0 part /
vdb    252:16   0   10G  0 disk
/dev/vda is the disk the operating system is installed on, since we have a 1Mb
boot partition, and a 10gb disk. This means /dev/vdb is the disk we will
prepare for use with Cinder.
We need to create a LVM physical volume and a volume group on the disk:
$ sudo pvcreate /dev/vdb
  Physical volume "/dev/vdb" successfully created.
$ sudo vgcreate cinder-volumes /dev/vdb
  Volume group "cinder-volumes" successfully created
Now, we also need to edit the LVM configuration file. LVM will automatically scan
block storage devices in /dev to see if they contain volumes, and this can
cause some trouble when it detects the many volumes Cinder will be making. So,
we will change LVMs behaviour from exploring all block devices for volumes, to
only scan /dev/vdb and not to go deeper, by adding a filter.
$ sudo vim /etc/lvm/lvm.conf
devices {
...
filter = [ "a/vdb/", "r/.*/"]
Install and Configure the Cinder Service
Now we can install the Cinder packages:
$ sudo apt install cinder-volume
Lets edit some configuration, and add some DB creds:
$ sudo vim /etc/cinder/cinder.conf
[DEFAULT]
...
transport_url = rabbit://openstack:password123@controller
auth_strategy = keystone
my_ip = 10.0.0.31
enabled_backends = lvm
glance_api_servers = http://controller:9292

[database]
#connection = sqlite:////var/lib/cinder/cinder.sqlite
connection = mysql+pymysql://cinder:password123@controller/cinder
Lets set up Keystone:
[keystone_authtoken]
www_authenticate_uri = http://controller:5000
auth_url = http://controller:5000
memcached_servers = controller:11211
auth_type = password
project_domain_name = default
user_domain_name = default
project_name = service
username = cinder
password = openstack
We need to configure some LVM settings:
[lvm]
volume_driver = cinder.volume.drivers.lvm.LVMVolumeDriver
volume_group = cinder-volumes
target_protocol = iscsi
target_helper = tgtadm
What this does is configure Cinder to pass block storage volumes to the instances we make over iscsi. This is how we get away with not having the disks physically connected to the instances, and being on a different host to the compute host.
And we need to set a lockfile path:
[oslo_concurrency]
lock_path = /var/lib/cinder/tmp
The last thing we need to do is restart some services:
$ sudo systemctl restart tgt
$ sudo systemctl restart cinder-volume
Verifying that Cinder was Installed Correctly
Head back to the controller, source the admin creds, and list all volume services:
$ . admin-openrc
$ openstack volume service list
+------------------+-------------------+------+---------+-------+----------------------------+
| Binary           | Host              | Zone | Status  | State | Updated At                 |
+------------------+-------------------+------+---------+-------+----------------------------+
| cinder-scheduler | controller        | nova | enabled | up    | 2020-01-31T02:42:17.000000 |
| cinder-volume    | block-storage@lvm | nova | enabled | up    | 2020-01-31T02:42:20.000000 |
+------------------+-------------------+------+---------+-------+----------------------------+
We see cinder-scheduler running on the controller, and cinder-volume running on the block storage machine, with both services alive. I think we are done setting up Cinder.
Installing Swift, the Object Storage Service
Swift is the object storage service for OpenStack. Swift takes in objects of any size and replicates them across a storage cluster. Swift uses a eventual consistency model, as opposed to Ceph, which uses strong consistency model. This means an object you get from Swift may or may not be the latest version of that object.
Swift is fast and robust, and we will be integrating it into this cluster.
I’m going to be following the Installation Documentation.
Creating Users and Set Up Services and Endpoints
Swift uses sqlite databases on the object storage nodes, so we do not need to add any database entries. So, we can get right to making users.
SSH into the controller, source the admin creds, and make a swift user.
$ . admin-openrc
$ openstack user create --domain default --password-prompt swift
User Password:
Repeat User Password:
+---------------------+----------------------------------+
| Field               | Value                            |
+---------------------+----------------------------------+
| domain_id           | default                          |
| enabled             | True                             |
| id                  | 4f74761ec0b74087b91eb8431388b174 |
| name                | swift                            |
| options             | {}                               |
| password_expires_at | None                             |
+---------------------+----------------------------------+
$ openstack role add --project service --user swift admin
Now we can make the Swift service:
$ openstack service create --name swift \
  --description "OpenStack Object Storage" object-store
+-------------+----------------------------------+
| Field       | Value                            |
+-------------+----------------------------------+
| description | OpenStack Object Storage         |
| enabled     | True                             |
| id          | aa1bb7fe0ffb4144b295ac0d752a6933 |
| name        | swift                            |
| type        | object-store                     |
+-------------+----------------------------------+
And the endpoints:
$ openstack endpoint create --region RegionOne \
>   object-store public http://controller:8080/v1/AUTH_%\(project_id\)s
+--------------+-----------------------------------------------+
| Field        | Value                                         |
+--------------+-----------------------------------------------+
| enabled      | True                                          |
| id           | d25b1f10c3f14fc98fd87a8b17fb405d              |
| interface    | public                                        |
| region       | RegionOne                                     |
| region_id    | RegionOne                                     |
| service_id   | aa1bb7fe0ffb4144b295ac0d752a6933              |
| service_name | swift                                         |
| service_type | object-store                                  |
| url          | http://controller:8080/v1/AUTH_%(project_id)s |
+--------------+-----------------------------------------------+
$ openstack endpoint create --region RegionOne \
  object-store internal http://controller:8080/v1/AUTH_%\(project_id\)s
+--------------+-----------------------------------------------+
| Field        | Value                                         |
+--------------+-----------------------------------------------+
| enabled      | True                                          |
| id           | 4289f12ec58a46669092f3645ca48d26              |
| interface    | internal                                      |
| region       | RegionOne                                     |
| region_id    | RegionOne                                     |
| service_id   | aa1bb7fe0ffb4144b295ac0d752a6933              |
| service_name | swift                                         |
| service_type | object-store                                  |
| url          | http://controller:8080/v1/AUTH_%(project_id)s |
+--------------+-----------------------------------------------+
$ openstack endpoint create --region RegionOne \
  object-store admin http://controller:8080/v1
+--------------+----------------------------------+
| Field        | Value                            |
+--------------+----------------------------------+
| enabled      | True                             |
| id           | 9c6a6d0a1d784da49c53d92f3387285d |
| interface    | admin                            |
| region       | RegionOne                        |
| region_id    | RegionOne                        |
| service_id   | aa1bb7fe0ffb4144b295ac0d752a6933 |
| service_name | swift                            |
| service_type | object-store                     |
| url          | http://controller:8080/v1        |
+--------------+----------------------------------+
Installing Swift to the Controller
Let’s install some packages and configure them.
$ sudo apt install swift swift-proxy python3-swiftclient
From there, we will need to manually create some directories and files:
$ sudo mkdir /etc/swift
$ sudo curl -o /etc/swift/proxy-server.conf https://opendev.org/openstack/swift/raw/branch/master/etc/proxy-server.conf-sample
Time to edit the configuration:
$ sudo vim /etc/swift/proxy-server.conf
[DEFAULT]
bind_ip = 10.0.0.11
bind_port = 8080
# keep_idle = 600
# bind_timeout = 30
# backlog = 4096
 swift_dir = /etc/swift
 user = swift
In the [pipeline:main] section, remove tempurl and tempauth, and replace
with authtoken and keystoneauth like so:
[pipeline:main]
pipeline = catch_errors gatekeeper healthcheck proxy-logging cache listing_formats container_sync bulk ratelimit authtoken keystoneauth copy container-quotas account-quotas slo dlo versioned_writes symlink proxy-logging proxy-server
Back to it:
[app:proxy-server]
use = egg:swift#proxy
account_autocreate = True

[filter:keystoneauth]
use = egg:swift#keystoneauth
operator_roles = admin,user
Let’s set up keystone:
[filter:authtoken]
paste.filter_factory = keystonemiddleware.auth_token:filter_factory
www_authenticate_uri = http://controller:5000
auth_url = http://controller:5000
memcached_servers = controller:11211
auth_type = password
project_domain_id = default
user_domain_id = default
project_name = service
username = swift
password = openstack
delay_auth_decision = True
Finally, a small config change for memcached:
[filter:cache]
use = egg:swift#memcache
memcache_servers = controller:11211
Setting Up Disks on Each of the Object Storage Machines
The next set of steps we need to do on both of the Object Storage nodes.
Install some packages:
$ sudo apt install xfsprogs rsync
We now need to determine what drives we have, so run lsblk:
vda    252:0    0   10G  0 disk
├─vda1 252:1    0    1M  0 part
└─vda2 252:2    0   10G  0 part /
vdb    252:16   0   10G  0 disk
vdc    252:32   0   10G  0 disk
We see that vdb and vdc are our disks. Lets format with them XFS:
$ sudo mkfs.xfs /dev/vdb
$ sudo mkfs.xfs /dev/vdc
From there, we will set up persistent mountpoints under /srv:
$ sudo mkdir -p /srv/node/vdb
$ sudo mkdir -p /srv/node/vdc
Next, edit fstab:
$ sudo vim /etc/fstab
/dev/vdb /srv/node/vdb xfs noatime,nodiratime,logbufs=8 0 2
/dev/vdc /srv/node/vdc xfs noatime,nodiratime,logbufs=8 0 2
Mount the drives:
$ sudo mount /srv/node/vdb
$ sudo mount /srv/node/vdc
Time to set up rsync:
sudo vim /etc/rsyncd.conf

uid = swift
gid = swift
log file = /var/log/rsyncd.log
pid file = /var/run/rsyncd.pid
address = 10.0.0.41

[account]
max connections = 2
path = /srv/node/
read only = False
lock file = /var/lock/account.lock

[container]
max connections = 2
path = /srv/node/
read only = False
lock file = /var/lock/container.lock

[object]
max connections = 2
path = /srv/node/
read only = False
lock file = /var/lock/object.lock
Make sure the IP address is correct for the machine you are editing it on.
Enable rsync with:
$ sudo vim /etc/default/rsync
RSYNC_ENABLE=true
Restart rsync with:
$ sudo systemctl restart rsync
Installing Swift to the Object Storage Machines
Time to install and configure Swift on our object storage nodes. We need to do the following on each of our nodes.
$ sudo apt install swift swift-account swift-container swift-object
From there, we need to edit our configuration files. We need to download them first:
$ sudo curl -o /etc/swift/account-server.conf https://opendev.org/openstack/swift/raw/branch/master/etc/account-server.conf-sample
$ sudo curl -o /etc/swift/container-server.conf https://opendev.org/openstack/swift/raw/branch/master/etc/container-server.conf-sample
$ sudo curl -o /etc/swift/object-server.conf https://opendev.org/openstack/swift/raw/branch/master/etc/object-server.conf-sample
Lets edit our config, starting with account-server.conf:
$ sudo vim /etc/swift/account-server.conf
[DEFAULT]
bind_ip = 10.0.0.41
bind_port = 6202
user = swift
swift_dir = /etc/swift
devices = /srv/node
mount_check = true

[pipeline:main]
pipeline = healthcheck recon account-server

[filter:recon]
use = egg:swift#recon
recon_cache_path = /var/cache/swift
Make sure you use the correct IP address for your object storage node.
Onto container-server.conf:
$ sudo vim /etc/swift/container-server.conf
[DEFAULT]
bind_ip = 10.0.0.41
bind_port = 6201
user = swift
swift_dir = /etc/swift
devices = /srv/node
mount_check = true

[pipeline:main]
pipeline = healthcheck recon container-server

[filter:recon]
use = egg:swift#recon
recon_cache_path = /var/cache/swift
Finally, object-server.conf:
$ sudo vim /etc/swift/object-server.conf
[DEFAULT]
bind_ip = 10.0.0.41
bind_port = 6200
user = swift
swift_dir = /etc/swift
devices = /srv/node
mount_check = true

[pipeline:main]
pipeline = healthcheck recon object-server

[filter:recon]
use = egg:swift#recon
recon_cache_path = /var/cache/swift
recon_lock_path = /var/lock
We then need to ensure some directories exist and the swift user has access to it:
$ sudo chown -R swift:swift /srv/node
$ sudo mkdir -p /var/cache/swift
$ sudo chown -R root:swift /var/cache/swift
$ sudo chmod -R 775 /var/cache/swift
Creating and Deploying Starting Swift Rings
Swift has three main parts of its storage architecture, and it was hinted at in the previous section. Swift has the idea of “rings” to separate concerns within its architecture. There is the account ring, the container ring and the object ring.
We need to configure the different rings on the controller, and then take the configuration generated and give it to all the object storage nodes.
So SSH into the controller, and let’s make some rings:
$ cd /etc/swift
The account ring initial config sits in the account.builder file, which we will
create:
$ sudo swift-ring-builder account.builder create 10 3 1
Then we can add our rings. We need to add both object storage nodes, and both of their disks.
$ sudo swift-ring-builder account.builder add \
  --region 1 --zone 1 --ip 10.0.0.41 --port 6202 --device vdb --weight 100
Device d0r1z1-10.0.0.41:6202R10.0.0.41:6202/vdb_"" with 100.0 weight got id 0
$ sudo swift-ring-builder account.builder add \
  --region 1 --zone 1 --ip 10.0.0.41 --port 6202 --device vdc --weight 100
Device d1r1z1-10.0.0.41:6202R10.0.0.41:6202/vdc_"" with 100.0 weight got id 1
$
$ sudo swift-ring-builder account.builder add \
  --region 1 --zone 1 --ip 10.0.0.51 --port 6202 --device vdb --weight 100
Device d2r1z1-10.0.0.51:6202R10.0.0.51:6202/vdb_"" with 100.0 weight got id 2
$ sudo swift-ring-builder account.builder add \
  --region 1 --zone 1 --ip 10.0.0.51 --port 6202 --device vdc --weight 100
Device d3r1z1-10.0.0.51:6202R10.0.0.51:6202/vdc_"" with 100.0 weight got id 3
From there, we can examine the ring contents with:
$ sudo swift-ring-builder account.builder
account.builder, build version 4, id c77e5777355547608a121a2949a175dc
1024 partitions, 3.000000 replicas, 1 regions, 1 zones, 4 devices, 100.00 balance, 0.00 dispersion
The minimum number of hours before a partition can be reassigned is 1 (0:00:00 remaining)
The overload factor is 0.00% (0.000000)
Ring file account.ring.gz not found, probably it hasn't been written yet
Devices:   id region zone ip address:port replication ip:port  name weight partitions balance flags meta
            0      1    1  10.0.0.41:6202      10.0.0.41:6202   vdb 100.00          0 -100.00
            1      1    1  10.0.0.41:6202      10.0.0.41:6202   vdc 100.00          0 -100.00
            2      1    1  10.0.0.51:6202      10.0.0.51:6202   vdb 100.00          0 -100.00
            3      1    1  10.0.0.51:6202      10.0.0.51:6202   vdc 100.00          0 -100.00
We can rebalance the account ring with:
$ sudo swift-ring-builder account.builder rebalance
Reassigned 3072 (300.00%) partitions. Balance is now 0.00.  Dispersion is now 0.00
Next up is the container ring. Let’s make the container.builder file:
$ sudo swift-ring-builder container.builder create 10 3 1
We can add our rings with the below, taking care to include each node and each disk:
$ sudo swift-ring-builder container.builder add \
  --region 1 --zone 1 --ip 10.0.0.41 --port 6201 --device vdb --weight 100
Device d0r1z1-10.0.0.41:6201R10.0.0.41:6201/vdb_"" with 100.0 weight got id 0
$ sudo swift-ring-builder container.builder add \
  --region 1 --zone 1 --ip 10.0.0.41 --port 6201 --device vdc --weight 100
Device d1r1z1-10.0.0.41:6201R10.0.0.41:6201/vdc_"" with 100.0 weight got id 1
$
$ sudo swift-ring-builder container.builder add \
  --region 1 --zone 1 --ip 10.0.0.51 --port 6201 --device vdb --weight 100
Device d2r1z1-10.0.0.51:6201R10.0.0.51:6201/vdb_"" with 100.0 weight got id 2
$ sudo swift-ring-builder container.builder add \
  --region 1 --zone 1 --ip 10.0.0.51 --port 6201 --device vdc --weight 100
Device d3r1z1-10.0.0.51:6201R10.0.0.51:6201/vdc_"" with 100.0 weight got id 3
Again, we can view the contents with:
$ sudo swift-ring-builder container.builder
container.builder, build version 4, id ac293f6e2e2248798e213382f4b9f60e
1024 partitions, 3.000000 replicas, 1 regions, 1 zones, 4 devices, 100.00 balance, 0.00 dispersion
The minimum number of hours before a partition can be reassigned is 1 (0:00:00 remaining)
The overload factor is 0.00% (0.000000)
Ring file container.ring.gz not found, probably it hasn't been written yet
Devices:   id region zone ip address:port replication ip:port  name weight partitions balance flags meta
            0      1    1  10.0.0.41:6201      10.0.0.41:6201   vdb 100.00          0 -100.00
            1      1    1  10.0.0.41:6201      10.0.0.41:6201   vdc 100.00          0 -100.00
            2      1    1  10.0.0.51:6201      10.0.0.51:6201   vdb 100.00          0 -100.00
            3      1    1  10.0.0.51:6201      10.0.0.51:6201   vdc 100.00          0 -100.00
We can rebalance the ring with:
$ sudo swift-ring-builder container.builder rebalance
Reassigned 3072 (300.00%) partitions. Balance is now 0.00.  Dispersion is now 0.00
Next up is the object ring:
$ sudo swift-ring-builder object.builder create 10 3 1
We can add the nodes to the ring with:
$ sudo swift-ring-builder object.builder add \
  --region 1 --zone 1 --ip 10.0.0.41 --port 6200 --device vdb --weight 100
Device d0r1z1-10.0.0.41:6200R10.0.0.41:6200/vdb_"" with 100.0 weight got id 0
$ sudo swift-ring-builder object.builder add \
  --region 1 --zone 1 --ip 10.0.0.41 --port 6200 --device vdc --weight 100
Device d1r1z1-10.0.0.41:6200R10.0.0.41:6200/vdc_"" with 100.0 weight got id 1
$
$ sudo swift-ring-builder object.builder add \
  --region 1 --zone 1 --ip 10.0.0.51 --port 6200 --device vdb --weight 100
Device d2r1z1-10.0.0.51:6200R10.0.0.51:6200/vdb_"" with 100.0 weight got id 2
$ sudo swift-ring-builder object.builder add \
  --region 1 --zone 1 --ip 10.0.0.51 --port 6200 --device vdc --weight 100
Device d3r1z1-10.0.0.51:6200R10.0.0.51:6200/vdc_"" with 100.0 weight got id 3
We can view the contents of the ring with:
$ sudo swift-ring-builder object.builder
object.builder, build version 4, id 092ad11e9c4d4939a6a4a6acf110cea0
1024 partitions, 3.000000 replicas, 1 regions, 1 zones, 4 devices, 100.00 balance, 0.00 dispersion
The minimum number of hours before a partition can be reassigned is 1 (0:00:00 remaining)
The overload factor is 0.00% (0.000000)
Ring file object.ring.gz not found, probably it hasn't been written yet
Devices:   id region zone ip address:port replication ip:port  name weight partitions balance flags meta
            0      1    1  10.0.0.41:6200      10.0.0.41:6200   vdb 100.00          0 -100.00
            1      1    1  10.0.0.41:6200      10.0.0.41:6200   vdc 100.00          0 -100.00
            2      1    1  10.0.0.51:6200      10.0.0.51:6200   vdb 100.00          0 -100.00
            3      1    1  10.0.0.51:6200      10.0.0.51:6200   vdc 100.00          0 -100.00
We can rebalance with:
$ sudo swift-ring-builder object.builder rebalance
Reassigned 3072 (300.00%) partitions. Balance is now 0.00.  Dispersion is now 0.00
If you look in /etc/swift, there is now some compressed archives:
$ ll /etc/swift
total 116
drwxr-xr-x   3 root root  4096 Feb  6 00:22 ./
drwxr-xr-x 121 root root  4096 Feb  4 23:05 ../
-rw-r--r--   1 root root  9827 Feb  6 00:13 account.builder
-rw-r--r--   1 root root  1475 Feb  6 00:13 account.ring.gz
drwxr-xr-x   2 root root  4096 Feb  6 00:22 backups/
-rw-r--r--   1 root root  9827 Feb  6 00:18 container.builder
-rw-r--r--   1 root root  1489 Feb  6 00:18 container.ring.gz
-rw-r--r--   1 root root  9827 Feb  6 00:22 object.builder
-rw-r--r--   1 root root  1471 Feb  6 00:22 object.ring.gz
-rw-r--r--   1 root root 53820 Feb  4 23:23 proxy-server.conf
These need to be copied to each of the object storage nodes. Lets do that.
$ for x in 10.0.0.41 10.0.0.51; do scp *.ring.gz ubuntu@$x:~/;done
[email protected]'s password:
account.ring.gz              100% 1475   562.7KB/s   00:00
container.ring.gz            100% 1489     3.1MB/s   00:00
object.ring.gz               100% 1471     2.3MB/s   00:00
[email protected]'s password:
account.ring.gz              100% 1475   607.6KB/s   00:00
container.ring.gz            100% 1489     3.7MB/s   00:00
object.ring.gz               100% 1471     2.8MB/s   00:00
Now log onto both the object storage nodes and move the archives to /etc/swift:
$ sudo mv *.ring.gz /etc/swift
Setting up the Master Swift Configuration
The last thing we need to do is to set up the master configuration for Swift. SSH into your controller node, and let’s do it:
Change into the /etc/swift directory.
$ cd /etc/swift
Download the config file:
$ sudo curl -o /etc/swift/swift.conf \
  https://opendev.org/openstack/swift/raw/branch/master/etc/swift.conf-sample
We need to generate two secrets, which we will again do with openssl:
$ openssl rand -hex 6
6243f9946d1e
$ openssl rand -hex 6
69bab31f606c
And edit /etc/swift/swift.conf:
$ sudo vim /etc/swift/swift.conf
[swift-hash]
swift_hash_path_suffix = 6243f9946d1e
swift_hash_path_prefix = 69bab31f606c

[storage-policy:0]
name = Policy-0
default = yes
From there, this /etc/swift/swift.conf file needs to be distributed to all the
object storage nodes:
$ for x in 10.0.0.41 10.0.0.51; do scp /etc/swift/swift.conf ubuntu@$x:~/; done
[email protected]'s password:
swift.conf                   100% 8451     2.9MB/s   00:00
[email protected]'s password:
swift.conf                   100% 8451     1.7MB/s   00:00
Then SSH into each of the object storage nodes and move the file to
/etc/swift/swift.conf:
$ sudo mv swift.conf /etc/swift/swift.conf
$ sudo chown -R root:swift /etc/swift
Lastly, we need to restart the services:
On the controller:
$ sudo systemctl restart memcached
$ sudo systemctl restart swift-proxy
On the object storage nodes:
$ sudo swift-init all start
Verifying Swift Was Installed Correctly
We can see if swift is working correctly by making a container and placing an object in it. Do the following on the controller node:
$ . demo-openrc
$ swift stat
               Account: AUTH_33569bb56110474db2d584b4a1936c6b
            Containers: 0
               Objects: 0
                 Bytes: 0
          Content-Type: text/plain; charset=utf-8
           X-Timestamp: 1580951741.32857
       X-Put-Timestamp: 1580951741.32857
            X-Trans-Id: tx0dec10331bb941488a804-005e3b68bc
X-Openstack-Request-Id: tx0dec10331bb941488a804-005e3b68bc
Now we will make a container, make a file, and place it in the container:
$ openstack container create container1
+---------------------------------------+------------+------------------------------------+
| account                               | container  | x-trans-id                         |
+---------------------------------------+------------+------------------------------------+
| AUTH_33569bb56110474db2d584b4a1936c6b | container1 | txc383885cf6d44d2fb3f07-005e3b6a65 |
+---------------------------------------+------------+------------------------------------+
$ echo "Test for Demo user" > test_file.txt
$ openstack object create container1 test_file.txt
+---------------+------------+----------------------------------+
| object        | container  | etag                             |
+---------------+------------+----------------------------------+
| test_file.txt | container1 | ffc8c08a288fd4d5b11804fc331909b7 |
+---------------+------------+----------------------------------+
$ openstack object list container1
+---------------+
| Name          |
+---------------+
| test_file.txt |
+---------------+
We can download the file and view it with:
$ mkdir test
$ cd test
$ openstack object save container1 test_file.txt
$ cat test_file.txt
Test for Demo user
It worked! We can now delete the file with:
$ openstack object delete container1 test_file.txt
Installing Heat, the Orchestration Service
Heat is the orchestration service for OpenStack. Heat takes input in a form of templates which describe the deployment specifications for an application. You can specify what sort of virtual machines are required, their storage needs and network topologies, and Heat will go and make the infrastructure needed a reality.
Heat can manage the entire lifecycle of an application, from the initial deployment to changing requirements midway through, and to tearing down.
Heat directly interacts with the OpenStack API endpoints of the major services to manage infrastructure.
I will be following the Install Documentation.
Creating the Heat Database
Heat, like most OpenStack services need a database, so let’s make one on the Controller:
$ sudo mysql
MariaDB [(none)]> CREATE DATABASE heat;
Query OK, 1 row affected (0.012 sec)
Add the heat user and grant privileges:
MariaDB [(none)]> GRANT ALL PRIVILEGES ON heat.* TO 'heat'@'localhost' \
  IDENTIFIED BY 'password123';
Query OK, 1 row affected (0.012 sec)
MariaDB [(none)]> GRANT ALL PRIVILEGES ON heat.* TO 'heat'@'%' \
  IDENTIFIED BY 'password123';
Query OK, 1 row affected (0.012 sec)
Creating the Heat User and Services
Lets make a user for Heat:
$ . admin-openrc
$ openstack user create --domain default --password-prompt heat
User Password:
Repeat User Password:
+---------------------+----------------------------------+
| Field               | Value                            |
+---------------------+----------------------------------+
| domain_id           | default                          |
| enabled             | True                             |
| id                  | 3c8ca893913742619ed257ad0553b489 |
| name                | heat                             |
| options             | {}                               |
| password_expires_at | None                             |
+---------------------+----------------------------------+
$ openstack role add --project service --user heat admin
Heat needs two services to be created: heat and heat-cfn.
$ openstack service create --name heat --description "Orchestration" orchestration
+-------------+----------------------------------+
| Field       | Value                            |
+-------------+----------------------------------+
| description | Orchestration                    |
| enabled     | True                             |
| id          | 41cc3e7d6b634e80b31f1a88c4472aab |
| name        | heat                             |
| type        | orchestration                    |
+-------------+----------------------------------+
$ openstack service create --name heat-cfn --description "Orchestration"  cloudformation
+-------------+----------------------------------+
| Field       | Value                            |
+-------------+----------------------------------+
| description | Orchestration                    |
| enabled     | True                             |
| id          | d2fad2c90d9d4f16afeb26d5c7c29bbc |
| name        | heat-cfn                         |
| type        | cloudformation                   |
+-------------+----------------------------------+
Since we created two services, we now need to define two sets of endpoints. The
first for heat:
$ openstack endpoint create --region RegionOne orchestration public http://controller:8004/v1/%\(tenant_id\)s
+--------------+-----------------------------------------+
| Field        | Value                                   |
+--------------+-----------------------------------------+
| enabled      | True                                    |
| id           | e33e7674797a497dbc1e5d425add3992        |
| interface    | public                                  |
| region       | RegionOne                               |
| region_id    | RegionOne                               |
| service_id   | 41cc3e7d6b634e80b31f1a88c4472aab        |
| service_name | heat                                    |
| service_type | orchestration                           |
| url          | http://controller:8004/v1/%(tenant_id)s |
+--------------+-----------------------------------------+
$ openstack endpoint create --region RegionOne orchestration internal http://controller:8004/v1/%\(tenant_id\)s
+--------------+-----------------------------------------+
| Field        | Value                                   |
+--------------+-----------------------------------------+
| enabled      | True                                    |
| id           | 67df0a3ade9d4322865daa20b87ac082        |
| interface    | internal                                |
| region       | RegionOne                               |
| region_id    | RegionOne                               |
| service_id   | 41cc3e7d6b634e80b31f1a88c4472aab        |
| service_name | heat                                    |
| service_type | orchestration                           |
| url          | http://controller:8004/v1/%(tenant_id)s |
+--------------+-----------------------------------------+
$ openstack endpoint create --region RegionOne orchestration admin http://controller:8004/v1/%\(tenant_id\)s
+--------------+-----------------------------------------+
| Field        | Value                                   |
+--------------+-----------------------------------------+
| enabled      | True                                    |
| id           | 7f16502e18994f45a39fb40443636c8c        |
| interface    | admin                                   |
| region       | RegionOne                               |
| region_id    | RegionOne                               |
| service_id   | 41cc3e7d6b634e80b31f1a88c4472aab        |
| service_name | heat                                    |
| service_type | orchestration                           |
| url          | http://controller:8004/v1/%(tenant_id)s |
+--------------+-----------------------------------------+
The second for heat-cfn:
$ openstack endpoint create --region RegionOne cloudformation public http://controller:8000/v1
+--------------+----------------------------------+
| Field        | Value                            |
+--------------+----------------------------------+
| enabled      | True                             |
| id           | a9944905d2474773a6f2604619ab86e3 |
| interface    | public                           |
| region       | RegionOne                        |
| region_id    | RegionOne                        |
| service_id   | d2fad2c90d9d4f16afeb26d5c7c29bbc |
| service_name | heat-cfn                         |
| service_type | cloudformation                   |
| url          | http://controller:8000/v1        |
+--------------+----------------------------------+
$ openstack endpoint create --region RegionOne cloudformation internal http://controller:8000/v1
+--------------+----------------------------------+
| Field        | Value                            |
+--------------+----------------------------------+
| enabled      | True                             |
| id           | 587390973b9f4817a8ad2e27b04373b9 |
| interface    | internal                         |
| region       | RegionOne                        |
| region_id    | RegionOne                        |
| service_id   | d2fad2c90d9d4f16afeb26d5c7c29bbc |
| service_name | heat-cfn                         |
| service_type | cloudformation                   |
| url          | http://controller:8000/v1        |
+--------------+----------------------------------+
$ openstack endpoint create --region RegionOne cloudformation admin http://controller:8000/v1
+--------------+----------------------------------+
| Field        | Value                            |
+--------------+----------------------------------+
| enabled      | True                             |
| id           | a6494f8979e44921b85cd6595e136837 |
| interface    | admin                            |
| region       | RegionOne                        |
| region_id    | RegionOne                        |
| service_id   | d2fad2c90d9d4f16afeb26d5c7c29bbc |
| service_name | heat-cfn                         |
| service_type | cloudformation                   |
| url          | http://controller:8000/v1        |
+--------------+----------------------------------+
Heat requires another domain to be able to manage its infrastructure, so we need to create that, and an admin user and role for this new domain:
$ openstack domain create --description "Stack projects and users" heat
+-------------+----------------------------------+
| Field       | Value                            |
+-------------+----------------------------------+
| description | Stack projects and users         |
| enabled     | True                             |
| id          | 1337b657083e4946996d55cf49ce80e0 |
| name        | heat                             |
| options     | {}                               |
| tags        | []                               |
+-------------+----------------------------------+
$ openstack user create --domain heat --password-prompt heat_domain_admin
User Password:
Repeat User Password:
+---------------------+----------------------------------+
| Field               | Value                            |
+---------------------+----------------------------------+
| domain_id           | 1337b657083e4946996d55cf49ce80e0 |
| enabled             | True                             |
| id                  | 81277e90fa7341aea05224e59adbd6ea |
| name                | heat_domain_admin                |
| options             | {}                               |
| password_expires_at | None                             |
+---------------------+----------------------------------+
$ openstack role add --domain heat --user-domain heat --user heat_domain_admin admin
$ openstack role create heat_stack_owner
+-------------+----------------------------------+
| Field       | Value                            |
+-------------+----------------------------------+
| description | None                             |
| domain_id   | None                             |
| id          | 1625641497494370b0f98e6d1dcb0b2e |
| name        | heat_stack_owner                 |
| options     | {}                               |
+-------------+----------------------------------+
$ openstack role add --project demo --user demo heat_stack_owner
$ openstack role create heat_stack_user
+-------------+----------------------------------+
| Field       | Value                            |
+-------------+----------------------------------+
| description | None                             |
| domain_id   | None                             |
| id          | 8dfebc17aa4f45b5b5ed1e4be35ce98b |
| name        | heat_stack_user                  |
| options     | {}                               |
+-------------+----------------------------------+
Installing and Configuring Heat on the Controller
Once all the users, services and endpoints are set up, we can install the Heat packages and start configuration.
$ sudo apt install heat-api heat-api-cfn heat-engine
Lets configure:
$ sudo vim /etc/heat/heat.conf
[database]
connection = mysql+pymysql://heat:password123@controller/heat

[DEFAULT]
transport_url = rabbit://openstack:password123@controller
heat_metadata_server_url = http://controller:8000
heat_waitcondition_server_url = http://controller:8000/v1/waitcondition
stack_domain_admin = heat_domain_admin
stack_domain_admin_password = openstack
stack_user_domain_name = heat
Then, we just need to configure Keystone:
[keystone_authtoken]
www_authenticate_uri = http://controller:5000
auth_url = http://controller:5000
memcached_servers = controller:11211
auth_type = password
project_domain_name = default
user_domain_name = default
project_name = service
username = heat
password = openstack

[trustee]
auth_type = password
auth_url = http://controller:5000
username = heat
password = openstack
user_domain_name = default

[clients_keystone]
auth_uri = http://controller:5000
Save the file, then populate the database with:
$ sudo -s
# su -s /bin/sh -c "heat-manage db_sync" heat
Finally, restart the Heat services:
$ sudo systemctl restart heat-api
$ sudo systemctl restart heat-api-cfn
$ sudo systemctl restart heat-engine
We can verify everything is working as intended by listing the services:
$ openstack orchestration service list
+------------+-------------+--------------------------------------+------------+--------+----------------------------+--------+
| Hostname   | Binary      | Engine ID                            | Host       | Topic  | Updated At                 | Status |
+------------+-------------+--------------------------------------+------------+--------+----------------------------+--------+
| controller | heat-engine | 993cff41-f3cf-45d3-9f38-d09e04fff701 | controller | engine | 2020-02-06T03:09:12.000000 | up     |
| controller | heat-engine | 1640f217-da50-4565-b6e1-cdbc26a688a7 | controller | engine | 2020-02-06T03:09:12.000000 | up     |
| controller | heat-engine | 2051654e-bb5d-45c5-9d48-5e83cfea4e04 | controller | engine | 2020-02-06T03:09:12.000000 | up     |
| controller | heat-engine | d19f1626-5830-452f-a198-071950d88a1d | controller | engine | 2020-02-06T03:09:12.000000 | up     |
+------------+-------------+--------------------------------------+------------+--------+----------------------------+--------+
Bugs I Encountered and How to Fix Them
Right at the very end, after the next section, when I tried to launch an instance I ran into problems and my instances kept failing to launch. After a bit of debugging it turned out that I had experienced two separate bugs in Neutron.
Neutron on the Controller Node: KeyError: ‘gateway’
After reviewing /var/log/neutron/neutron-linuxbridge-agent.log on the controller
node, I saw: (full error for those googling for help in the future =D ).
ERROR neutron.plugins.ml2.drivers.agent._common_agent [req-94658efb-0dd2-4c95-94ba-85b2ee8c49c2 - - - - -] Error in agent loop. Devices info: {'current': {'tapee2ba6c7-78'}, 'timesta
mps': {'tapee2ba6c7-78': 5}, 'added': {'tapee2ba6c7-78'}, 'removed': set(), 'updated': set()}: KeyError: 'gateway'
Traceback (most recent call last):
  File "/usr/lib/python3/dist-packages/neutron/plugins/ml2/drivers/agent/_common_agent.py", line 465, in daemon_loop
    sync = self.process_network_devices(device_info)
  File "/usr/lib/python3/dist-packages/osprofiler/profiler.py", line 160, in wrapper
    result = f(*args, **kwargs)
  File "/usr/lib/python3/dist-packages/neutron/plugins/ml2/drivers/agent/_common_agent.py", line 214, in process_network_devices
    resync_a = self.treat_devices_added_updated(devices_added_updated)
  File "/usr/lib/python3/dist-packages/osprofiler/profiler.py", line 160, in wrapper
    result = f(*args, **kwargs)
  File "/usr/lib/python3/dist-packages/neutron/plugins/ml2/drivers/agent/_common_agent.py", line 231, in treat_devices_added_updated
    self._process_device_if_exists(device_details)
  File "/usr/lib/python3/dist-packages/neutron/plugins/ml2/drivers/agent/_common_agent.py", line 258, in _process_device_if_exists
    device, device_details['device_owner'])
  File "/usr/lib/python3/dist-packages/neutron/plugins/ml2/drivers/linuxbridge/agent/linuxbridge_neutron_agent.py", line 586, in plug_interface
    network_segment.mtu)
  File "/usr/lib/python3/dist-packages/neutron/plugins/ml2/drivers/linuxbridge/agent/linuxbridge_neutron_agent.py", line 522, in add_tap_interface
    return False
  File "/usr/lib/python3/dist-packages/oslo_utils/excutils.py", line 220, in __exit__
    self.force_reraise()
  File "/usr/lib/python3/dist-packages/oslo_utils/excutils.py", line 196, in force_reraise
    six.reraise(self.type_, self.value, self.tb)
  File "/usr/lib/python3/dist-packages/six.py", line 693, in reraise
    raise value
  File "/usr/lib/python3/dist-packages/neutron/plugins/ml2/drivers/linuxbridge/agent/linuxbridge_neutron_agent.py", line 514, in add_tap_interface
    tap_device_name, device_owner, mtu)
  File "/usr/lib/python3/dist-packages/neutron/plugins/ml2/drivers/linuxbridge/agent/linuxbridge_neutron_agent.py", line 547, in _add_tap_interface
    mtu):
  File "/usr/lib/python3/dist-packages/neutron/plugins/ml2/drivers/linuxbridge/agent/linuxbridge_neutron_agent.py", line 498, in ensure_physical_in_bridge
    physical_interface)
  File "/usr/lib/python3/dist-packages/neutron/plugins/ml2/drivers/linuxbridge/agent/linuxbridge_neutron_agent.py", line 287, in ensure_flat_bridge
    if self.ensure_bridge(bridge_name, physical_interface):
  File "/usr/lib/python3/dist-packages/neutron/plugins/ml2/drivers/linuxbridge/agent/linuxbridge_neutron_agent.py", line 456, in ensure_bridge
    self.update_interface_ip_details(bridge_name, interface)
  File "/usr/lib/python3/dist-packages/neutron/plugins/ml2/drivers/linuxbridge/agent/linuxbridge_neutron_agent.py", line 418, in update_interface_ip_details
    gateway)
  File "/usr/lib/python3/dist-packages/neutron/plugins/ml2/drivers/linuxbridge/agent/linuxbridge_neutron_agent.py", line 402, in _update_interface_ip_details
    dst_device.route.add_gateway(gateway=gateway['gateway'],
KeyError: 'gateway'
One of my team members linked me to this Ask OpenStack
page, since it lists the same problem. I tried using brctl addif to add the
new bridges to the interfaces, but it did not solve the problem.
After a bit more googling, I tracked down Launchpad Bug #1855759.
This is the exact problem I was hitting. Nice to see it got fixed upstream and backported to upstream -stable for Neutron.
I manually modified the files under /usr/lib/python3/dist-packages/neutron/,
and applied the changes from the following commit to them:
commit b99765df8f1d1d6d3ceee3d481d1e6ee1b2200e7
Author: Rodolfo Alonso Hernandez <[email protected]>
Date: Tue Dec 10 15:50:20 2019 +0000
Subject: Use "via" in gateway dictionary in Linux Bridge agent
I used the Backported Commit to Train.
After that I restarted all Neutron services on the controller, and everything worked.
Yes, I will make sure to SRU this fix to Eoan to help everyone out - watch this space.
Neutron on the Compute Note: ebtables Unknown argument ‘–among-src’
After reviewing /var/log/neutron/neutron-linuxbridge-agent.log on the compute
node, I saw: (full error for those googling for help in the future =D ).
ERROR neutron.plugins.ml2.drivers.agent._common_agent [req-91257a46-44ee-4246-b3b6-813d82f1c2d3 - - - - -] Error in agent loop. Devices info: {'current': {'tap5878f227-c9'}, 'timestamps': {'tap5878f227-c9': 13}, 'added': {'tap5878f227-c9'}, 'removed': set(), 'updated': set()}: neutron_lib.exceptions.ProcessExecutionError: Exit code: 2; Stdin: ; Stdout: ; Stderr: ebtables v1.8.3 (nf_tables): Unknown argument: '--among-src'
Try `ebtables -h' or 'ebtables --help' for more information.
Traceback (most recent call last):
  File "/usr/lib/python3/dist-packages/neutron/plugins/ml2/drivers/agent/_common_agent.py", line 465, in daemon_loop
    sync = self.process_network_devices(device_info)
  File "/usr/lib/python3/dist-packages/osprofiler/profiler.py", line 160, in wrapper
    result = f(*args, **kwargs)
  File "/usr/lib/python3/dist-packages/neutron/plugins/ml2/drivers/agent/_common_agent.py", line 214, in process_network_devices
    resync_a = self.treat_devices_added_updated(devices_added_updated)
  File "/usr/lib/python3/dist-packages/osprofiler/profiler.py", line 160, in wrapper
    result = f(*args, **kwargs)
  File "/usr/lib/python3/dist-packages/neutron/plugins/ml2/drivers/agent/_common_agent.py", line 231, in treat_devices_added_updated
    self._process_device_if_exists(device_details)
  File "/usr/lib/python3/dist-packages/neutron/plugins/ml2/drivers/agent/_common_agent.py", line 246, in _process_device_if_exists
    device_details)
  File "/usr/lib/python3/dist-packages/neutron/plugins/ml2/drivers/linuxbridge/agent/linuxbridge_neutron_agent.py", line 865, in setup_arp_spoofing_protection
    arp_protect.setup_arp_spoofing_protection(device, device_details)
  File "/usr/lib/python3/dist-packages/neutron/plugins/ml2/drivers/linuxbridge/agent/arp_protect.py", line 42, in setup_arp_spoofing_protection
    _setup_arp_spoofing_protection(vif, port_details)
  File "/usr/lib/python3/dist-packages/oslo_concurrency/lockutils.py", line 328, in inner
    return f(*args, **kwargs)
  File "/usr/lib/python3/dist-packages/neutron/plugins/ml2/drivers/linuxbridge/agent/arp_protect.py", line 48, in _setup_arp_spoofing_protection
    _install_mac_spoofing_protection(vif, port_details, current_rules)
  File "/usr/lib/python3/dist-packages/neutron/plugins/ml2/drivers/linuxbridge/agent/arp_protect.py", line 184, in _install_mac_spoofing_protection
    ebtables(new_rule)
  File "/usr/lib/python3/dist-packages/tenacity/__init__.py", line 292, in wrapped_f
    return self.call(f, *args, **kw)
  File "/usr/lib/python3/dist-packages/tenacity/__init__.py", line 358, in call
    do = self.iter(retry_state=retry_state)
  File "/usr/lib/python3/dist-packages/tenacity/__init__.py", line 319, in iter
    return fut.result()
  File "/usr/lib/python3.7/concurrent/futures/_base.py", line 428, in result
    return self.__get_result()
  File "/usr/lib/python3.7/concurrent/futures/_base.py", line 384, in __get_result
    raise self._exception
  File "/usr/lib/python3/dist-packages/tenacity/__init__.py", line 361, in call
    result = fn(*args, **kwargs)
  File "/usr/lib/python3/dist-packages/neutron/plugins/ml2/drivers/linuxbridge/agent/arp_protect.py", line 232, in ebtables
    run_as_root=True)
  File "/usr/lib/python3/dist-packages/neutron/agent/linux/ip_lib.py", line 713, in execute
    run_as_root=run_as_root)
  File "/usr/lib/python3/dist-packages/neutron/agent/linux/utils.py", line 147, in execute
    returncode=returncode)
neutron_lib.exceptions.ProcessExecutionError: Exit code: 2; Stdin: ; Stdout: ; Stderr: ebtables v1.8.3 (nf_tables): Unknown argument: '--among-src'
Try `ebtables -h' or 'ebtables --help' for more information.
It seems ebtables comes in both the ebtables and iptables packages, and at
different versions:
$ ebtabls --version

Command 'ebtabls' not found, did you mean:

  command 'ebtables' from deb ebtables (2.0.10.4+snapshot20181205-1ubuntu1)
  command 'ebtables' from deb iptables (1.8.3-2ubuntu5)

Try: sudo apt install <deb name>
It seems ebtables is managed by alternatives:
$ ll /usr/sbin/ebtables
16:12 lrwxrwxrwx 1 root root 26 Oct 17 13:09 /usr/sbin/ebtables -> /etc/alternatives/ebtables*
Lets change that:
$ /usr/sbin/ebtables --version
ebtables 1.8.3 (nf_tables)
$ sudo update-alternatives --config ebtables
There are 2 choices for the alternative ebtables (providing /usr/sbin/ebtables).

  Selection    Path                       Priority   Status
------------------------------------------------------------
* 0            /usr/sbin/ebtables-nft      10        auto mode
  1            /usr/sbin/ebtables-legacy   10        manual mode
  2            /usr/sbin/ebtables-nft      10        manual mode

Press <enter> to keep the current choice[*], or type selection number: 1
update-alternatives: using /usr/sbin/ebtables-legacy to provide /usr/sbin/ebtables (ebtables) in manual mode
$ ebtables --version
ebtables v2.0.10.4 (legacy) (December 2011)
Much better. Version 1.8.3 does not implement among and version 2.0.10.4
does. I highly recommend updating the alternatives for ebtables right now
if you are following this blog post.
After this, restart the Neutron services on the compute node.
Final Configuration
If you have made it this far, then congratulations. You have a cluster which is nearly all set up and nearly ready to begin launching instances.
Before we can launch our first instance, we just need to set up some virtual networks, add a keypair used for SSH, create some security group rules so we aren’t firewalled out, and to create some instance flavours so we can launch virtual machines of differing specifications.
Configuring Virtual Networks
We need to tell OpenStack about our provider network on 203.0.113.0/24, and what ranges of IP addresses we want to assign:
$ . admin-openrc
$ openstack network create --share --provider-physical-network provider \
--provider-network-type flat provider
+---------------------------+---------------------------------------------------------------------------------------------------------------------------------------------------------+
| Field | Value |
+---------------------------+---------------------------------------------------------------------------------------------------------------------------------------------------------+
| admin_state_up | UP |
| availability_zone_hints | |
| availability_zones | |
| created_at | 2020-02-12T04:05:26Z |
| description | |
| dns_domain | None |
| id | 01ae2817-9697-430f-bdd4-6435d45dbbda |
| ipv4_address_scope | None |
| ipv6_address_scope | None |
| is_default | None |
| is_vlan_transparent | None |
| location | cloud='', project.domain_id=, project.domain_name='Default', project.id='a45f9c52c6964c5da7585f5c8a70fdc7', project.name='admin', region_name='', zone= |
| mtu | 1500 |
| name | provider |
| port_security_enabled | True |
| project_id | a45f9c52c6964c5da7585f5c8a70fdc7 |
| provider:network_type | flat |
| provider:physical_network | provider |
| provider:segmentation_id | None |
| qos_policy_id | None |
| revision_number | 1 |
| router:external | Internal |
| segments | None |
| shared | True |
| status | ACTIVE |
| subnets | |
| tags | |
| updated_at | 2020-02-12T04:05:26Z |
+---------------------------+---------------------------------------------------------------------------------------------------------------------------------------------------------+
$ openstack subnet create --network provider --allocation-pool start=203.0.113.101,end=203.0.113.250 --dns-nameserver 8.8.8.8 --gateway 203.0.113.1 --subnet-range 203.0.113.0/24 provider
+-------------------+---------------------------------------------------------------------------------------------------------------------------------------------------------+
| Field | Value |
+-------------------+---------------------------------------------------------------------------------------------------------------------------------------------------------+
| allocation_pools | 203.0.113.101-203.0.113.250 |
| cidr | 203.0.113.0/24 |
| created_at | 2020-02-12T04:05:37Z |
| description | |
| dns_nameservers | 8.8.8.8 |
| enable_dhcp | True |
| gateway_ip | 203.0.113.1 |
| host_routes | |
| id | 6e854541-fc59-4639-947b-a074efc05463 |
| ip_version | 4 |
| ipv6_address_mode | None |
| ipv6_ra_mode | None |
| location | cloud='', project.domain_id=, project.domain_name='Default', project.id='a45f9c52c6964c5da7585f5c8a70fdc7', project.name='admin', region_name='', zone= |
| name | provider |
| network_id | 01ae2817-9697-430f-bdd4-6435d45dbbda |
| prefix_length | None |
| project_id | a45f9c52c6964c5da7585f5c8a70fdc7 |
| revision_number | 0 |
| segment_id | None |
| service_types | |
| subnetpool_id | None |
| tags | |
| updated_at | 2020-02-12T04:05:37Z |
+-------------------+---------------------------------------------------------------------------------------------------------------------------------------------------------+
We can list networks with:
$ openstack network list
+--------------------------------------+----------+--------------------------------------+
| ID                                   | Name     | Subnets                              |
+--------------------------------------+----------+--------------------------------------+
| 01ae2817-9697-430f-bdd4-6435d45dbbda | provider | 6e854541-fc59-4639-947b-a074efc05463 |
+--------------------------------------+----------+--------------------------------------+
Creating Some Flavours
We need to tell OpenStack what sort of specifications we wish to assign to instances, which are called flavours.
We will add a few of them:
$ openstack flavor create --id 0 --vcpus 1 --ram 64 --disk 1 m1.nano\
+----------------------------+---------+
| Field                      | Value   |
+----------------------------+---------+
| OS-FLV-DISABLED:disabled   | False   |
| OS-FLV-EXT-DATA:ephemeral  | 0       |
| disk                       | 1       |
| id                         | 0       |
| name                       | m1.nano |
| os-flavor-access:is_public | True    |
| properties                 |         |
| ram                        | 64      |
| rxtx_factor                | 1.0     |
| swap                       |         |
| vcpus                      | 1       |
+----------------------------+---------+

$ openstack flavor create --id 1 --vcpus 1 --ram 128 --disk 2 m1.small
$ openstack flavor create --id 2 --vcpus 1 --ram 256 --disk 3 m1.large
$ openstack flavor create --id 3 --vcpus 2 --ram 512 --disk 5 m1.xlarge
We can list all flavors with:
$ openstack flavor list
+----+-----------+-----+------+-----------+-------+-----------+
| ID | Name      | RAM | Disk | Ephemeral | VCPUs | Is Public |
+----+-----------+-----+------+-----------+-------+-----------+
| 0  | m1.nano   |  64 |    1 |         0 |     1 | True      |
| 1  | m1.small  | 128 |    2 |         0 |     1 | True      |
| 2  | m1.large  | 256 |    3 |         0 |     1 | True      |
| 3  | m1.xlarge | 512 |    5 |         0 |     2 | True      |
+----+-----------+-----+------+-----------+-------+-----------+
Adding a SSH Keypair
We need to seed the instance with a SSH keypair that we can use to connect with.
Let’s make a new SSH keypair for the demo user and add it to the keypair store.
$ . demo-openrc
$ ssh-keygen -q -N ""
$ openstack keypair create --public-key ~/.ssh/id_rsa.pub mykey
+-------------+-------------------------------------------------+
| Field       | Value                                           |
+-------------+-------------------------------------------------+
| fingerprint | 72:d1:ee:80:59:f1:9a:03:96:d6:3f:31:32:53:20:9e |
| name        | mykey                                           |
| user_id     | bf0cfff44d3c49cb92d10e5977a9decc                |
+-------------+-------------------------------------------------+
We can check our list of keys with:
$ openstack keypair list
+-------+-------------------------------------------------+
| Name  | Fingerprint                                     |
+-------+-------------------------------------------------+
| mykey | 72:d1:ee:80:59:f1:9a:03:96:d6:3f:31:32:53:20:9e |
+-------+-------------------------------------------------+
Creating a Basic Security Group
We need to create a basic security group for our instances so we can connect to them. For now, we will allow SSH and ICMP through the firewall.
$ openstack security group rule create --proto icmp default
$ openstack security group rule create --proto icmp default
+-------------------+--------------------------------------------------------------------------------------------------------------------------------------------------------+
| Field             | Value                                                                                                                                                  |
+-------------------+--------------------------------------------------------------------------------------------------------------------------------------------------------+
| created_at        | 2020-02-06T03:52:15Z                                                                                                                                   |
| description       |                                                                                                                                                        |
| direction         | ingress                                                                                                                                                |
| ether_type        | IPv4                                                                                                                                                   |
| id                | 4ec97531-46d7-4c26-bb38-6d122f077168                                                                                                                   |
| location          | cloud='', project.domain_id=, project.domain_name='Default', project.id='33569bb56110474db2d584b4a1936c6b', project.name='demo', region_name='', zone= |
| name              | None                                                                                                                                                   |
| port_range_max    | None                                                                                                                                                   |
| port_range_min    | None                                                                                                                                                   |
| project_id        | 33569bb56110474db2d584b4a1936c6b                                                                                                                       |
| protocol          | icmp                                                                                                                                                   |
| remote_group_id   | None                                                                                                                                                   |
| remote_ip_prefix  | 0.0.0.0/0                                                                                                                                              |
| revision_number   | 0                                                                                                                                                      |
| security_group_id | ecea2521-11a6-4e2d-b979-6d5c59bd1580                                                                                                                   |
| tags              | []                                                                                                                                                     |
| updated_at        | 2020-02-06T03:52:15Z                                                                                                                                   |
+-------------------+--------------------------------------------------------------------------------------------------------------------------------------------------------+
$ openstack security group rule create --proto tcp --dst-port 22 default
+-------------------+--------------------------------------------------------------------------------------------------------------------------------------------------------+
| Field             | Value                                                                                                                                                  |
+-------------------+--------------------------------------------------------------------------------------------------------------------------------------------------------+
| created_at        | 2020-02-06T03:52:46Z                                                                                                                                   |
| description       |                                                                                                                                                        |
| direction         | ingress                                                                                                                                                |
| ether_type        | IPv4                                                                                                                                                   |
| id                | 54332a65-d89e-49ac-9756-fd72ad2c18ee                                                                                                                   |
| location          | cloud='', project.domain_id=, project.domain_name='Default', project.id='33569bb56110474db2d584b4a1936c6b', project.name='demo', region_name='', zone= |
| name              | None                                                                                                                                                   |
| port_range_max    | 22                                                                                                                                                     |
| port_range_min    | 22                                                                                                                                                     |
| project_id        | 33569bb56110474db2d584b4a1936c6b                                                                                                                       |
| protocol          | tcp                                                                                                                                                    |
| remote_group_id   | None                                                                                                                                                   |
| remote_ip_prefix  | 0.0.0.0/0                                                                                                                                              |
| revision_number   | 0                                                                                                                                                      |
| security_group_id | ecea2521-11a6-4e2d-b979-6d5c59bd1580                                                                                                                   |
| tags              | []                                                                                                                                                     |
| updated_at        | 2020-02-06T03:52:46Z                                                                                                                                   |
+-------------------+--------------------------------------------------------------------------------------------------------------------------------------------------------+
We can list security groups with:
$ openstack security group list
+--------------------------------------+---------+------------------------+----------------------------------+------+
| ID                                   | Name    | Description            | Project                          | Tags |
+--------------------------------------+---------+------------------------+----------------------------------+------+
| ecea2521-11a6-4e2d-b979-6d5c59bd1580 | default | Default security group | 33569bb56110474db2d584b4a1936c6b | []   |
+--------------------------------------+---------+------------------------+----------------------------------+------+
Launching an Instance
Everything should be set now. Go ahead and launch your first instance with the cirros image we previous uploaded into Glance.
$ openstack server create --flavor m1.nano --image cirros --nic net-id=01ae2817-9697-430f-bdd4-6435d45dbbda \
 --security-group default --key-name mykey myfirstinstance
+-----------------------------+-----------------------------------------------+
| Field                       | Value                                         |
+-----------------------------+-----------------------------------------------+
| OS-DCF:diskConfig           | MANUAL                                        |
| OS-EXT-AZ:availability_zone |                                               |
| OS-EXT-STS:power_state      | NOSTATE                                       |
| OS-EXT-STS:task_state       | scheduling                                    |
| OS-EXT-STS:vm_state         | building                                      |
| OS-SRV-USG:launched_at      | None                                          |
| OS-SRV-USG:terminated_at    | None                                          |
| accessIPv4                  |                                               |
| accessIPv6                  |                                               |
| addresses                   |                                               |
| adminPass                   | Q9XtMEM56LnW                                  |
| config_drive                |                                               |
| created                     | 2020-02-12T04:06:59Z                          |
| flavor                      | m1.nano (0)                                   |
| hostId                      |                                               |
| id                          | 8b16810d-1c9c-4094-b794-f2929388623c          |
| image                       | cirros (5ad293f2-1d07-44ae-8a23-19d619885a3b) |
| key_name                    | mykey                                         |
| name                        | myfirstinstance                               |
| progress                    | 0                                             |
| project_id                  | 33569bb56110474db2d584b4a1936c6b              |
| properties                  |                                               |
| security_groups             | name='ecea2521-11a6-4e2d-b979-6d5c59bd1580'   |
| status                      | BUILD                                         |
| updated                     | 2020-02-12T04:06:59Z                          |
| user_id                     | bf0cfff44d3c49cb92d10e5977a9decc              |
| volumes_attached            |                                               |
+-----------------------------+-----------------------------------------------+
That has begun the process to provision a new virtual machine on the compute node with the m1.nano flavor.
We can check the status of our instance with:
$ openstack server list
+--------------------------------------+-----------------+--------+------------------------+--------+---------+
| ID                                   | Name            | Status | Networks               | Image  | Flavor  |
+--------------------------------------+-----------------+--------+------------------------+--------+---------+
| 8b16810d-1c9c-4094-b794-f2929388623c | myfirstinstance | ACTIVE | provider=203.0.113.103 | cirros | m1.nano |
+--------------------------------------+-----------------+--------+------------------------+--------+---------+
We can also check the status from Horizon:
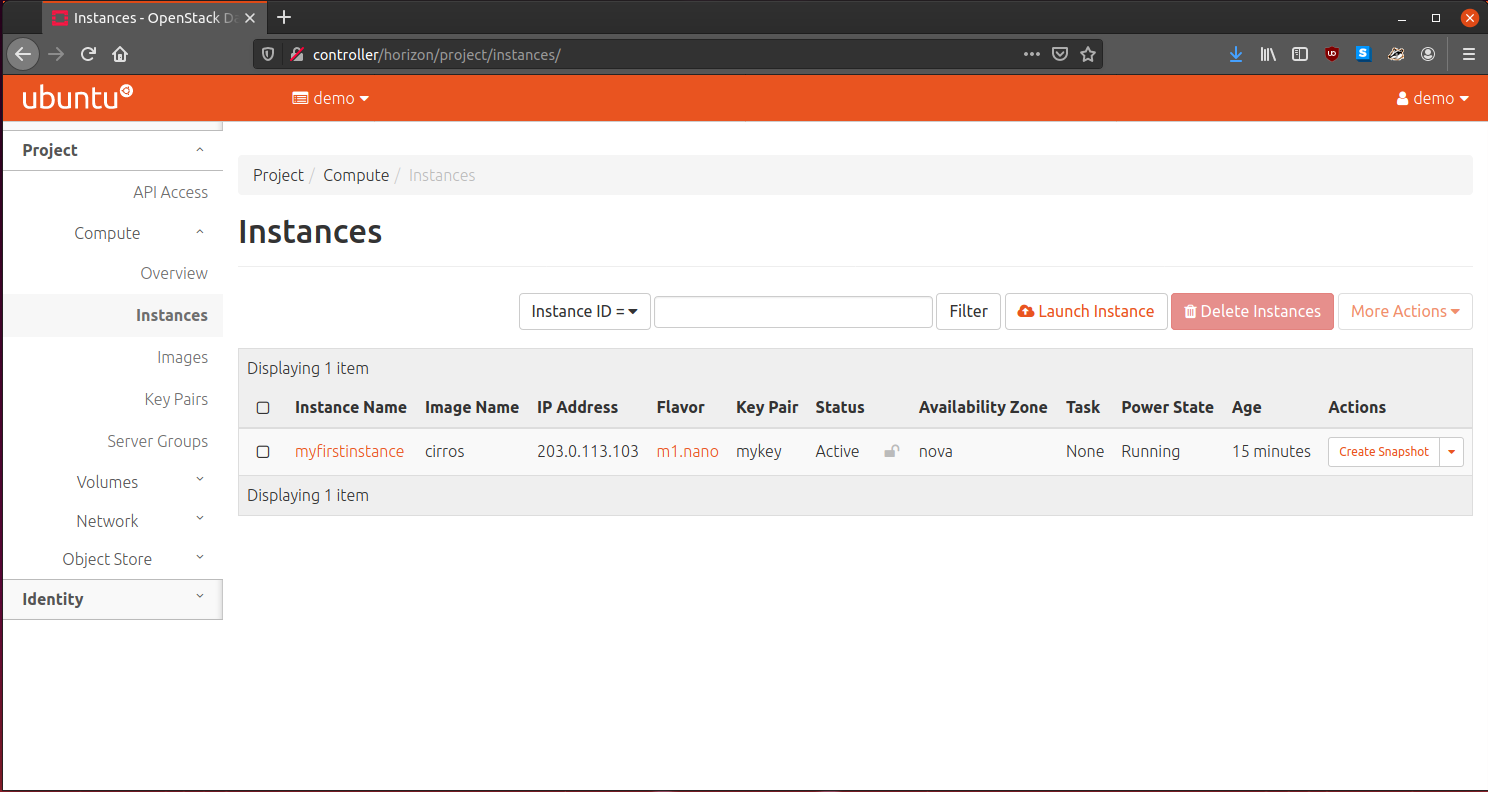
From there, we can go ahead and SSH into it, with the “cirros” user:
$ ssh [email protected]
The authenticity of host '203.0.113.103 (203.0.113.103)' can't be established.
ECDSA key fingerprint is SHA256:cs620jJtz28Xum30RluDJ4cLjQ7WzB89xhAxoWcODSk.
Are you sure you want to continue connecting (yes/no/[fingerprint])? yes
Warning: Permanently added '203.0.113.103' (ECDSA) to the list of known hosts.
$ uname -rv
4.4.0-28-generic #47-Ubuntu SMP Fri Jun 24 10:09:13 UTC 2016
$ hostname
myfirstinstance
$ free -m
             total         used         free       shared      buffers
Mem:            46           34           11            0            3
-/+ buffers:                 31           15
Swap:            0            0            0
You know, if you made it this far, and have a working OpenStack cluster, you deserve a medal! Really, excellent work.
$ figlet Well Done!
__ __ _ _ ____ _
\ \ / /__| | | | _ \ ___ _ __ ___| |
\ \ /\ / / _ \ | | | | | |/ _ \| '_ \ / _ \ |
\ V V / __/ | | | |_| | (_) | | | | __/_|
\_/\_/ \___|_|_| |____/ \___/|_| |_|\___(_)
Useful Things We Can Do From Horizon
Horizon aims to implement most tasks users want to do on a regular basis, which is primarily to create and manage their virtual machines they wish to provision. Horizon can do some neat things to help users with that like:
Horizon can display everything you want to know about your instance:
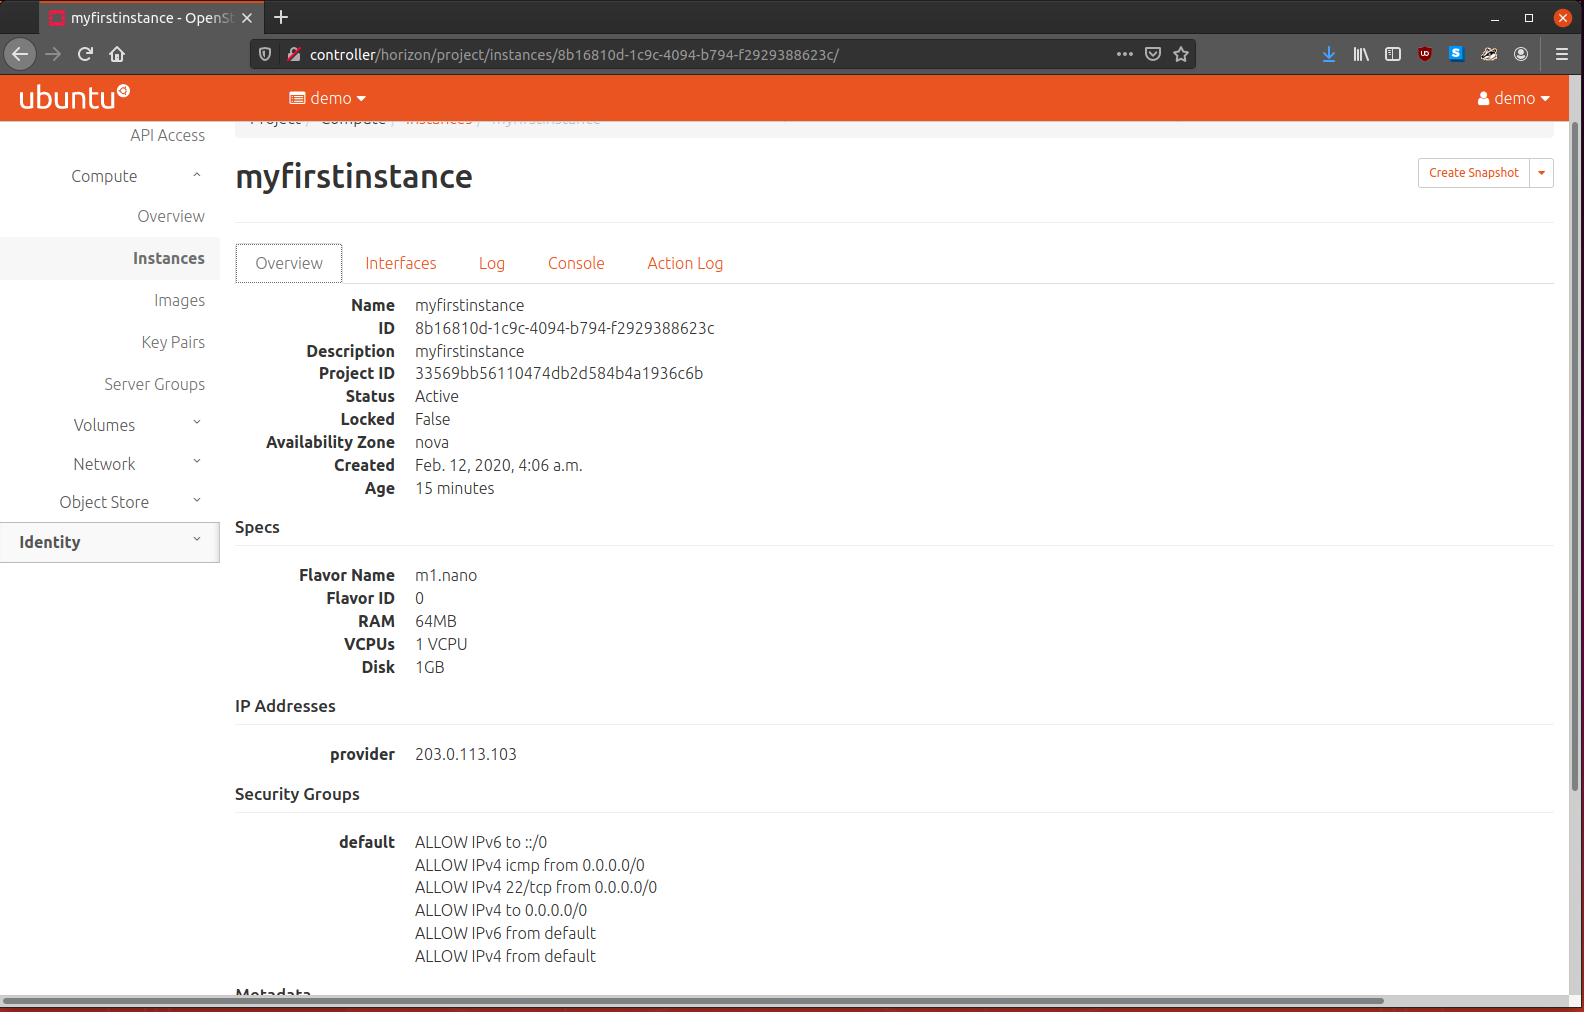
Horizon can show you network interfaces on your instance:
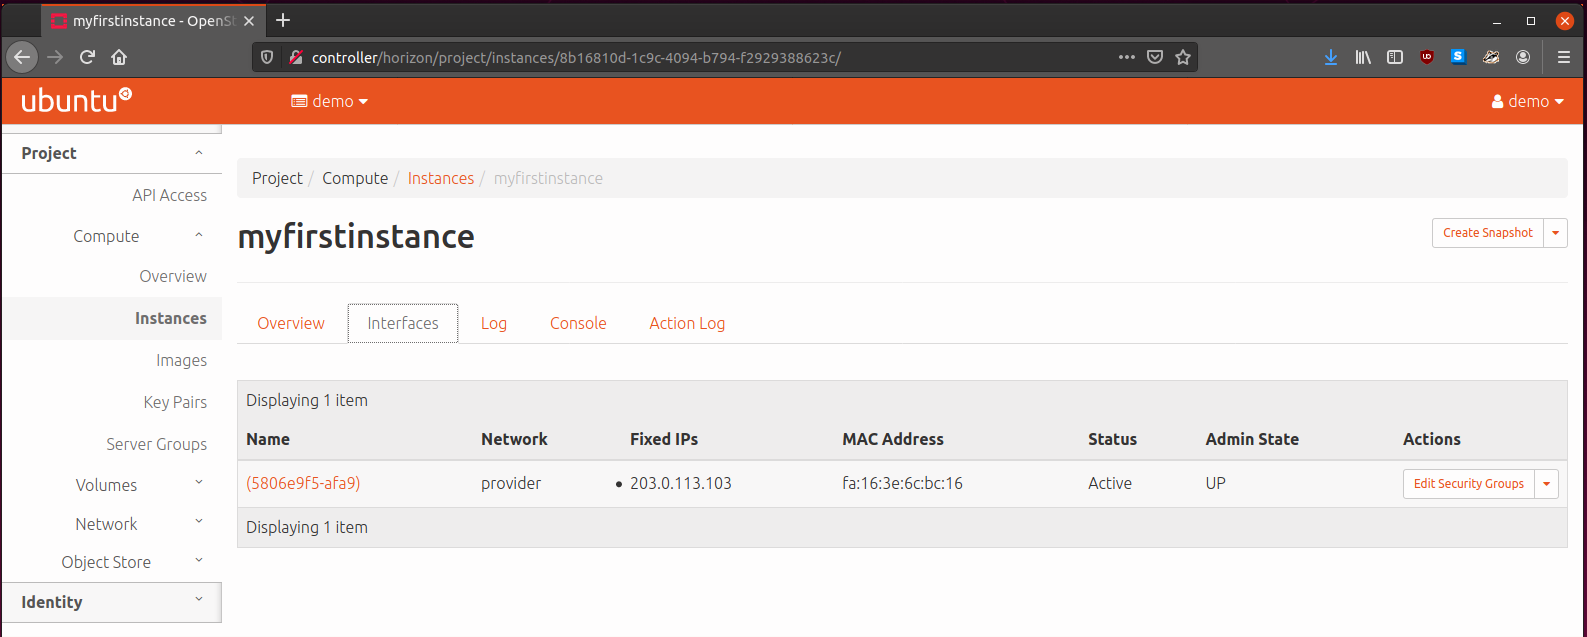
Horizon can give you a listing of the instances syslog:
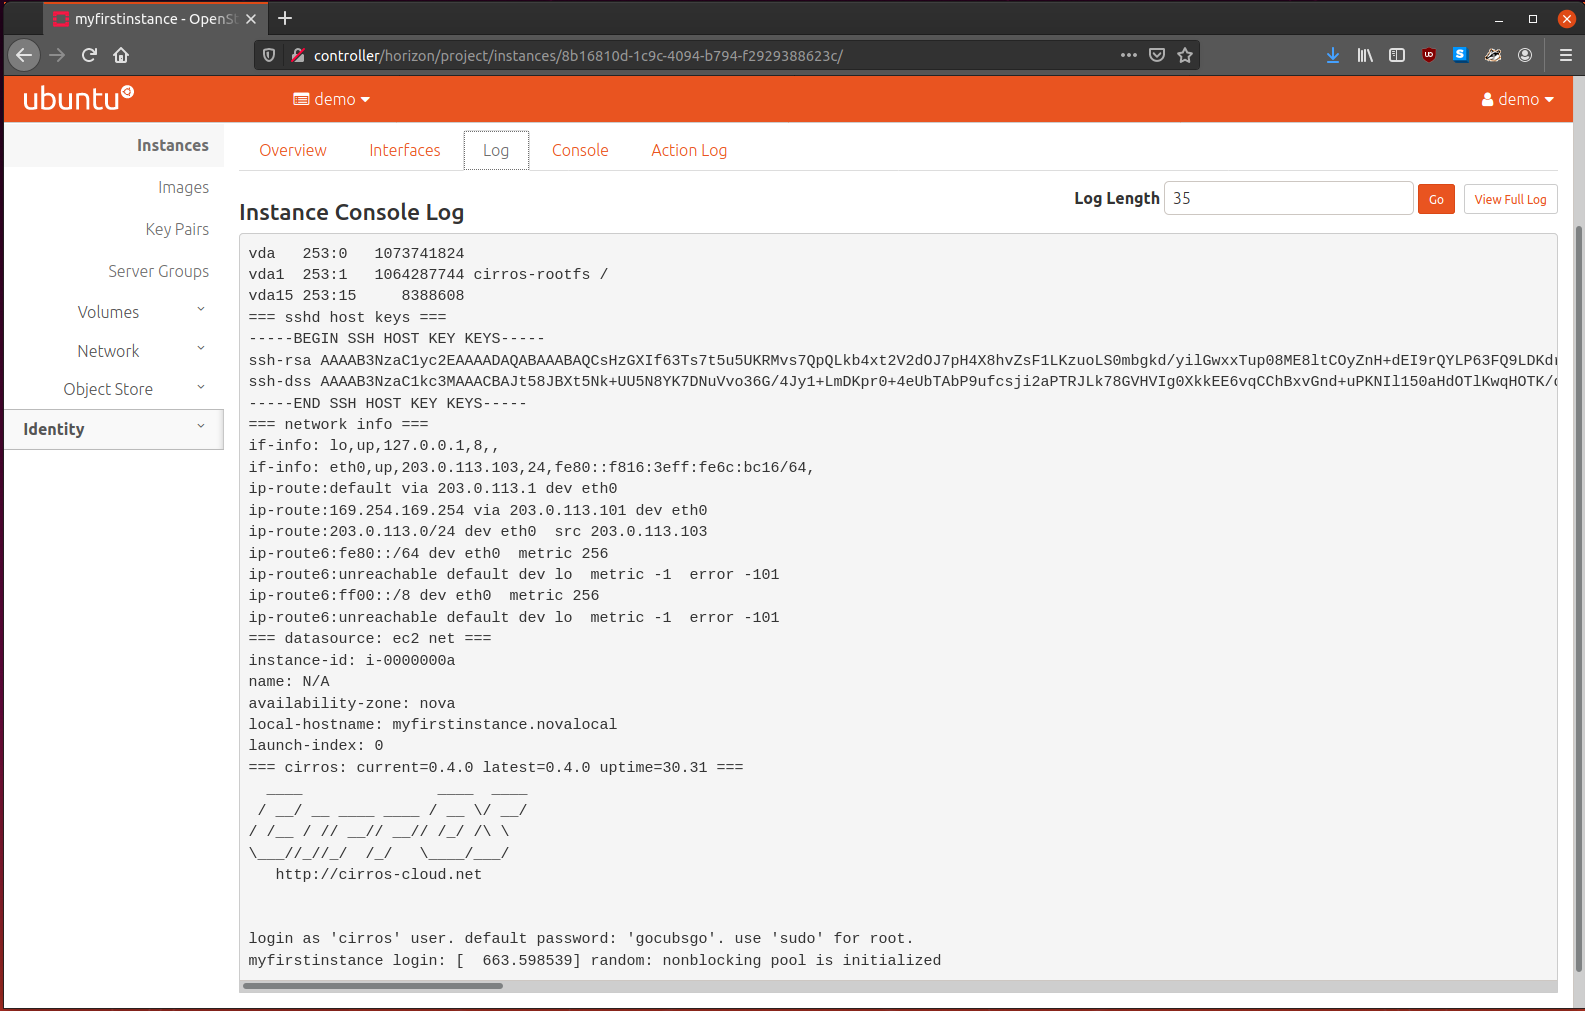
Horizon can even give you a web based VNC-like remote terminal to your instance:

Of course, Horizon can also help you launch instances:
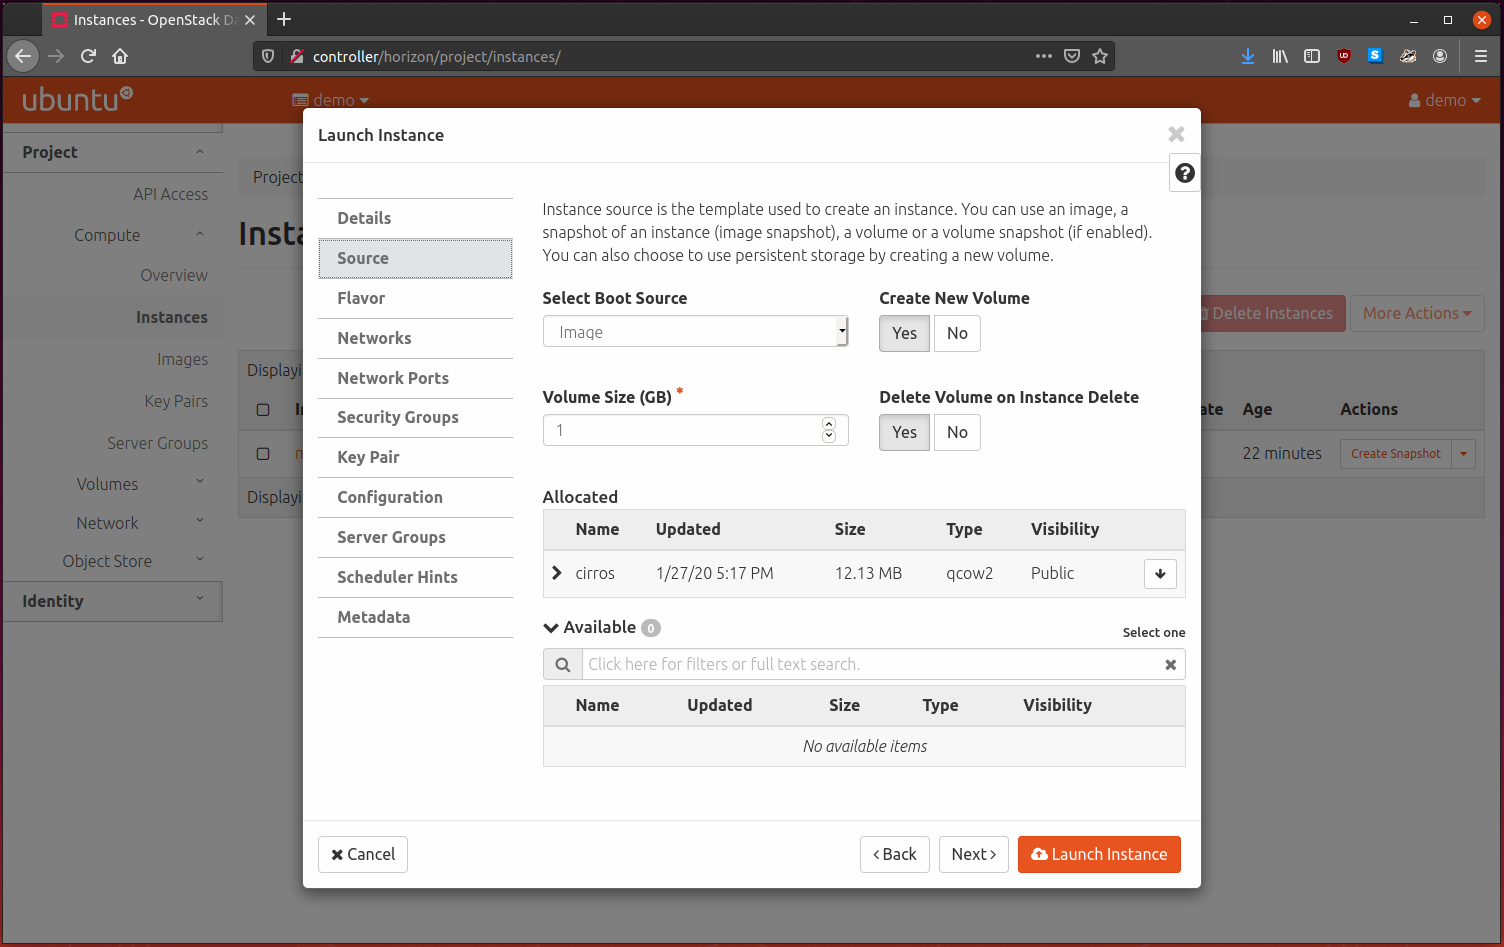
Conclusion
Well, I have to say, this blog post has been an absolute journey. OpenStack is by far the most complicated software package that I have installed and configured, in both the time needed and sheer amount of moving parts aspects.
I started this post with only a vague idea of what OpenStack is and what it does, but now, after installing each of the primary services, configuring them, and seeing how they come together, I now understand the purpose of each service and sub-service, as well as a good idea of how they are implemented and the design decisions made.
We haven’t touched too much on usage and debugging OpenStack too much, since this blog post is much too long already, but that will be coming in the future.
I hope you enjoyed the read, and if you have been following along, I hope you have a working cluster.
As always, if you have any questions, feel free to contact me.
Matthew Ruffell